How to remove an object from a photo. How to remove objects, people (extra objects) from a photo on iPhone
How often, after taking a photo, do we notice that extra elements got into the frame, for example: wires, strangers or extra objects? But the picture itself would be perfect if these objects in the background did not interfere. Photoshop masters can easily edit a photo and remove all interfering details, but what about ordinary people who do not know how to work in professional graphic editors? The way out, as usual, is simple - use third-party software, which is "sharpened" for specific purposes. In our case, this is the Snapheal program, designed to help mere mortals easily remove all unnecessary elements from a photo. Working with the program is quite simple. When launching Snapheal, we are greeted with a hint on how to work with it, and an import window for uploading a photo. Add your photo and start editing. To do this, we have three blocks available:
- removing redundant elements
- retouching a separate part of the photo
- Full photo editing
Unfortunately, each of the blocks works independently of each other, so you cannot simultaneously cut out objects and, for example, change the contrast, you must save the intermediate result. Nevertheless, Snapheal is not a graphical editor, and its main purpose is to remove unnecessary elements. All other functions are rather for small adjustments after the main task is completed.
 Let's not get hung up on secondary functions and immediately move on to the main one - “smart” object deletion. We have special tools for selecting the area that we need to remove. You can use the “lasso” and select the desired area with maximum accuracy, or you can take the “brush” and cover the desired area over the photo. Then you have one of three processing options to choose from:
- Twister - to remove objects against the sky;
- Shapeshift - to remove large objects;
- Wormhole - on the contrary, for removing small objects.
After that, it is desirable to set one of three replacement parameters: low, medium, or very precise. That's all, it remains only to press the "Erase!" and wait a bit while Snapheal removes the elements we don't need. Naturally, the higher the processing accuracy you set, the longer the process will take (if you do not take into account the size of the photo itself).
 Not every time the result of the program will be satisfactory, because it still depends on the very concept of the photo. It is clear that the more uniform the background, the better the effect will be. However, if the result is not satisfactory, try different substitution options. As a rule, one of them will give quite a positive effect.
 Now about the more pressing - about the price. She "bites" - 479 rubles. Too much for a narrow program. On the other hand, the Photoshop package for these purposes is not the best investment, especially if you do not use it professionally.
Good day to all, my dear friends. I'm with you again, Dmitry Kostin. I remembered a lot of moments here when you are photographed, and some extra person or some object that is out of place in the photo gets into the frame. Familiar? You only notice it when you can't take a photo. Leave as is? Yes, for nothing!
Extra objects can be thrown out of the photo, and no one will notice the difference. Do you want to know how to remove an unwanted object from any photo in Photoshop? Then read on.
Content-aware padding
As you can see the cat has evaporated, but you don't have a cut out area as it usually happens. The void was filled with adjacent pixels, which, according to the program itself, most likely could be in this place.

I had a small "bump". when I removed the cat, a piece from the handle appeared in the area where the tail should be (probably a clothes dryer). But it is removed in exactly the same way. And now you have a clean blanket without a pet.
Similarly, I decided to remove the textbook from the desk. Agree that it is very simple? But that's not all.
Stamp Tool
Sometimes the first method may not be quite suitable for the purposes we need. But that's not a problem. Photoshop almost always has several solutions for a specific task. And this case is no exception.

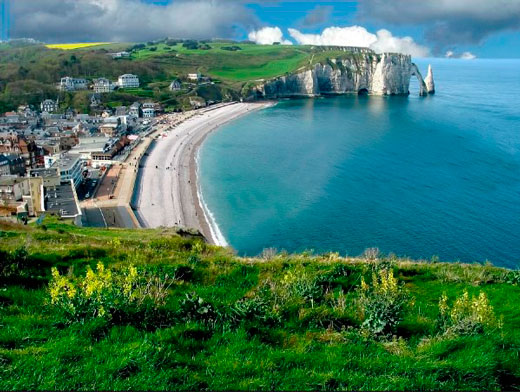
Let's take a picture of a beautiful view of the coast. A beautiful view, but as you can see, a daring bird flew past and got into the frame. It hit beautifully, but let's say it's not needed there.
Then we roll up our sleeves, take a lasso and do all the operations from the first paragraph. Let's see what we got. Somehow not so much, right?

The stamp tool will help us with this. This tool is similar to "Healing brush", which we used, but there are differences. With the repair brush, we took the donor area and painted over an unnecessary detail with it in such a way that the colors that correspond to this area were then superimposed. Nothing like this happens with a stamp.

If it is somehow difficult for you to understand this process in the text version, then I made a separate video tutorial especially for you. Happy viewing.
It turned out quite a good picture, as if it were so. You can combine several methods to achieve the desired result.
Do you have photos where you can remove something superfluous? If so, then it's time to get rid of it. Well, if you want to explore all the possibilities of Photoshop in a short time, then I recommend that you look great video course. In it, all the information is presented amazingly and is designed for any level of user.
Well, that's all I have. I hope you enjoyed my lesson today. Do not forget to subscribe to blog article updates, then you will be the first to know about the release of interesting articles and other interesting information. See also other blog articles. I am sure you will find something interesting for yourself. Well, I say goodbye to you. Bye Bye!
Sincerely, Dmitry Kostin
Instruction
Select the Clone Stamp Tool from the Tools panel. The Tools panel is located on the left side of the program window by default. You can just use the "hot key" S.
Adjust tool options Clone Stamp Tool (Stamp). To do this, left-click on the triangle near the palette Brush (Brush), which by default is located in the upper left part of the window, under the main menu.
The tool Clone Stamp Tool (Stamp), like any brush, has two parameters: Master Diameter (Diameter) and Hardness (Hardness), which are regulated by sliders. You can also enter parameter values in the boxes above the sliders in order to adjust these parameters. The first parameter determines the size of the brush with which we will remove unnecessary objects from the photo. The second parameter determines the hardness of the edges of the brush.
In order to remove unnecessary objects from our photo, first select a semi-soft large brush.
Enlarge image for ease of use. You can do this by dragging the slider in the Navigator palette to the left, or by typing a numeric value into the box to the left of the palette slider. Palette Navigator (Navigator) by default is located in the upper right corner of the Photoshop window.
Determine the area of the photo that we will clone in order to remove unnecessary objects. To do this, move the cursor to the area of the photo, free from wires and with the Alt button pressed, click the left mouse button. The cursor becomes a circle with a crosshair inside.
After releasing the Alt button, move the cursor over the item to be removed. Left click. Some of the wires are gone. We repeat this simple operation, choosing the source for cloning the image as close as possible to the extra object that we are removing.
To move around the enlarged photo, you can move the red rectangle in the palette Navigator (Navigator). It limits the part of the photo that we see in the window of an open image file.
A few minutes of work, and all the extra items from our photo disappeared.
note
It may happen that the clone area was chosen poorly and the object to be removed turned out to be covered with a spot that does not match the color of the rest of the image. It's okay, an unsuccessful action can be undone through the palette History (History), which by default is located in the right middle part of the Photoshop window. The last action in this palette is highlighted in blue. Move the cursor over the previous action above the last one and click the left mouse button.
For example like this. In the first photo there is an unnecessary empty basket. On the second, I removed it.
For a long time we used the wonderful site Webinpaint, in which such objects were removed easily and quickly, in three clicks. On this site, I had a lesson set in 2010, which. During this time, the lesson has spread very far, and many have used it. But now the SITE IS MADE PAID, and I get a lot of questions and requests to find something similar.
Alas, everything in our world is becoming more expensive, and all such sites are now paid. Therefore, to everyone who does not know how to use Photoshop, I will show you how to remove an unwanted object in a photo using Photoshop - online online Pixlr, simply called EDITOR
If you just want to remove an object on a colored background, then you can do this using the BRUSH tool. For example, let's take this picture. And we'll take a month off it. 
Since here the object is on a uniform, blue background, we take the BRUSH tool.

And we select a color for painting over an unnecessary object.
1- open the color selection.
2.- We click with a brush in the place what color we need to paint over the object. THE PROGRAM WILL CHOOSE THE COLOR ITSELF.
3.- Confirm the choice of color.

Now select the size of the brush and paint over the object with it. In the color selection window, the one that we need is lit.

Now just paint over the unnecessary object. That's all.

ATTENTION. This is the easiest way to remove an object, as it only needs ONE color. If the unnecessary object is located on several colors, then you need to SELECT THE COLOR each time. Although this is not difficult, since it is selected automatically. But pretty boring.
But if an object we don’t need is located on grass, sand, a background of a forest, and so on, then simply choosing a color will not do anything here. Then we start using the STAMP tool.
We take the picture from the previous lesson. And we also remove the Christmas tree in the foreground. 
We go to the site in Pixlr.com Editor. and upload the image.

ATTENTION. If you insert a picture from the Internet, then by inserting its address, a download plate will appear. Just wait until the image is loaded, then the plate will be removed by itself.
Select the STAMP tool, its size and shape.

Let's get to work. Take the Stamp tool and, holding down the Ctrl key, select the clone source by simply clicking on it (it should be next to the object to be removed; this is essentially what we will paint this object with):

ATTENTION! Please note that the copy point moves along with the stamp tool, that is, you periodically, if the pattern does not match, you need to set a new copy point using the Ctrl key.
In our example, the top of the Christmas tree is against the background of red Christmas trees. After setting the copy point, I painted over the top red. The yellow grass went further, and I again set the copy point, holding down the Ctrl key, I select the cloning source - GRASS.

And I go to the bottom part, where there is green grass, and also set the copy point, holding down the Ctrl key, select the clone source - GREEN GRASS

And I remove the lowest part of the Christmas tree. That's all.

Believe me, this is done much faster than I describe. Hold down the Ctrl key, click, paint over the desired part, click the Ctrl key again, and paint over again. Everything is pretty fast.
Restoring the lost texture. As you may have noticed, when sketching the Christmas tree, below, my grass was slightly disturbed, so I suggest restoring it also using the Stamp tool. Select a clone source with a good texture and using a large size stamp brush, preferably a square one, paint over the area with the broken texture.

If everything suits us, then we save our photo. Click FILE - SAVE, or click on the cross in the right corner. We write the name of our picture, select the format and click on "Yes"
This is what we got, with the texture already tweaked a bit.

So pretty quickly, you can remove all unnecessary objects from your photos. Do not be afraid to spoil something, you can always undo your actions, or paint over again. Try bolder and you will succeed!
In this tutorial, I will show you how to use the tool Clone Stamp Tool(stamp) remove the person from the photo and restore the background.
Materials for the lesson:
Step 1
Open the photo of Old Couple and above, above the background, create a new layer.


Step 2
Activate Clone Stamp Tool(Stamp) (S).

To successfully use Stamp, you first need to define the source (the point to be cloned). To do this, just hold the key alt and click in a suitable place on the image, then start drawing. You will draw with the pixels you cloned. Now that we have figured out how the tool works, undo the last action (Ctrl + Z) and deactivate the checkbox Aligned(Alignment) in the top options bar.

Now, one by one, we take samples of the sources around the woman and use the Stamp to paint over her. Unfortunately, there are no universal recipes for how best to use the Stamp in a particular case. Try to completely paint over the woman. Don't worry about the repeating pattern for now, we'll fix that later.
In the screenshot, the sources for the samples are marked with red circles (Alt+click).

You should get something similar.

And do not forget that each cloning step must be done on a new layer. After the first step we have the background and one new layer.

Note that despite my best efforts, the photo still has a terrible repeating pattern (this is a side effect of using Stamp). In the next step, we will fix this.

Step 3
Create a new layer (Ctrl+Shift+Alt+N) and with the Stamp we try to carefully get rid of the repeating patterns.

Note that at the level of the man's legs, the grass is sharper than farther (at the level of the knees). Let's try to achieve the same result on the left side of the photo. We take a sample of cut grass and carefully paint over, trying to avoid repeating patterns.

The flowers in the background look unrealistic, so we continue to clone them to the very edge of the document. Don't forget: New Layer (Ctrl+Shift+Alt+N) and Stamp.

Step 4
The result still looks unnatural. Create a grass selection on the right side, press Ctrl+Shift+C to copy it, then create a new layer (Ctrl+Shift+Alt+N) and paste the copied area (Ctrl+Shift+V). Move the copied grass to the left side of the image.

Add a mask to the same layer Layer - Layer Mask - Reveal All(Layer - Layer Mask - Show All) and with a soft round black brush (B) remove the hard edges on the copied grass. Thanks to this, we will carefully merge the new piece of grass with the background. Repeat this process a few times to cover other areas of the photo that aren't good enough.


