How and with what to treat cuts on the skin: features, algorithm of actions and recommendations. How to properly treat wounds Garden var with propolis
Even if the roof structure is equipped with an ideal under-roof ventilation system, the roof is always an element of the house exposed to moisture. Outside - this is atmospheric precipitation, and from the inside - air vapor rising from the warm rooms of the room and condensing in the upper part of the house, in particular on the supporting structures of the roof - wooden rafters. First of all, open wooden structures are subjected to constant exposure to moisture - the lower crowns of logs and timber, frame elements. This is especially true for areas with a humid climate.

A humid environment encourages the growth of microorganisms and insects. Therefore, mold, fungi can form on wooden surfaces, contributing to the decay of wood. In addition to these microorganisms, the roof rafters can be chosen as a favorable habitat for carpenter insects. Therefore, first of all, wooden roof structures need bioprotection - treatment with a chemical agent that is safe for people and animals, but prevents the reproduction of insects and microorganisms.
And of course, the second enemy that lies in wait for the roof rafters is fire. Wood is a combustible material. And this should not be forgotten, especially in areas with arid hot climates. Therefore, in order to be completely sure of the fire safety of the rafters, it is also recommended to treat them with flame retardants - fire protection agents.
What tool to choose for processing rafters?
The modern market offers many effective means for bio- and fire protection of wooden structures. However, if you use them separately, then the wood processing has to be carried out in several stages. First, an antiseptic is applied in several layers, and only then - flame retardants. As a result, the process becomes quite lengthy and laborious. Therefore, the most modern scientific development in the field of protecting wooden surfaces are universal products that contain both surfactants that prevent the growth of microorganisms and insects, and salt solutions that, when in contact with fire, form a resistant fire-retardant film. As a result, wood changes its properties and becomes a difficult-to-ignite material.
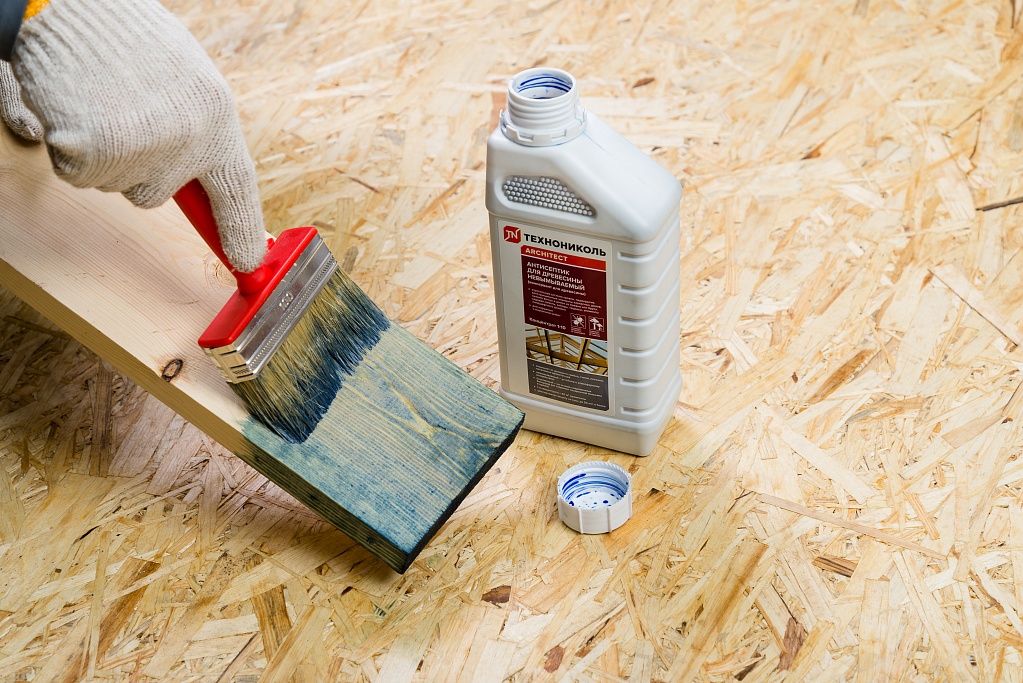
One of the most up-to-date universal means is TECHNONICOL Fire Bioprotection of Wood (10 and 20 l). As a part of impregnation - a complex of highly effective biocides and flame retardants. The product is safe for people and animals, does not contain arsenic and chromium compounds.
It is ideal for protecting wooden structures used both indoors and outdoors. However, the outer elements should not come into contact with the ground and be exposed to atmospheric precipitation.
Advantages of TECHNONICOL wood fire and bioprotection
- The product is applied once at the rate of at least 500 g/m². It is at this consumption of impregnation that wood becomes a difficult-to-ignite material, acquires the properties of substances that belong to the I group of fire protection.
- Impregnation provides fire protection for more than 7 years, and bioprotection - for 20 years, which eliminates the process of decay under the fire-retardant film.
- The structure and properties of wood do not change during processing, impregnation is not subject to aging, leaching and salting out.
- The agent can be applied both for the first time and on previously treated surfaces. After that, wooden surfaces can be glued, coated with any paint and varnish materials.
Application rules
- Wooden surfaces must be cleaned of chips, sawdust, dust and old paint. If the wood has already been infested with mold that has caused the discoloration, a wood bleach must be used before impregnation.
- If the agent is used on the finished roof structure, then a roller, brush, sprayer is used. At the same time, it is applied abundantly and evenly.
- If the rafters have not yet been installed, it is better to immerse them in the solution for 30-60 minutes. This method is convenient for processing a large number of wood parts at the same time.
- Processing should be carried out at a temperature not lower than +5°C. At the same time it is necessary to exclude hit on the processed surfaces of water and an atmospheric precipitation.
- When using impregnation, glass surfaces must be protected. The use of personal protective equipment is mandatory: goggles, mask, gloves. If the solution comes into contact with the skin or eyes, rinse these areas with plenty of water.

Make sure that your roof rafters serve you for many years. Applying a universal fire and biological protection agent to wooden structures will help you significantly save on roof repairs during its long-term operation.
There are more than 15 hydrangeas in my garden, and most of them are paniculate. The fashion for new luxurious and, moreover, completely winter-hardy varieties has not bypassed me. They are so beautiful and so different! Differences in their "character" are also important to consider when pruning.
Size matters
All varieties of panicled hydrangeas with large dense inflorescences ('Grandiflora', 'Vanille Fraise', 'Phantom', 'Limelight', etc.), I must cut in the fall. Their “caps” sometimes break off under their own weight, and if you add more snow, it’s not far from the injury of the whole plant. I form the bushes immediately “cleanly” - most likely there will be no time for this in the spring, and neither I nor my friends gardeners have ever noticed problems with wintering even with very heavily cut hydrangeas.
I examine each branch and move along it from top to bottom, from inflorescences. If the “cap” is large, and the shoot under it is thick and strong, it can be cut as you like, but, of course, taking into account the general plan for the formation of the bush. You will leave only a small stump with 1-3 pairs of buds - the shoots grown from them will be powerful, and the inflorescences at their ends will reach their maximum size. If you cut only the crown, flowering will be worse, but there is a chance to form an excellent skeletal branch from this shoot and increase the size of the bush. An intermediate option is pruning for 4-6 buds: the hydrangea will bloom confidently and increase in growth.
All small twigs ending in tiny buds or not blooming at all, I usually cut to the base. Of course, if the whole bush is not too small and does not yet consist only of them. Moreover, if I see that nothing has grown on an adult branch, except for such “frail tails”, I cut it out to a fork or even to the base.
After that, I clear the center of the bush from extra shoots going inside the crown. And finally, in accordance with the “strength” of each branch and the entire bush as a whole, I finally shorten the young branches left, normalizing the number of buds on them so that the next year the bush produces an average number of strong shoots with large luxurious inflorescences. After all, it is in them that all the beauty of these hydrangeas!
By the way, in the same way I cut the hydrangea tree. But with the difference that the branches in the bush are short-lived and require periodic replacement (when flowering on them begins to wane).
Hydrangea paniculata is the most grateful material for a wide variety of formations. I saw live a clipped hedge, and "bonsai" - clumsy, very short cut trees with trunks as thick as an arm, and an "umbrella" on a high stem, and a "flowering ball lying on the ground" - a stocky stump, all shoots on which are cut annually almost to the base, and next season they grow back. All in your hands!
Tenderness for the whole winter
Quite another thing is the variety of panicled hydrangea with loose graceful inflorescences (‘Tardiva’, ‘Kuyshu’, ‘Great Star’, ‘Levana’, ‘Wim’s Red’ and others). They are not threatened with breakdowns either by rains or blizzards. But - and it's just wonderful! - they look extraordinarily beautiful in winter, covered with snow or hoarfrost. Therefore, with a clear conscience, I postpone the pruning of these hydrangeas until spring. Well, if you don’t plan to come to the dacha in winter, I cut them off like the previous group, but with the difference that the length of the remaining part of the annual shoots (and, accordingly, the number of buds on them) should be larger. Since the inflorescences are still not too large, let there be a lot of them!
And in general, varieties with small and light inflorescences are less demanding on pruning. You can simply cut off the drying panicles and give the bushes freedom, well, except sometimes thin them out.
And the last tip. Try to "feel" each plant, assess its growth strength and response to pruning. Right now, while the hydrangeas are still in drying inflorescences, this is easiest to do. You just need to take a look!
Almost every one of us at least once in a lifetime faced with a medical surgical intervention. If you yourself were not exposed to it, then there were probably people in your environment who underwent surgery.
Wound care in the postoperative period
At first, when the patient is still in the hospital, there is no need to take care of the postoperative suture on your own. This is done by the medical staff. And few people think about what kind of fluids and drugs nurses use. However, after discharge from the hospital, you have to worry about yourself. How much time you have to deal with such a procedure depends on the location of the seam. The more serious the operation, the larger the area occupied by the seam and the longer the postoperative period lasts. Everyone can take care of the wound in the postoperative period. It is only necessary to acquire some knowledge and skills in this area so as not to harm the body. First of all, you need to know what items should be in your arsenal for processing seams.
materials
Necessary medications for the treatment of sutures in the postoperative period:
- sterile bandage;
- antiseptic solution;
- cotton wool, cotton pads and sticks or gauze napkins;
- hydrogen peroxide.
Processing rules
After you have purchased all the necessary medications at the pharmacy, you can begin to process postoperative sutures. Remember that you need to do this 2 times a day, without missing a single procedure. In some cases, it is recommended to treat the wound more often. This will ensure rapid healing and will prevent the development of complications in the postoperative period. Remember to take care of your wound every time you shower. During hygiene procedures, be careful not to damage it.
Before proceeding with the procedure, wash your hands thoroughly with soap, preferably up to the elbow. Hands for processing postoperative sutures should be perfectly clean. In some cases, after discharge, doctors allow you not to bandage the wound. If, nevertheless, the bandage was recommended to be worn for some more time, then before processing the seams, it must be removed very carefully, since the bandage sometimes sticks to the wound. Then, in a thin stream, pour hydrogen peroxide over the seam. You will see the reaction of dead tissues to peroxide - it will begin to foam. After the “hissing” stops, blot the wound with sterile cotton wool or a bandage, wait until it dries.
Now you can start processing the seam with an antiseptic solution. Iodine is not recommended, as it can dry out the wound. Doctors sometimes do not advise treating the wound after surgery with green paint. The problem is that under it you can’t see how the wound heals and whether any undesirable changes occur. It is best to use a solution of fucorcin. Dip a cotton swab into the preparation and gently lubricate the seam itself and the area around it.
In the first days after the operation, it is recommended to apply a bandage with a hypertonic solution to the wound. It is prepared in the following way. Dissolve two tablespoons of common table salt in hot water. Cool the resulting solution slightly, moisten a gauze napkin in it, attach it to the seam and tie it with a bandage
Itching and inflammation in the suture area
It happens that patients in the postoperative period are worried about itching in the suture area. This is a fairly common problem, especially in the second week after surgery, when there is an active healing process. In this case, the seam can be treated with a cotton pad moistened with novocaine solution.
If you notice inflamed areas, they must be treated with alcohol diluted to 40 degrees. The seam is not completely lubricated with alcohol to avoid drying out. If the alcohol treatment does not relieve the inflammation, and the reddened areas reappear, consult a doctor immediately. He may prescribe additional treatment.
Do not remove the crusts that appear on the surface of the wound. This is the formation of new layers of skin and if they are removed, the scar after healing may remain deep, even if you have had a cosmetic stitch.
At the end of the procedure, if necessary, apply a bandage from a sterile bandage. There is no need to tie too tight. Under the bandage should get air. This promotes faster healing.
The seam after the operation must be regularly treated until the wound is completely healed. This should be done even after removing the threads. Carefully monitor the condition of the seam. At the slightest change in the appearance of the wound and a feeling of discomfort, contact your doctor, who will prescribe treatment to prevent suppuration. Perhaps, to treat the suture externally, you will be prescribed drugs for oral administration, which will promote more active healing.

DISINFECTION AND STERILIZATION OF INSTRUMENTS
Salon Marketing experts and Zhanna Zheleboglo prepared detailed material about the proper disinfection and sterilization of manicure instruments in a beauty salon.
- PART 1: stages of disinfection and sterilization beauty salon tools
- PART 2: what equipment to use for sterilization tools in beauty salons and where, having all Certificates (only for Ukraine)
- PART 3: what are and where to buy modern preparations for disinfection of premises and / or work surfaces in beauty salons; preparations for skin disinfection; preparations for disinfection of instruments in beauty salons; preparations for disinfection of rotating instruments.
- PART 4: where to read about how the director of a beauty salon to create and implement security standards client service. Spoiler: in the book of Natalia Goncharenko.
STERILIZATION OF MANICURE INSTRUMENTS
– “Why such difficulties?!”. We very often come across in a conversation with managers and masters of beauty salons with such a bewildered question.
“Everything is much simpler. When the client "sprayed" tool. That's the whole disinfection in beauty salons!
It's sad... Or rather, SCARY!
The essence of all stages of cleaning, disinfection, sterilization and storage of manicure tools come down to only one thing - HEALTH OF THE MASTER AND CLIENT!
It is the master who must understand, initiate and be responsible for compliance with all hygiene and instrument sterilization rules at the workplace*, if the director, for some strange reason, does not pay attention to this issue He doesn't even try to get to the bottom of the issue. Even though he puts himself in danger. It is the master, working with a dirty manicure tool, who is at risk! First of all, viral and infectious diseases are transmitted to the master, and then to the client - “gifts” in the form of Hepatitis B, HIV, Herpes and other no less terrible diseases.
So, how to protect yourself, your families, clients and business. Let's look at all the steps.
80% of infections are transmitted by hand
PART 1: FOUR STAGES
STAGE #1. ANTISEPTIC TREATMENT OF HANDS
Purpose of hygienic hand antisepsis: destruction/suppression of transient (temporary) microflora.
Transient microflora - all types of microorganisms that have fallen into the hands, depending on the diseases.
Process description: do not wash your hands; rub the antiseptic into the palms, fingers, spaces between the fingers, into the skin of the back of the hand, nail beds. If there is a risk of infection with the hepatitis B virus or Mycobacterium tuberculosis, hygienic hand antisepsis is carried out twice in a row.
Simple rules for antiseptic skin treatment:
- Clean, short cut nails, not varnished.
- No rings, bracelets, watches.
- Take the hand antiseptic agent from the dispenser (for non-contact sampling) into the recess of the palm.
- Rubbing alcohol-containing antiseptics only into dry hands (to avoid reducing the effectiveness of the antiseptic + wet hands tolerate the antiseptic worse in dermatological terms).
- Hands should be moistened with an antiseptic throughout the exposure, then it is rubbed into the skin until it dries.
- Use for antiseptics only those preparations that contain a regenerating fatty film of the skin (otherwise, the skin dries out and is injured from alcohol antiseptics).
Hand skin protection:
In cosmetology and pedicure rooms, masters are recommended to use disposable latex gloves. In cases of damaged skin of the master or client - such protection is MANDATORY!
STAGE 2. DISINFECTION IN SALONS
After the end of the procedure, not only the tools used, but also all the tools on the desktop must go through several successive stages of processing.
First you need to prepare a disinfectant solution. For an accurate measurement, use a special measuring cup to determine the required amount of concentrate. Water is poured first, then the concentrate is added.

Order and hygiene on the desktop during the procedure will provide a convenient tray for tools. Hand and rotary tools can be freely placed on it. The tray must be made of a material resistant to disinfectants. It can be made of plastic or metal.
After that, the instruments are immersed in the prepared disinfectant solution, fully opened or disassembled. Keep in mind that the higher the concentration percentage of the solution, the shorter the exposure time.

Rotating instruments must be disinfected separately from manual instruments in a special container with an internal insert with holes (sieve). The finished solution is poured in an amount that ensures complete immersion of the nozzles.
Important!
For disinfection of manicure instruments in beauty salons, it is necessary to use only products intended for this purpose. Keep in mind that these products should include anti-corrosion additives.
STAGE 3. STERILIZATION OF THE MANICURE INSTRUMENT
After disinfection and pre-sterilization cleaning, manicure tools are put into kraft bags and placed in a dry-heat oven or autoclave. In the sterilizer, you can process instruments only completely dry. Sterilization of manicure instruments is carried out under the influence of high temperature. Do not remove instruments without allowing them to cool in the sterilizer itself.
Use the tweezers to remove the instruments from the sterilizer.
When carrying out disinfection and sterilization of the instrument, all its surfaces must be completely covered with a disinfection solution and be in the sterilizer.
Important!
Ball sterilizers are not recommended for use in the sterilization of manicure instruments by the most authoritative organization in the world - the FDA (US Food and Drug Administration). They are DO NOT ensure the cleanliness of manicure instruments due to a large number of factors.
STEP 4. TOOL STORAGE
Store instruments in a UV sterilizer with germicidal lamps.

STAGE SUMMARY DISINFECTION AND STERILIZATION OF INSTRUMENTS IN BEAUTY SALON
| STAGE NAME | WHAT'S HAPPENING | IF YOU SKIP A STAGE |
|---|---|---|
| DISINFECTION | Fungi, microorganisms, viruses, infections are destroyed. | Danger of spreading infections in the environment during instrument cleaning. |
| PRE-STERILIZATION CLEANING | Surface dirt is washed off - skin particles, blood, etc. Cleaning can be chemical - in a disinfectant solution. And mechanical - brush, vibration. | The remaining dirt is not removed after sterilization, but is even more fixed on the instruments. This leads to a decrease in the performance of the tools. |
| STERILIZATION | Under thermal influence, microbial spores are destroyed. | The instrument is not sterile. Microbial spores can germinate after a certain amount of time. |
ATTENTION! Disinfection and pre-sterilization cleaning can be combined. Combination options:
- The same solution for disinfecting manicure instruments in a beauty salon can play the role of a disinfectant and a cleaning agent for pre-sterilization cleaning of the instrument. Cleaning in this case is carried out chemically - the dirt is dissolved in a disinfectant.
- An ultrasonic sterilizer can also combine the first two steps. Vibration and liquid (instruments are placed in the sterilizer in stages) simultaneously play the role of a disinfectant (one of the liquids is based on alcohol), mechanical and chemical cleaning.
Skipping a stage pre-sterilization cleaning or by conducting it before disinfection, you deliberately direct your actions to contaminate the environment. Dirt and infections literally spray and spread in the air and water, settle on the hands, in the sink, on the floor, creating conditions for re-infection.
NEVER attempt to clean instruments without first dipping them in a disinfectant solution.
REMEMBER that not every client of a beauty salon admits to you that he has some kind of disease dangerous for others, all the more, he may not know about it.
Accept the rule for yourself: "All clients are potentially infected"
Focus on the clarity of all stages of cleaning and disinfection in the manicure room. Do not hesitate, customers will definitely appreciate your concern for their safety!
PART 2.
WHAT EQUIPMENT TO USE FOR STERILIZATION OF INSTRUMENTS IN BEAUTY SALONS?
STERILIZATION is an obligatory stage in instrument preparation. Sterilization of a manicure instrument occurs ONLY under the influence of temperature and ONLY when the instrument is completely immersed in special sterilizers.
The main types of sterilizers for manicure instruments:
- - sterilizes any metal instrument, burs, cutters under the influence of high temperature. Sterilization takes place at a temperature of 180 C for 60 minutes. After sterilization, the instruments are stored in UV cabinets or in tightly closed containers.
- Autoclave - sterilization under the influence of high-temperature steam up to 137C for 20-25 minutes. This method allows not to dull the instrument during sterilization and preserve its cutting properties.
PART 3
PRODUCTS FOR DISINFECTION
You will need drugs:
- for disinfection of rooms and work surfaces
- for skin disinfection
- for instrument disinfection
In Ukraine, a lot of disinfectants are sold for express disinfection of surfaces of premises, apparatus, equipment, hard furniture made of materials resistant to the drug, manicure, cosmetic, hairdressing tools.
Modern products do not contain aldehydes, formaldehydes and other toxic and environmentally hazardous components. Preparations must have bactericidal, tuberculocidal, fungicidal (fungi of the genus Candida, Trichophyton, Aspergillus niger), virucidal (AIDS, hepatitis A, B, C viruses, adeno-, polio-, rotaviruses, etc.) properties. Have a prolonged antimicrobial effect.
How to learn how to write Customer Service Standards, read in the best book about the salon business "My Beauty Salon".
"My Beauty Salon" is a book by Natalia Goncharenko about how to create a profitable and safe beauty salon, cosmetology center or private practice, attract clients and organize the work of staff. It is read in 16 countries of the world.


