Light in photography. Portrait Lighting Schemes - Classical (Rembrandt) Lighting Scheme
The main task of studio lighting is to simulate natural light. The first photographic pavilions, until artificial lighting was invented, used natural light. This is what the first pavilions looked like.

The studios were usually located in the attics of houses, as a lot of sunlight was needed for shooting. Wide windows were made in the roof and light came through them. If it was raining or the weather was cloudy, the shooting was postponed.
The first studios worked with contrasting, harsh lighting, but as technology developed, studios began to be arranged with windows to the north in order to avoid direct sunlight. The photographer was able to open the windows or cover them with frosted glass or curtains. Used for illuminationreflectors made of polished copper sheets.
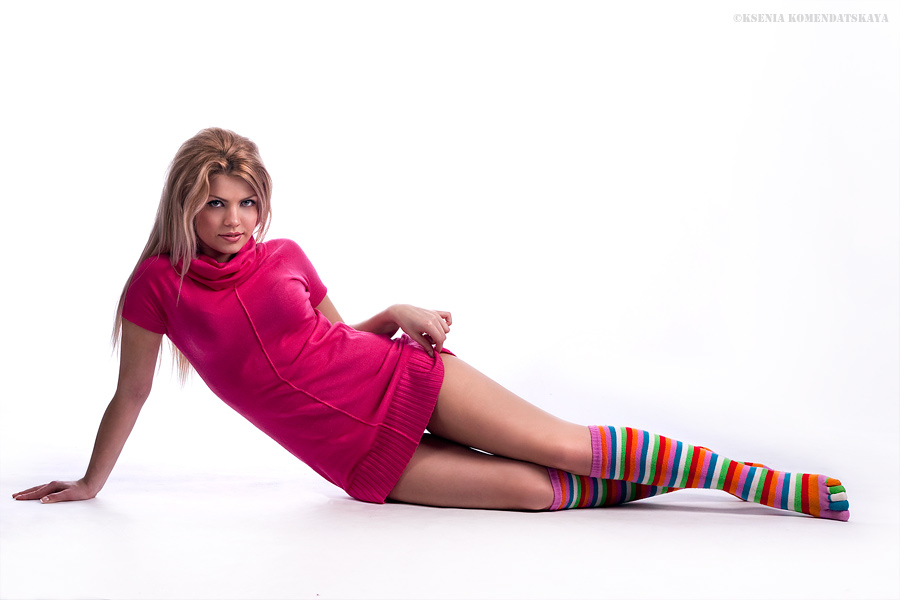
In the picture you see the classic lighting scheme, which is still used by all photographers in the world. The light comes from above and from the side of the windows, the light is soft and can be compared to lighting with a large softbox. With the help of reflectors, the shadow side of the model is highlighted, and the reflector above the model's head gives contour highlighting of the hair and allows you to "separate" the figure from the background. This is the classic lighting scheme. It is often called Rembrandtian, because in this manner the artist painted his portraits.
How artificial light is put in studios today.
key light - the main luminous flux that forms a light-tone or black-and-white pattern. The most powerful light source.
Key light can be hard or soft. If the light is hard, the shadows will be sharp and contrasting. For hard light use reflectors small size andbeauty disheswith a silver surface. For soft light softbox or scattering nozzles on a reflector or plate. We must not forget that the farther away from the model you are the light source, the harder the light will be.
Key light source options:
- Frontal
- Anterior Diagonal
- Side
- back diagonal
- back

This is what the black and white pattern will look like under different lighting options:

front lighting

front-diagonal lighting (key light on the left)

side lighting (key light on the left)

back-diagonal lighting (key light on the left)

In the classic scheme, the key light is usually placed in the front diagonal position, at an angle of approximately 45 degrees relative to the camera-model line.
The light source is placed slightly above the model's head. If you set it too high, then the shadows will creep down, you will get shadows under the eyes and a long shadow from the nose. If too low, the shadows will creep up and the face will look wide and creepy.
Here are the top and bottom light options as an example of shadow distribution.

top light

bottom light
The power of the key light should be about 1-1.5 stops brighter than other sources. In order to receive harmonious light, you need to be able to coordinate the action of all lighting fixtures.
fill light- a source of scattered light, which plays an auxiliary role in light and shade lighting, and the main role in light-tonal lighting. The goal is to highlight the shadows and soften the black and white pattern. In black and white lighting, it reduces the contrast of the image and makes it possible to reproduce the shape and texture in the shadows. It should not be noticeable as an independent luminous flux.
Fill light typically uses a softbox or reflective panel that the fill light source is directed at. The fill light is usually placed behind the camera, front or front diagonal.
This is how the shadow filling will change depending on the strength of the fill light source.

weak shadow fill

average shadow fill

strong shadow fill
modeling light- a narrowly focused, not very intense stream of light, which is designed to emphasize the shape and texture in the shadows (the texture of hair, clothes, the line of the neck, shoulder, etc.). It is also needed to separate the model from the background.
Usually this source is installed in the back diagonal, sometimes in the back direction.
Light-forming nozzles are used to obtain a narrow light spot: a tube (Snoot), reflectors with curtains (Barn Doors), sometimes stripboxes.
The brightness of light modulations by shadows should not exceed the brightness of lights formed by the key light source.
background light - a light source designed to illuminate the background.
The task of background light is to separate the model from the background, give the image volume and show perspective. Usually nozzles for background light are used - standard reflectors (sometimes with curtains), a tube, a ladle. The background can be colored using filters. For a photon pattern, you can use gabos that give some kind of pattern (window, leaves, spots, etc.). You can make a gabo yourself or use some improvised means (baskets, other items with holes). If the background is not evenly lit, an additional sense of space is created. That is, the abstract background is illuminated unevenly, thereby creating the illusion of an aerial perspective, where light is perceived as distant, and dark as close.
The background light source is coordinated, if possible, with the direction of the key light source.
This is how the portrait will look like with one, two, three and four light sources:

one light source (drawing)

two light sources (drawing and filling)

three light sources (drawing, filling and background)

four light sources (drawing, filling, background and hair modeling)
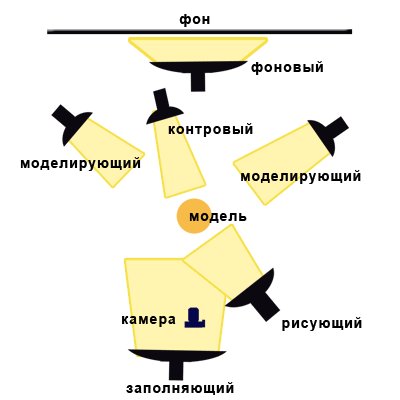
This is what a classic four-source scheme looks like:

It is generally recommended to turn on the background light source first. Then the key light turns on. As described above, the nature of the chiaroscuro will depend on the intensity of the key light source, its distance from the model, the installation height, and the direction of the light source. Then, depending on the artistic task, a fill light source is set (strong or weak shadow filling). And at the very end is a modeling light source.
There are many options for switching on light sources. The main thing to remember is that you are shooting a portrait and the person should ultimately look like himself.
Good afternoon! In touch, Timur Mustaev. Any photographer understands how important lighting is in their work. The ability to use it correctly is a key skill that will help out even under difficult environmental conditions.
There are different types of light, types of light devices. One of the most significant classifications is made on the basis of the directivity of the light source. In this regard, I want to ask you: side light in photography - what do we know about it? How and when is it best to use it?
Side light
Choosing the right and profitable type of lighting is not easy in itself. So, in addition to the general points on this issue, there is also a different position of the light sources, which, of course, affects the image.
If we mentally draw a circle, in the center of which there will be an object / subject of shooting, then an illuminator can be placed along its edges.
Directly lateral light (BS) is considered to be standing on the side of the model and directed at her so that the angle between the light and the photographer is 90 degrees.
Shapes, texture - in this case they will become more attractive, clear, due to which volume will also appear. Often BS is used in portraits, but landscape photographers also love it, and the architecture of the city looks impressive with it.
When photographing outdoors, be it nature or people, you should always remember that, compared to a studio, the light here changes depending on the time of day and you need to catch it in time.
The sun in the lateral position usually falls on the period before noon, or already towards the end of the day. Why is that? The sun at its zenith (at its highest point) shines from above and practically does not create shadows on objects, or rather it takes them down, they tend to the earth. In humans, this will be expressed, at least, in terrible dark bags under the eyes and chin.

The Importance of Light
Where it will stand, and therefore where the light will come from, is the deciding factor. A slight deviation - and you get a different kind of picture!
In addition to the lateral, we can talk about the frontal (front) and opposite to it - (rear).
Also, between the lateral and frontal, there is a diagonal (at 45 degrees), nameless and sliding, which are located on both sides of the diagonal. Of course, any type can be presented very competently and interestingly, if used in a suitable situation and with skill. But it is the side (or side - diagonal) that is considered the most successful.

What are its properties?
- First, it is convenient for us. After all, it shines from the side, that is, not clearly directly on the model, being somewhere behind the photographer, who can block it, and not behind the subject of the photo shoot, falling into the lens and thereby causing him some harm.
- Secondly, it, as already mentioned, gives three-dimensionality, in contrast to the front, which makes the photo flat. And at the same time, the side does not create strong problems, such as, for example, the light from behind: in the latter case, we have overexposure, a dark object and an overly bright background, a very hard contrast.
Thus, with side lighting, we get a beautiful image without unnecessary fuss in post-processing. Although someone may call it a predictable and easy option due to the described positive features.

Examples of using
To learn how to understand and control light, the best solution is to work with a single view. To start. Then you can add more sources and freely experiment with lighting schemes. I invite readers to try this option on their own and see what result can be obtained. We are talking below about studio conditions.
So, within the framework of this theme, the main key light is presented from the side and directed at the model, one or two other devices illuminate the background. With this setting, we can get a shadow or highlight effect where one side of the face is lit and the other is not. BS will fall just in the ear of a person.
- The first type: the face is slightly turned towards the light so that the narrow part of the face is illuminated, and the wide part, more facing the photographer, is in the shade. In such a half-turn, the border of light and shadow passes along the profile and line of the nose.
- Second: we turn the face away from the source, then the narrow part of the face is shaded, but the wide part remains in the light.
The main thing is to clearly position the illuminator, what pose, facial expression the client will take will already be the subject of creative vision.

In this case, the rotation of the model's head relative to the source may not necessarily be the same as I described above. Vary it, thereby creating completely different images and patterns. It can be full face, easy or classic turn, etc.
I understand that many factors need to be taken into account, but I ask you to take one more into service: as soon as a glare from the light appears in the eyes of the model, the whole photo will immediately seem alive and expressive.
Are you completely clueless about your SLR camera? Do you only take pictures in automatic mode? Then why do you need a SLR camera? I recommend you a course that will teach you how to use all the functions of the camera. After learning, learn how to take amazing photos that your friends will envy!
Digital SLR for beginners 2.0- for those who have a NIKON SLR camera.

My first MIRROR- for those who have a CANON SLR camera.

Sincere wishes for continued success! Your guide to the world of photography.
All the best to you, Timur Mustaev.
Today I want to touch on such an important topic for a photographer as lighting and light.
Lighting is important to all photographers, regardless of their favorite genre of photography. Studio photographers have it easier - they can easily move light sources around the studio, creating the desired pattern and lighting. Landscape photographers work with light a little more difficult: they have to use what they have, take into account the location of the sun and the presence / absence of clouds in the sky.
I want to start a conversation about light with the direction of lighting. All directions can be divided into 3 types:
- frontal
- lateral
- backlight (backlight)
As the name implies, front lighting- such lighting when the light source is directly in front of the subject and, accordingly, strictly behind the back of the photographer. You need to be careful with the front light - such light practically does not cast shadows (especially when the sun is at its zenith), so the frame can turn out to be flat. 
- such a direction of illumination when the light source is on the side of the subject and from the photographer. Rays of light seem to cross the frame horizontally, creating shadows and giving the picture volume and depth. 
Finally, backlight (or backlight) occurs when the light source is behind the subject and in front of the camera lens. Shooting in backlight is quite difficult: since objects are not lit, they can turn out to be dull and colorless, devoid of detail. Backlight is ideal for getting a silhouette in a shot when details are not important. Also, backlighting can be a good solution when the subject allows it. For example, the translucent petals of tulips sparkled in the rays of the sun. 
Each type of lighting is good if used wisely. When shooting, you should always keep an eye on where the light source is. If you're shooting landscapes, you can still "move" the Sun by shifting relative to your subject, or by choosing a time when the Sun is exactly where it will help create the best shot.
The word “photography” literally translates as “drawing with light”. That is why beautiful light is the key to a good picture. It takes constant practice to learn to "see" the light, "catch" the light, and use it to advantage. But for starters, it would be nice to summarize in your head a little theoretical knowledge about light in photography. This is what we will do!
light in photography can be classified according to the following parameters:
- the nature of the lighting (soft or hard light);
- method of obtaining lighting (directional, diffused, reflected);
- direction of light relative to the subject (front, side, back, top, bottom);
- the role of this or that source in the general light-shadow pattern (drawing, filling, backlighting, modeling and background);
- depending on the nature of the source (natural and artificial light);
- by color temperature (warm or cold light).
You can endlessly select more and more types of light, but we will focus on the presented division.
Soft light and hard light.
 hard light has a characteristic picture, which is easy to recognize by the sharp contrast between light and shadow, a minimum of halftones. In hard lighting, shadows from objects become deep, and highlights become pronounced. The texture of the subjects is also emphasized. The simplest example of hard light is the sun on a bright afternoon. Also, hard light can be created by using flashes directed at the subject without using any attachments. hard light give studio devices with a reflector or with a honeycomb-type nozzle, tube, etc.
 Soft light characterized by a calmer pattern - a maximum of halftones and gradients. Therefore, in classic portrait photography, the main source is a soft light source - a studio device with a photo umbrella or softbox, or soft light from a window. Also an example soft light may be natural light on a cloudy day, or light in the shade of a building on a sunny day.
How to get the desired black and white pattern.
You can control the light (when shooting in a studio or with flash) or use what is around (when shooting outdoors or indoors without a flash). Be that as it may, the photographer can use three different methods of obtaining kind of light.
 directional light obtained by using a fairly powerful source, aimed at the subject from a short distance, without the use of additional attachments. Therefore, directional light is usually hard with a characteristic black and white pattern.
 reflected light obtained by reflecting the main source from any surface. It can be a mirror, a white homogeneous material, a silvery surface or a plain wall painted in a single color. White and silver surfaces do not change color temperature (i.e. retain their natural colors). Colored surfaces give off colored reflections when light is reflected from them, so they must be used with care. Reflected light is in the middle position between directional and diffused light.
scattered light- this is the light from the main source, which passes through translucent substances before reaching the subject. As a diffuser, cumulus clouds in the sky, a piece of translucent fabric, a sheet of paper, curtains or professional devices (translucent umbrellas, softboxes, etc.) can serve. Also scattered light is the light in the shade on a sunny day. Diffused light is the softest, giving smooth transitions between light and shadow on the subject.
You probably visualize that the light can be directed at different angles relative to the subject: directly at the model (“head on”), from the side, at 45 degrees, from behind, from above or below. The way of transferring volumes on the subject depends on the angle of illumination. Surely you have heard expressions like “flat light” and “volumetric, artistic light”. So, in order to convey the volume that we see in the real, 3D world with the help of a photograph, a two-dimensional image, it is necessary to use light that emphasizes the volume of objects.
Best for this task side light, and in combination with accent backlighting, it creates the maximum artistic effect. Only side light is a rather broad concept, it can be placed at different angles. How to set the side light correctly depends on the model and the features of its appearance. It also creates a beautiful light-shadow pattern top light, which is often used for model shooting in the studio. But low light is mainly used to fill in shadows or to create a specific shooting effect for horror films.
The role of light sources in the lighting scheme
 Now let's consider the role of different sources depending on their participation in the overall picture of the illumination of the subject. You've probably come across terms like fill light, key light, back light etc. Let's see what all these terrible concepts mean. In fact, there is nothing complicated:
key light- This is the main source of illumination in the lighting scheme. It is he who draws the main volumes of the object, hence the name. In the English-speaking world, this light is called "key light", i.e. key light. Source key light there is usually one, and it is the most powerful compared to the others. Side or top light is classically used as key light.
fill light- light that is used to evenly illuminate the entire scene. It is usually used either to highlight shadows, or to generally equalize the illumination in the frame in order to be able to properly expose the picture at the desired shutter speed and aperture.
modeling light used to create accents (underlining highlights) or soften individual shadows on the subject. Typically, modeling light is highly focused, and its power is set so as not to interrupt the main cut-off pattern.
Backlight(it is also called contour) is created using a source located behind the model. It is usually used to separate the model from the background, to create accents and artistically highlight the contours of the figure. In classic portrait photography backlight directed either from behind or from behind at an angle (behind the shoulder). Schemes using backlight are the most beautiful. Backlighting looks spectacular in male portraits, and also looks interesting for highlighting the lush hairstyles of girls. By the way, it is thanks to the backlight that the pictures taken at sunset seem so magical!
background light- as you might guess from the name, it is used to highlight the background. The fact is that due to the distance between the background and the model, when using, for example, one light source, the background turns out to be darkened. This does not mean that it must be highlighted, sometimes background light is not used precisely to create such an effect of the depth of space. The light is directed to the background either pointwise (they create a light spot behind the model), or evenly (they illuminate the entire surface of the background equally), or create a soft gradient transition. I do not recommend using the latter option in inexpensive studios with cheap paper backgrounds, because they tend to be imperfect. As a result, such a homeless effect is obtained in the pictures, forgive me for such an expression.
The light falling on the object in front, from the side of the camera, is called frontal. Most of the examples show that these are most often unfavorable lighting conditions for shooting: in these cases there is no expressive light pattern, there is no necessary gradation of lights and shadows, three-dimensional shapes and spaces in the pictures are poorly transmitted, the picture becomes flat, shadows from objects fall back and are hidden behind the figures and objects themselves, therefore, shadows are not visible from the side of the camera.
Accordingly, the space with frontal illumination is outlined very sluggishly, since objects located at different distances from the shooting point are illuminated in this case equally brightly and are transmitted in tones that are close in lightness, which conceals the distances separating objects; nothing indicates the distribution of figures in space, and the details of the image are perceived as being in close proximity to each other.
An image of all the details of the subject, which is equivalent in strength and contrast of tones, without exception, leads to an excessive variegation of the photograph, overloading it with details.
All these circumstances provide sufficient grounds for recognizing frontal lighting as undesirable in most cases. In practical work, such light should be avoided if possible, unless the frontal light is a well-thought-out way to solve special visual problems specifically set by the photographer. What are these shooting situations?
Frontal lighting can be used if the photographer has set out to convey the subject's own tones without changing them with a light pattern, i.e. bright lights or deep shadows. Then the image turns out to be very thin, delicate, as they sometimes say, pastel. But, of course, such an effect is not always achieved and only in special cases. There is an important requirement for the subject itself; it should be collected in tone: either consist of tones close in lightness, or from a small number of contrasting tones (for example, black and white without intermediate grays). That's when, with the obligatory perfect technique of photographic processes, you can get an image similar to photo 72 (E. Daulbaev "A Study in White Tone").
The plaster model was illuminated with only one light source - a soft wide beam directed exactly from the camera and from the same height at which the model was installed. The second source illuminated the white background. Its brightness is slightly higher than the brightness of the model, and the figure is separated from the background by a slight shadow contour.


