How to make a warm greenhouse. Assembling a frame from a metal profile. How to build a winter greenhouse with your own hands
A similar topic was raised by us earlier when we studied the construction of a thermos greenhouse. This is an expensive structure that requires a lot of effort, time and knowledge, but can bring many benefits to the plants you want to grow in the winter. The bad thing is that not all of us can afford the construction of such a structure, and it is necessary to build it in the summer in order to have time to organize everything correctly before the fall. But what if the desire to build a greenhouse for the winter season has come now, when it is no longer very warm outside and there is less and less time left for such a construction? How to do the job quickly and for little money in order to have fresh greens all winter, and maybe even vegetable crops? This is not to say that it is simple and generally cheap, but there is a way to significantly reduce costs, if, of course, you can stabilize your own queries a little.
Choosing the type of winter greenhouse
First of all, we need to determine the parameters of the greenhouse structure, which we will build on the summer cottage.
Functionality
We determine the internal arrangement of the structure depending on the crops that we will grow inside, because in closed ground you can always plant not only vegetables, herbs, mushrooms and flowers, but even some exotic plants. Here it is certainly worth understanding that the costs will increase with each serious requirement.
The location of the building in relation to the ground level
Any heated greenhouse can be built like a thermos and deepened into the ground or installed on the surface of the ground, or it can be equipped already in a ready-made room, for example, in a utility room, in a garage, and so on.

architectural solution
A huge number of options for greenhouses can lead to some shock, because today you can build arched, horizontal, one- or two-slope structures, build combined buildings or buy finished products that only need to be installed, and so on.
We build a polycarbonate greenhouse with our own hands (video)
Construction Materials
It is possible to conditionally divide all such structures into polycarbonate, glazed, wooden, brick, metal with a covering and others.
Heating and lighting of the building
Be sure to decide on greenhouse equipment, which will act as the main assistant in the cold and cloudy season. We choose high-quality heating, as well as practical lighting of the building.
Greenhouses by the method of planting and growing crops
Also, even before construction begins, you need to determine exactly how you will grow plants indoors. They can be planted in beds or in special containers that can be conveniently placed on racks.

Choosing a place for a greenhouse for the winter season
When installing a greenhouse, the main thing to understand is that it should receive an absolute maximum of sunlight, which means that it is better to orient the structure along the length, from east to west. In addition, it is necessary to install the structure in a more or less quiet place so that strong gusts of wind do not cool the structure. Also, try to arrange the greenhouse conveniently for yourself, so that both construction and maintenance are comfortable. Don't forget about the accessible and wide entrance.

Having correctly determined the location and type of the greenhouse structure, its purpose and internal equipment, you can safely proceed to construction.
We build a winter greenhouse on our own
It is possible to build a building of this kind in a short time and inexpensively, but if you are in a hurry, as autumn is on its heels with cold weather, several assistants should be involved in the work to build the structure, sheathe it and fit it, and also put it into operation as quickly as possible. Today we will explain to you how to do it quite quickly and very correctly, of course, taking into account all the requirements of a low budget.

Immediately we would like to choose the type of greenhouse and determine what materials we will build it from. In addition, determine the location and interior equipment. But we will do it consistently.
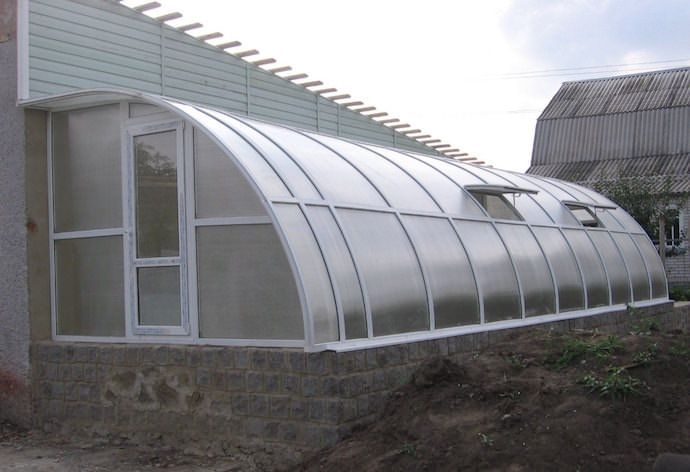
So, our design will be installed on the side of the outbuilding, that is, the adjacent winter greenhouse in the direction from west to east. We decided to do this for many reasons - aesthetically pleasing, saving money on construction (since one wall already exists) and saving space on the site, since two different structures will be closely adjacent to each other.
As materials for the construction, we chose brick for the foundation, a profile pipe or wooden beam for the frame, and polycarbonate for covering. Of course, it will seem to many that these are expensive materials, but believe me, it is better to build such a greenhouse for the winter, for 10 years, or even more, than a structure made of rails and film, since this is a standard summer greenhouse that will last many times in winter less.

We build the foundation
We decided to make something like a thermos, but not to deepen the greenhouse, but just raise the base a little.
So, we install the foundation, standard tape, to a depth of 50 cm, a width of 30-40 cm and around the entire perimeter. It is advisable to choose more or less warm and sunny days for pouring, fill in a sand cushion, you can also have a layer of gravel, install the formwork and pour the cement mortar in shape, paving its direction with reinforcement. You won’t have to especially bandage anything, since the weight on the foundation will be small, and we are sure that nothing will happen to it even after many years.
The foundation should settle for at least 5-7 days, wetted with water on hot days. In addition, be sure to equip waterproofing, especially in the place where the foundation will adjoin the basement.

We build a basement, greenhouse walls
Building a basement is one of the main processes that you should pay attention to. It is advisable to raise it from a new brick, but if we save money, then a normal used brick will also work. We raise the walls by about 100 cm, this is the most successful height in our business. We build external walls in half brick, but if possible, then in brick. The wall that will adjoin the structure must also be raised with a brick, because here we also need a base for the frame, and inside the greenhouse, a brick can serve as a convenient ledge for the production of shelves, levels, and so on. Be sure to include in the work plan the construction of a vestibule, which is necessary to keep warm in the greenhouse and to store tools, soil mixtures, fertilizers, and so on. That is, we should get a basement and walls that, from the top, will resemble a two-room room with one walk-through room. First, a small vestibule, at least 100-150 cm long, to the next room, and then, after the next door, the greenhouse itself.

It is very desirable to install special fasteners for the frame around the perimeter in the walls. For example, it can be reinforcement that will make a serious dressing of the wall with the frame, or just a metal corner that will come out of the brick every 50-70 cm. Believe me, installing the frame on ready-made mounts will be much easier than without them.

winter greenhouse frame
We have talked many times about a wide variety of frames, but today we want to choose a wooden beam. It will be cheaper than a profile pipe, it will serve you well for several decades, it is mounted very quickly, which is what we need.

A wooden beam is installed along the perimeter of the erected wall a few days after its construction. The beam is fixed to anchors, dowels or special metal fasteners using a corner that we removed from the wall.
The frame is mounted around the perimeter of the future greenhouse, along all walls, then a special carrier is installed along the wall of the structure, to which the new building adjoins, and the skeleton is installed. The created frame must be strong and practical, have a reliable bond with all adjacent surfaces, as well as good stability. In addition, the frame under the roof must be installed at the right angle, say, 25-30 degrees to the horizon.

After installation, the frame should be treated with special means, which you can read about in more detail in the material on protecting wood in the country.
Sheathing frame with polycarbonate
The principle of action can be seen in the material in which we described the construction of a polycarbonate greenhouse. Here you will not have exactly any differences, except for the correct arrangement of polycarbonate and its adjoining to the wall of the structure, next to which there is a greenhouse.

Do not forget to think about high-quality ventilation in the greenhouse, install, for example, vents around the perimeter.
Tightness of the structure
The greenhouse for the winter, which we build on our own, must be airtight, because cold drafts will quickly change the temperature in a negative direction, which is very bad. Therefore, mounting foam and sealants will help you.
The tightness of the greenhouse is necessary not only to keep warm, but also to properly regulate the temperature inside, which only you can influence, but not the cold outside.
Interior arrangement
Having built a greenhouse, making it airtight, installing vents and doors to the main building and a transition between the vestibule and the greenhouse, we need to move on to proper arrangement, because if the structure is ready, then it needs to be put into operation faster.
Communications
We bring into the greenhouse the communications we need, electricity and water. We distribute exits for lighting, install shut-off valves for the water supply.
We choose lamps with the help of articles on the site, because we also talked about this, but we choose not just for lighting, but also strictly according to the characteristics of the plants that you will focus on.
We simply bring the water supply into the room, but if possible, then we are preparing to install drip irrigation, because standard wiring can be done quickly and inexpensively.

Priming
We choose the type of growing plants - on beds or special racks, and prepare a greenhouse for this type. We bring in the soil, prepare substrates, fertilizers, special additives. We install lighting exactly where it is needed, we supply water. In principle, the matter is small - to install heating and start growing plants.
Do-it-yourself greenhouse heating
Today it is difficult to choose heating for a winter greenhouse construction only because there are many special installations for such a process, and most of them are quite expensive. We offer the most practical option - to choose infrared heaters, install them according to all requirements, but lay the soil for growing plants with biofuel, which will warm it throughout almost the entire winter, and even feed it with the necessary components. This can be horse manure, which for 80 days gives out a temperature of 33-38°C when decomposed, rotted bark, which gives out a temperature of 22-25°C for about 110 days, as well as cow manure - 20°C for about 100 days.

In order for the biofuel to burn out and release the temperature for heating, it is necessary to lay it directly under the soil layer, constantly maintain its aeration, as well as the humidity in the greenhouse, which should be kept at a stable level of about 70%.
Greenhouse for the winter: economy option
We built the foundation and frame, sheathed the structure and made it airtight, brought in water, electricity, installed heating and added some biofuel tricks, laid the ground, processed it and are ready to grow various crops in the winter. Naturally, even such an option will cost a pretty penny, and therefore we recommend that you study the video about building a winter greenhouse with your own hands, which we showed above, more carefully. Perhaps you will be satisfied with the option of a wooden structure covered with several layers of polyethylene.
Winter greenhouse at their summer cottage (20 photos)


Many summer residents would like to grow fresh vegetables all year round. It is possible to come to the country house even in winter. The building is heated, with all communications. For vegetables, if you want to grow them in winter and spring, you will also need a warm house. A year-round heated greenhouse can be equipped with your own hands.
This is the most important thing to start - to choose the right place. At 30%, the location will determine the efficiency of the greenhouse.

Table. Options for choosing a place for a greenhouse
| Parameter | Description |
|---|---|
| Daylight | Of course, in a stationary year-round greenhouse, additional artificial lighting will have to be provided, but why not use the possibilities of nature 100%. Plants should be provided with the maximum amount of daylight. By placing the greenhouse structure in a west to east direction in an open area, you will get maximum sun for the plants. |
| Wind | Cold winds can not only penetrate inside the structure through any even small cracks, but also, acting from the outside, reduce the temperature in it by 2-5 degrees. For young seedlings, such a difference can be fatal. Therefore, when installing a greenhouse, take care of its additional protection from the wind. |
| Water | Ideally, a year-round greenhouse has an automatic watering system. But if there is none, hydrocommunications should be located close, for convenient and efficient water intake and irrigation. Water temperature, especially in winter, also matters. Watering seedlings with cold water is unacceptable. |
| Approaches | Few people pay attention to this parameter. However, the approach to the greenhouse should be wide and comfortable. This will not only facilitate its construction, but also make comfortable and efficient operation. |

Material selection
What to build from? There are many options. You need to choose such a material so that the building lasts a long time, is durable, airtight, economical. In this regard, the old film and glass classical buildings, equipped with frame structures using wood, have finally become a thing of the past.
Why film, glass and wood are not suitable?

Greenhouse made of wood and glass - photo
- Even a heavy-duty film can tear - heat leakage will occur.
- In the frames and between them, cracks will necessarily form over time, through which heat will also leave.
- Glass breaks and in one layer has a low heat transfer.
What materials to choose for a year-round greenhouse?
- The frame structure can be used when installing metal-plastic frames, provided they are double-glazed.
- The walls of the greenhouse can be made of polycarbonate on a metal basis.
- For a year-round greenhouse, a brick building is suitable.
Reliability, long service life, protection for growing crops - these are the main parameters by which greenhouse building material is selected.
Assembling a greenhouse from cellular polycarbonate
Consider the polycarbonate structure, the features of its assembly and the tools and additional materials necessary for this.
What is good polycarbonate
This modern material has many positive performance qualities.
- It has excellent thermal insulation properties.
- It has a surprisingly flexible structure - it bends easily without breaking, which allows for the installation of even arched structures.
- This new material is 16 times lighter than the thinnest glass.
In polycarbonate structures, shaped pipes act as a frame. In addition to them, you will need:
- welding machine;
- polycarbonate sheets;
- bolts and sealant.
Assembly can be done in a few hours, according to the instructions that come with the finished greenhouse.
Advice! Not all ready-made designs provide transoms, but it is better to provide them, the possibility of ventilation will protect the plants from overheating.
The frame is assembled with bolts. Sheets are inserted into the frame. Don't forget to make the roof sloped (a 35-degree angle is enough) to keep snow from accumulating. Places of strips with open honeycombs on polycarbonate are treated with sealant to minimize heat loss.
Features of a metal-plastic greenhouse
Do-it-yourself metal-plastic structures are not the easiest thing to do. It will be the most durable for specialists, so it is better to make a custom-made greenhouse frame in a construction company that specializes in the manufacture of such products. Plus, the frame will need double glazing, which is also better to entrust to specialists.
As a result, the full cost of such a year-round greenhouse will not come cheap. But this is the most real opportunity to grow greens and vegetables all year round.
Advice! When installing a metal-plastic glazed greenhouse, it is recommended that one wall (north) be made not of glass and insulated.
The roof of such a greenhouse tilts 30 degrees. It is preferable to choose a single-slope configuration.
Features of a brick greenhouse
A brick greenhouse, or as it is also called capital, is a real “home” for plants, where life is possible all year round. This is not even a greenhouse anymore, but a real greenhouse in which you can grow not only vegetables, but also various exotic plants. Until now, despite new modern materials, such as metal-plastic and cellular polycarbonate, the option of a brick greenhouse is considered the most reliable, proven, optimal, and effective.
How to build a brick greenhouse
The construction can be done with your own hands, if you have at least minimal skills in brickwork and other construction work. But even without labor costs, a greenhouse will require a solid financial investment.
You will need:
- brick;
- mineral wool;
- cement, sand;
- roofing material;
- boards, timber for rafters;
- windows, doors, gutters.
The features of the building are that, unlike all other types of greenhouses, a brick one is a “two-room apartment” for green pets. The first room is the vestibule. Usually it occupies an area of 2x2 m or 2x2.5 m. Garden accessories, fertilizers, soil and other necessary things are stored in the vestibule, and a heating system (boiler, stove) is installed.
The main greenhouse room can be any area that you are able to master.
The partition between the two rooms is made capital. It has a door installed. The second door from the vestibule leads outside. In the greenhouse, not only windows are made, but also transoms.
Another feature - for a capital greenhouse, you will have to fill in the foundation, preferably tape.
Table. The main stages of the construction of a brick greenhouse
Heating system
You can heat a greenhouse in different ways. From the simplest and most ancient - furnace, to new and modern infrared equipment and heat guns. Each system has its own disadvantages and advantages.
Table. Characteristics of greenhouse heating systems
| Heating type | Characteristics |
|---|---|
| Used in capital buildings. The simplest and least expensive method. Does not require complex structures. The oven is installed in the vestibule. Chimney - around the perimeter of the greenhouse. For the arrangement of stove heating, ventilation is necessary. Among the disadvantages are uneven heat supply, the need for constant monitoring, strong heating of the furnace surface, fire hazard. The walls of a gas-generating solid fuel furnace do not heat up. | |
| It can be installed in a greenhouse from any material. Considered the safest. You will need a tank with a boiler, a pump, pipes, water, electricity. Water is heated by electricity, distributed through the system with the help of a pump, cooling down and returned to the boiler. This method provides not only an optimal uniform thermal regime, but also the necessary humidity. But only specialists can install such a system. Operation will also require serious material costs. | |
| Alternative to water. You will need gas heaters and burners, as well as pipes evenly distributed throughout the greenhouse. Gas is burned, heat is distributed in the room. There are several disadvantages, among which the main one is the need for constant monitoring to avoid gas leakage. Additional ventilation will also be required. This option is more economical than water, heating is carried out evenly, the room heats up faster. | |
| The most popular and demanded type. Can be used in all greenhouses. There are many devices, including: convector batteries, cables, guns, heating mats. Most systems are equipped with sensors, it is possible to adjust the modes. | |
| You should not even try to install the system with your own hands - it is mounted only by professionals at the time of assembling the greenhouse structure. Heating is excellent, uniform, fast. Condensation does not accumulate (which happens in winter with all other systems). But there is a possibility of overdrying the air, so it is recommended to install humidifiers in parallel. |
What vegetables are grown in a greenhouse all year round
In a heated greenhouse, you can grow absolutely any vegetables, herbs, berries, flowers, and even exotic plants. But if there is only one greenhouse on the site, and you give preference to vegetables, you will have to choose up to three vegetable crops and the same number of greens.
Vegetables
From traditional vegetables for year-round cultivation, they usually choose:
- cucumbers;
- tomatoes;
- pepper;
- Chinese cabbage;
- radish;
- salads.

Greens
From spicy green crops are grown:
- dill;
- parsley;
- cilantro;
- basil;
- green onion.
Pepper - can be sown and grown with any crops.
Tomatoes - grow well with onions and radishes.

Cucumbers - prefer radishes, lettuce and all green crops.
Greens - Can grow with all crops.
Advice! It is undesirable to combine cucumbers with tomatoes and cabbage with parsley in neighboring crops.

Planting seedlings in a greenhouse
The time for planting seedlings that have grown in rooms to a permanent place of growth in a capital heated greenhouse depends on the time you have chosen for sowing. For the successful planting of seedlings, there are certain rules.
- Seedlings are ready for planting when they have at least 7-8 true leaves (peppers have at least 12). The bushes are strong, stable, not elongated, flower buds may begin to form in peppers and tomatoes. Leaf color is intense green.

- Before planting, seedlings need to be hardened off two weeks in advance - they should be taken outside for several hours, gradually increasing the time.
- Greenhouse soil is prepared in advance - it is filled with humus, a bucket of 1 m² (not manure!) And minerals (potassium and phosphorus - 40 g each, nitrogen - 30 g / m²). The soil is dug up, loosened, broken into holes.


- The wells are watered with water, two liters each. Seedlings are also well watered two hours before planting.

- The seedling is carefully removed from the seedling container with the help of a planting scoop, along with the root soil. If too long a root sticks out of the soil clod, it is allowed to pinch it by a third.
- The seedling falls into the hole, holds with one hand, the second fills the space between the walls and the lump.
- The soil is compacted near the stem, watered again. For plants that will be tied up (tomatoes, cucumbers, some varieties of pepper), it is immediately recommended to install pegs or plank trellises.

Plant care in the greenhouse
In a greenhouse that works all year round for the “production” of fresh vegetable products, plants need especially careful care.
The first important condition is soil preparation. Vegetables grown out of season in a greenhouse will place increased demands, primarily on the soil. It should be light, fertile, with a high concentration of substances needed by plants.
The following components are required in the composition of greenhouse soil:
- manure;
- turf;
- peat;
- straw (sawdust);
- sand;
- carbohydrate-containing and nitrogen-containing fertilizers.
The second condition is feeding. Vegetables and herbs need to be fed regularly throughout the entire growth and fruiting cycle.
The third important component of care is watering and humidity regime. Drip irrigation is preferred, or a fine shower (for some crops). If it is not possible to install an automatic irrigation system with temperature control of the supplied water, make sure that its temperature is not lower than the ambient temperature.

Heating is described in detail above. One has only to note that in the conditions of the middle zone, it will be necessary to heat a year-round greenhouse with different intensity for at least seven months a year.

An important care measure is weed control and soil loosening. The earth crust is dangerous for all garden plants, but it is especially harmful to seedlings and seedlings in a greenhouse, where plants get less air than in open ground.
The loosening of greenhouse soil, depending on the composition of the soil, often begins even before germination (when sowing crops with seeds). If the seeds have not yet sprouted, but the crust has already formed, of course, it must be destroyed in order to make it easier for the seedlings to reach the surface. Loosening before germination is carried out between rows, to a depth of not more than 5 cm, with a light ripper.
When the main crops sprout, or after planting seedlings in the greenhouse, all loosening is combined with weeding and is carried out after watering. The soil is loosened closer to the stem of the plant, but so as not to destroy the lateral roots.
Advice! Vegetable crops, such as tomatoes, peppers, cabbage, cucumbers, loosen immediately after planting seedlings deep, up to 7 cm. As the lateral roots grow, the loosening depth decreases, and the distance from the stem increases.


Also, in a year-round greenhouse, it is necessary to pay special attention to the prevention of diseases of vegetable crops, to take measures to treat diseases that have arisen, to remove vegetation residues, obsolete lashes, stems, leaves in a timely manner, and after harvesting, while preparing the greenhouse for a new sowing cycle, disinfect it.


Growing vegetables in a greenhouse will certainly bring excellent results if you follow all the rules for caring for seedlings and planting them in protected ground. The reward will be juicy and healthy fruits, vegetables and herbs from your own site all year round.
Video - How to build a large winter greenhouse
You won’t surprise anyone with a greenhouse on the site today: small and large, temporary and capital, home-made and factory-made - they all help to get a crop earlier than usual. Some of them appear in spring and disappear in autumn. Others remain to winter in a semi-disassembled form. And some continue to "work" even in cold weather. Can an ordinary gardener build such a greenhouse or do-it-yourself winter greenhouse is an unattainable dream?
Features of winter greenhouses
Before starting to build a winter greenhouse, let's understand how it differs from the usual one:
- First, its "capital". It makes no sense to put a temporary greenhouse on the foundation and make it too heavy: sometimes it is moved from place to place, made up of separate frames that are removed for the winter. Even polycarbonate greenhouses are sometimes simply placed on brick posts.
The winter greenhouse is a more solid structure. A large area, the presence of heating and lighting with the ability to regulate, a strong heavy frame to withstand snow and wind loads - all this makes it impossible to move the greenhouse around the site and build it without a good foundation. Therefore, you need to carefully consider the choice of location. - A typical greenhouse can be any size, depending on the number of garden crops you want to grow. The winter greenhouse is most often used for growing vegetables for sale, so less than a few tens of square meters. m to build a greenhouse is unprofitable.
- The coating material can be anything, but the best option is polycarbonate. Lightweight and durable, it immediately replaced glass and film in the construction of greenhouses.
- The design of the greenhouse should provide for the possibility of making additional insulation in severe frosts.
- Plants require different conditions: light, temperature, air humidity. In the greenhouse, it is necessary to provide for the possibility of dividing the space into zones with different conditions.
Material selection
Before you build a winter greenhouse, you need to decide on the material for the frame and cover.
The capital greenhouse must be durable, so the choice of material for the frame can be limited to metal and wood. And not thin profiles and bars, which barely hold their weight. Vertical racks and roof beams must withstand winter loads with a margin.
As for what to prefer, metal or wood, it is difficult to achieve a consensus here. Metal is more durable, but wood is more convenient to work with and easy to repair. But most importantly, the tree does not heat up in the heat. The microclimate in a greenhouse made of wood is better than in a metal one.
You can use the film to cover the winter greenhouse, but you will have to change it often. And although it is cheaper, it will take two to three times more than for a conventional greenhouse. "Eternal" glass also has disadvantages: fragility and heavy weight.
The only material that meets all the requirements is polycarbonate. Durable, with good light transmission, lightweight - he immediately won the hearts of gardeners.
How to build a greenhouse yourself
The place for the greenhouse is chosen carefully: they put it for more than one year. A flat, well-lit area without trees and buildings is suitable. It is not recommended to choose places with high soil moisture.
Having decided on the dimensions, proceed to the foundation. The most suitable would be a shallow reinforced concrete tape. The foundation for the greenhouse must be strong, so we fill it in accordance with all the rules:
- We make a trench marking with a width of 20-30 cm and select the soil to a depth of 0.7-0.8 m.
- Then we pour a layer of sand 20 cm at the bottom and carefully tamp.
- We lay roofing material for waterproofing on a sand cushion, assemble the formwork and knit a reinforcing cage: we lay two rows of bars (at the bottom and at the top of the tape) and connect them with transverse pieces of reinforcement.
- We bring the formwork above the ground by 20 - 50 cm. Having set the upper edge of the formwork to the level and having strengthened it well, you can start laying concrete.
Not everyone does such a high base. But it facilitates work inside the greenhouse, it is more convenient to make high beds. After the foundation has hardened, it is recommended to insulate the foundation with foam plastic and a blind area.
On the finished plinth, we begin to assemble the greenhouse. The prefabricated frame is assembled according to the instructions, using drawings and photos.
They begin to assemble a wooden frame of their own design from a lower trim bar, which is laid on a plinth. The beam must be treated with anti-rotting drugs. Vertical racks are installed in such a way that the edges of the polycarbonate sheets lie on the posts. The tops of the racks are connected with a bar, the verticality is checked and fixed with braces.

If the width of the greenhouse allows, then a gable roof is made without central supports. With large spans in the middle of the greenhouse, they put several pillars that support the roof.
Having built a frame, polycarbonate sheets are fixed on it. It is fixed with special self-tapping screws with rubber washers. The edges of the sheets are sealed with tape so that moisture does not get inside.
The greenhouse must be ventilated, so they make several windows. There are many devices for automatically opening and closing them, which makes it easier to maintain the greenhouse.
Greenhouse heating
You can't grow anything without heating in a greenhouse in winter. Heat sources can be different, depending on what we will heat:
- You can warm the earth. In this case, a common method is biofuel, that is, heat, as a result of the decay of plant residues in warm beds. It is not difficult to make such a bed: it does not require building materials or special skills.
In the intended place, they dig a trench 40 - 50 cm wide and deep. Tree branches, broken slate, bark and other poorly rotting large debris are laid at the bottom. This is a drain to remove excess moisture. It is covered with a small layer of earth and they begin to fill the trench with organic matter. Grass, straw, manure, paper, dry leaves - everything goes into action. The more diverse the composition of this part of the garden, the longer it "works", because everything rots at different speeds. Additionally, you can shed the mixture with mullein or a solution of chicken manure. The “charged” bed is covered with a layer of fertile soil on top. Such a bed, even in open ground, allows you to plant plants much earlier than normal calendar dates.Another way to heat the ground is to lay heating pipes inside the beds. The water in the pipes is heated by any available method (an old wood-fired boiler, a stove with a heating coil). Install a conventional heating system, which is turned on as needed.
Another way, more expensive, is to use a heating cable to heat the ground. - A completely different way of heating a greenhouse is a furnace heating device. In this case, the air in the entire greenhouse is heated. By the same principle, a conventional water heating system with radiators and pipes, as well as heating with various kinds of heaters, works.
Which method of heating to choose is up to you, based on the possibilities.
It should be noted that the construction of greenhouses is becoming more popular. There are many ways to make a winter greenhouse, everyone chooses according to their needs and capabilities. One of the options is presented in the video at the beginning of the article. Perhaps it is he who will seem most successful to you.
A winter greenhouse is the dream of many gardeners; you can grow vegetables and herbs, flowers and berries in it all year round. The construction of a winter greenhouse is not a cheap task; to ensure the necessary microclimate, it will be necessary not only to build the building itself, but also to take care of thermal insulation, install microclimate maintenance systems, and resolve issues of electricity and water supply. To learn how to build a reliable winter greenhouse, suitable even for harsh climates, read our article.
How are winter greenhouses different from summer ones? Why are they so much more expensive to build? To find answers to these questions, you need to consider the processes taking place in the greenhouse in winter.
Heating
In the summer greenhouse, the main heating occurs due to solar energy. During the day, the soil and structures of the greenhouse receive a large amount of solar heat, during the night they gradually give it away. Due to this, fluctuations in night and day temperatures are insignificant, and the plants feel comfortable. Even in cloudy weather, solar energy is sufficient for heating due to the long daylight hours.
In winter, especially in northern latitudes, the sunny day is short, and the sun itself is low above the horizon for most of the day. The sun's rays pass through the soil casually, practically without heating it. During the night, the soil has time to cool completely, and in cold weather it freezes. For this reason, solar energy is not enough to warm up winter greenhouses, and they have to be equipped with heating systems.

You can heat winter greenhouses: with the help of stoves, water heating radiators, electric and gas heaters. The choice of method depends on the resources available to you and the area of \u200b\u200bthe greenhouse. The main condition: the power of the heater should be enough to heat the winter greenhouse in the coldest months.
Warming
Greenhouse heating will be effective only with good insulation.
Ways to reduce heat loss:
- deepening the greenhouse into the ground;
- erection of deaf insulated walls;
- the use of double glazing or polycarbonate with a thickness of 10-25 mm;
- maximum sealing of joints and cracks.
Buried greenhouses have excellent thermal insulation characteristics, but have a number of disadvantages, which are listed below.

- For good thermal insulation, it is necessary to deepen the structure below the freezing depth of the soil, which for temperate latitudes is about 1.5 m, and for colder regions - up to 2 m. Preparing a pit of such a depth increases the estimate.
- Buried greenhouses should not be placed in areas with a high level of groundwater, otherwise a drainage system is required.
- For the construction of walls of a buried greenhouse, high-quality moisture-proof concrete is required.
All these activities increase the cost of a buried greenhouse and complicate the technology of its construction with your own hands.


Deaf insulated walls can be made of foam concrete, heat blocks or wood. In this case, foam plastic serves as a heater - it is easy to mount it on the walls, it is not afraid of moisture and does not rot. For thermal insulation of the soil, an insulated blind area with a width of at least 0.5 m is used.
Note! Warming of the walls of the greenhouse is performed only from the outside!

The cover of the greenhouse also matters. It should transmit light well, but at the same time provide good thermal insulation. When using glass, double or triple glazing is required with a distance between the panes of 10-30 mm.

When using polycarbonate, you need to apply. They will allow you to isolate the internal cells and create a sealed air gap, the thermal insulation properties of which are quite high. Polycarbonate 10, 16 or 25 mm thick can be laid in one layer. With a polycarbonate thickness of 4 or 6 mm, a double skin is required.

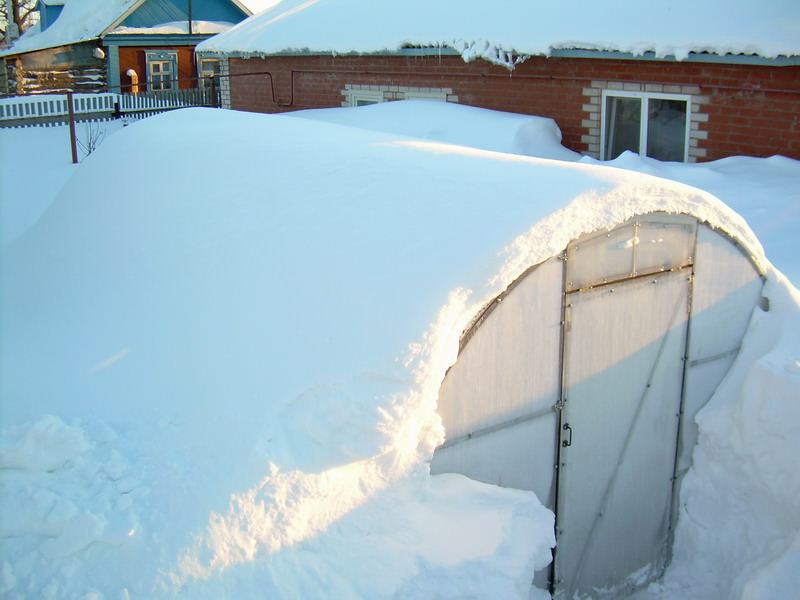
Note! Film for winter greenhouses can only be used in regions with rare snowfalls. With a heavy snow load, it stretches and breaks.
Watering and humidification
Water is essential for the successful growth and fruiting of any greenhouse crop. With a large greenhouse area, the volumes of water used will also be impressive, so the source of water supply must be selected at the stage of laying the foundation.
If you plan to pull pipes from a water supply or well, they must be laid at a considerable depth (at least 1 m for the southern regions and at least 1.8 m for the northern ones). For large greenhouses intended for growing products for sale, it is advisable to make a well right next to the structure or in the vestibule.

For heating water, you can use containers with a volume of 0.2 to 1 m 3. They are usually installed at some elevation - this is how the necessary pressure is created in the irrigation system. It is better to place containers in the northern part of the greenhouse so as not to shade the plants. The water in them is heated under the influence of sunlight, it is also possible to equip tanks with heating elements for artificial heating.

Note! A container of water is a good heat accumulator. Warming up during the day, it gradually cools down at night and gives off heat to the air, which helps to reduce temperature fluctuations.
Ventilation
A ventilation system is a prerequisite for the successful growth of most crops. Due to ventilation, excess heat and moisture are removed from the greenhouse, and oxygen and carbon dioxide are exchanged. Air exchange in greenhouses is provided by forced or natural ventilation systems.
Most often, vents are equipped for ventilation in greenhouses. They are installed at the top of the walls or on the roof. The higher the window is located, the more effective the ventilation will be: warm air itself rises, giving way to cooler air. You can open and close them manually or with .

Lighting
During the summer, natural daylight is sufficient for most crops. In winter, plants need to be illuminated. For this purpose, gas-discharge lamps DNaT and DNaZ are used in winter greenhouses.

The norm of minimum illumination, and hence the number of lamps, depends on the plants grown. In most cases, it is possible to calculate the total power of the lamps based on the area of the greenhouse - 100 W of electric power is enough for 1 m 2. For example, for a greenhouse with an area of 20 m 2, 2000 W or 5 HPS lamps of 400 W each, as well as starting equipment for them, are needed.

Sodium mirror phytolamps
Note! DNaT and DNaZ lamps get very hot. You need to place them under the ceiling in special lamps with reflectors.
Video - Building a winter greenhouse with your own hands (part 1)
Video - Building a winter greenhouse with your own hands (part 2)
Video - Building a winter greenhouse with your own hands (part 3)
How to build a winter greenhouse with your own hands
It is more expedient to order a greenhouse with an area of more than 100 m 2 for growing vegetables or flowers for sale in a company. Greenhouse manufacturers offer ready-made turnkey solutions - hangars or block structures with automatic heating, irrigation and ventilation systems. Greenhouses made according to a standard project, in this case, are cheaper, moreover, they are adapted for mechanized maintenance.

You can build a small winter greenhouse for home use yourself.
Before construction begins:
- choose a place for installation, the shape and size of the greenhouse;
- draw a sketch, taking into account the location of the beds, the heating, irrigation and ventilation systems;
- perform the calculation of the necessary materials.
The winter greenhouse is located in a lighted place, sheltered from cold winds. It can also be attached to a garage, utility block or residential building from the sunny side. A separate winter greenhouse is oriented from north to south, while the northern wall is made deaf (made of insulated materials) or in the form of a vestibule.

The simplest and most reliable design that provides good thermal insulation is a gable greenhouse with main walls made of foam concrete with insulation. The southern end wall is covered with polycarbonate in two layers. The vestibule on the north side is designed to protect from the cold wind and at the same time serves as a boiler room and pantry for inventory, boxes and racks. The slopes of the greenhouse are covered with reinforced polycarbonate. The wooden truss system eliminates the appearance of cold bridges. The sketch of the greenhouse is shown in the figure.

For a greenhouse of the indicated dimensions you will need:
- concrete grade M200 for the foundation - 3.6 m 3;
- fittings Ø10 mm - 100 m;
- fittings Ø6 mm - 130 m;
- edged board for formwork, 25 mm - 1 m 3;
- foam concrete block 200x300x600 mm - 170 pcs.;
- masonry glue (25 kg) - 9 bags;
- polystyrene S 100 mm - 3.3 m 3;
- board for rafters 40x150 mm - 0.5 m 3;
- polycarbonate 10 or 16 mm thick - 5 sheets;
- end profile L=2.1 m - 15 pcs.;
- ridge profile L = 6 m - 2 pcs.;
- connecting profile L=6 m - 12 pcs.;
- self-tapping screws with a thermal washer - 200 pcs.
Note! The construction of such a greenhouse takes an average of 1.5-2 months. Of these, 3-4 weeks are spent on the construction and drying of the foundation. At the same time, the air temperature should be positive, optimally - from 15 to 23 degrees.
Foundation for a greenhouse
For structures made of foam concrete, a solid foundation is required. The best option is a shallow strip foundation made of concrete with reinforcement. The foundation is necessary not only along the perimeter of the greenhouse, but also in place of the capital partition separating the vestibule and the greenhouse.

Step 1. Site clearing and marking. The area under the greenhouse is cleared of debris and vegetation, leveled if necessary. With the help of pegs and twine, mark the dimensions of the structure.

Step 2 Foundation layout. Cast-offs of bars and boards are installed at the corners of the future structure. They fix the twine on them and pull it around the perimeter of the foundation. Check the perpendicularity of the corners and the equality of the diagonals. With the help of twine mark the outer and inner contours of the foundation.

Step 3 Soil sampling and sanding. According to the markings obtained, they dig a trench 50 cm deep. The bottom of the trench is covered with a mixture of sand and gravel or just sand, tamped, periodically watered.
![]()
Step 4 Formwork installation. The formwork is made from a 25 mm edged board. If the soil is dense, the formwork can only be placed above ground level; on weak soils, it is installed at the bottom of the trench. The scheme of fixing the formwork is shown in the figure.

Step 5 Reinforcement. The foundation is carried out with mandatory reinforcement, otherwise, during seasonal ground movements, the foam concrete masonry may crack. For longitudinal reinforcement of the tape, reinforcement of the brand 10-A-III (A400) GOST 5781-82 is used, for transverse screeds - 6-A-I (A240) GOST 5781-82. Reinforcement at intersections is knitted with annealed wire. Particular attention is paid to the reinforcement of corners.

Step 6 Pouring concrete. For the foundation of the indicated dimensions, 3.6 m 3 of concrete will be required. It is quite difficult to knead it yourself - the process will turn out to be long and laborious, moreover, with layer-by-layer pouring, the strength of the foundation decreases. Builders recommend not saving and ordering ready-made concrete of the M200 brand. Concrete is poured into the prepared formwork, punched with a rod or a vibrating hose, and the surface is leveled.

Step 7 Ripening of concrete. The curing time of concrete depends on the temperature. Optimal conditions are 18-22°C, in this case the concrete will gain sufficient strength for construction in 14-21 days. Under a different temperature regime, it is recommended to withstand the foundation for at least 4 weeks. During drying, it is better to cover the concrete with plastic wrap to maintain constant humidity. When the top layer dries, the concrete is moistened with water.

Note! Formwork can be removed after 5-7 days. Formwork boards can be reused.
Foam concrete walls
For laying foam concrete blocks, it is recommended to use a special glue. It allows you to get seams of minimum thickness, and therefore reduce heat loss. Blocks can also be placed on cement mortar, but in this case additional insulation and plastering of the walls will be required.
Step 1. Waterproofing. It is performed using rolled materials (such as roofing material, stekloizol, bikrost or their analogues). A thin layer of cement-sand mortar is spread on a completely dried foundation (the ratio of cement and sand is 1: 4). Roll waterproofing is laid with an overlap at the joints and the surface is leveled with a rail and a level.

Step 2 Laying the first row. The first row of foam blocks is placed on a cement-sand mortar over waterproofing. The solution is applied with a trowel with a margin, blocks are installed and excess mixture is removed.

Step 3 Laying subsequent rows. All the following rows are placed on a special glue. It is applied with a notched trowel to all surfaces to be joined, both horizontal and vertical. The blocks are tightly adjusted to each other with light taps of a rubber mallet. The rows are laid with dressing for 1/2 block.

Step 4 Reinforcement. Reinforce the masonry with a welded masonry mesh every 2-3 rows. With a block height of 30 cm and an estimated wall height of 150 cm, 5 rows of masonry are obtained, so it is possible to lay a reinforcing mesh between the third and fourth row. Glue is applied over the grid, a block is placed on top. It is also possible to reinforce the masonry with the help of reinforcement bars laid in the grooves selected in the blocks.

Step 5 Doorways. Blocks for doorways must be cut to size. This can be done with a special hacksaw according to the template - the blocks are cut quite easily.

Step 6 Wall insulation. The walls are insulated from the outside with sheets of polystyrene. The thickness of the insulation depends on the region and ranges from 30 to 150 mm.

Table 1. The thickness of the insulation for the foam concrete walls of the greenhouse.
| Region | Polystyrene thickness, mm |
|---|---|
| South (Krasnodar, Astrakhan) | 30-40 |
| Volga region (Volgograd, Saratov) | 40-50 |
| Volga region (Ulyanovsk, Kazan, Nizhny Novgorod, Izhevsk) | 50-60 |
| Center (Moscow, Yaroslavl, Voronezh) | 60-70 |
| Northwestern Federal District (St. Petersburg) | 60-70 |
| DV (Khabarovsk, Vladivostok) | 70-80 |
| Ural (Orenburg, Ufa, Yekaterinburg, Perm) | 70-90 |
| Siberian Federal District (Irkutsk, Novosibirsk, Krasnoyarsk, Tyumen) | 80-100 |
Step 7 Wall decoration. The walls of the greenhouse can be finished with any moisture-resistant material, such as decorative bricks, siding or plaster for facades. Finishing will not only improve the appearance, but also provide additional thermal insulation and wind protection.

Decorating the walls of the greenhouse with decorative bricks
Note! Polystyrene can be replaced with foam or polyurethane. The use of mineral wool is not recommended due to the high humidity of the room.
Greenhouse roof
Racks, strapping and rafters are made of a wooden board 40x100 mm. The rafters are installed in increments of 50-70 cm (depending on the expected snow load).
Step 1. South wall. On the foundation, on top of the waterproofing, a bottom trim board is laid, fixed to the foundation with anchor bolts. Side racks from the board are attached to the foam concrete masonry on anchors. Intermediate racks and the upper harness are fixed to the corners and self-tapping screws.

Step 2 Upper harness. Along the perimeter of the block masonry, a board of the upper trim is laid with its fastening to the anchors. The fastening step is 60 cm. The upper trim is needed to distribute the weight of the roof over the entire wall, if you put the rafters directly on the blocks, chiseled loads are formed, due to which the foam concrete will begin to crumble.

Step 3 Racks and ridge beam. To fix the rafters, it is necessary to fix the ridge beam. To fasten it to the upper trim of the transverse walls, racks are installed strictly in the center, fixed with a corner and self-tapping screws, and then struts are additionally installed. The ridge beam is assembled from two boards 40x100 mm, fixing them on both sides of the racks.

Step 4 Rafter. The rafters are made from a board 40x100 mm. They apply the board to the ridge beam and the upper strapping of the longitudinal wall, mark the place washed down with a pencil. They wash down, try on the rafter leg in place and saw off the excess. The rafter legs are connected in pairs using metal plates in the ridge, and are also fixed with the help of corners and self-tapping screws to the ridge beam and the upper harness.

Step 5 Wall cladding with polycarbonate. Polycarbonate with a thickness of 10-25 mm can be fixed in one layer, this is enough for good thermal insulation. Begin sheathing from the end of the southern wall. Cut out polycarbonate to the size of the wall so that the stiffeners are directed vertically.

The upper sections of polycarbonate are isolated with a special aluminum adhesive tape. For the lower sections use. The cuts are closed with an end profile. Polycarbonate is fixed with self-tapping screws with a thermal washer. Similarly, the top of the northern wall and the wall between the vestibule and the greenhouse are sheathed.

Step 6 Sheathing slopes with polycarbonate. To connect the sheets on the slopes of the greenhouse, connecting profiles are used. For polycarbonate 10 mm, a one-piece profile is suitable, for 16 mm and 25 mm an aluminum split profile with a seal is required. They fix the coating through the profile so as not to violate the integrity of the polycarbonate.

The lower ends of the sheets are processed with a perforated tape and an end profile. From above, the slopes are connected using a ridge profile.

Note! After the installation is completed, it is necessary to seal all the gaps between the strapping boards and foam blocks with mounting foam or frost-resistant sealant.
Finishing the greenhouse
In the above project of the greenhouse, there are two doors, one leads from the street to the vestibule, the second - from the vestibule to the greenhouse. The street door must be insulated with polystyrene or other materials. The intermediate door can be made transparent - made of polycarbonate on a wooden frame. The door frame is attached to anchors with a length of at least 10 cm. The door is hung on hinges and equipped with a lock or lock.

Equip the greenhouse with the selected heating system, for example, a boiler and a radiator system. It is convenient to install the boiler in the vestibule, and bring the chimney through the main wall. Radiators or registers made of large-section pipes are located along the perimeter of the walls - with such an area of \u200b\u200bthe greenhouse, this is quite enough.

In a winter greenhouse, drip irrigation is convenient - it is suitable for most crops. The container is located in the vestibule and equipped with a heating system. Drip irrigation hoses lead to plants. For beds it is more convenient to use perforated hoses, for shelving - a system with droppers.
It is not difficult to make such a system in your personal plot. will provide you with detailed step-by-step instructions for designing and arranging drip irrigation using polypropylene pipes.


Lighting lamps are placed under the ceiling, while keeping in mind that some types of lamps get very hot and can damage polycarbonate. The use of lamps with reflectors increases the illumination of plants. The wiring is laid in a plastic or metal corrugated pipe and suspended from the greenhouse structures.

DNat lamp connection diagram
For growing plants in a winter greenhouse, beds or racks are equipped. When laying beds in a cold climate, the technology of biological, electric or water heating of the soil is used. In the southern regions, effective heating of the soil can be achieved with the help of sunlight. To do this, the main walls of the greenhouse are sewn up with foil or other reflective material, as a result, the illumination of plants and soil increases by 1.5-1.7 times.

 Mini greenhouses 20825
0
Mini greenhouses 20825
0
Have we answered your question?
Winter greenhouses are most often designed for growing early greens and vegetables, which not only allows you to have your own products in the cold season, but also, with good organization, makes it possible to make good money, since, as you know, the first vegetables have the highest price. However, before building such a greenhouse, you need to think carefully about heating it, especially in areas with cold and long winters. Although, of course, the choice of material, the location, and the size of the building itself affect the overall temperature in such a room.
Choosing materials for the greenhouse
The frame of the winter greenhouse can be made both wooden and metal. The first one is cheaper, but it less durable and not so durable, despite all sorts of modern impregnations that can cover it. Metal, although more expensive, but it withstands heavy loads and can last quite a long time.
For coverage, it is best to use cellular polycarbonate, because it has high thermal insulation and good light transmission. True, over time, its transparency decreases, but over the course of 6-7 years it demonstrates quite high light transmission. In addition, polycarbonate is durable and, at the same time, lightweight. It is very convenient to cut and mount on the frame.
Of course, glass is much more transparent, but its main drawback is fragility. In addition, it is a heavy material. For a winter greenhouse - glass is not the best option, because in a particularly snowy season it can can't stand the snow and simply crumble under its weight. However, if there is no particular choice, then a glass roof can also be used, but it must be installed under sharp slope, to avoid snow accumulation. In addition, when building a greenhouse, you can resort to different combinations, for example, make the walls glass, and the roof - film or polycarbonate.
How to choose a place for a greenhouse
The place for the greenhouse, if possible, is chosen calm and preferably on a hill- this to some extent will serve as an additional source of heating (in this case solar). If there is no natural elevation, then they often do artificial mounds. The foundation is not very deep: 50-70 cm. In addition, the greenhouse is equipped with special vents for ventilation.
In case the greenhouse will be exposed to the sun all day, care should also be taken to cover it with special mesh or blinds in order to prevent some sensitive plants from overheating. light and heat. This shelter should, if necessary, be easily raised and lowered.
 In order for the heating of the greenhouse not to be very expensive, it is better to install it as close as possible to the house, and even better to install it near the wall of the dwelling. This will make it possible to use the heating of the dwelling to heat the greenhouse, which will reduces costs compared to installing a separate greenhouse heating system. When choosing a heating system, you need to proceed from the type that functions in the house.
Electric heating in the winter greenhouse
- with electric heating, it is not advisable to use heaters, since the heating of the area will be uneven. In this case, it is better to lay cables in it when laying the foundation, which are used to install underfloor heating. In this way, it is possible to provide uniform heating of the whole room and provide additional soil heating;
- however, if necessary, especially if there is no other heat source, heaters can be used, but it is better to install them under the racks with plants. In this way, seedlings will not fall under direct flow of hot air, and it will be the soil that will warm up, albeit slightly.
Convectors
- you can also use convectors, several appliances with heating coils will heat evenly the whole room of the greenhouse;
- in this manner soil does not heat up which is a disadvantage.
Water heating
- when installing water heating, a pipe system is made through which warm water circulates;
- pipes are laid inside the greenhouse along the walls or under the floor, which allows you to heat the soil;
- for this heating system are used as metal, so plastic pipes;
- plastic pipes are preferred because they are more affordable, do not rust and easier to install;
- pipes are heated by gas boilers , can also be with electricity;
- it is undesirable to use metal pipes for heating the soil, since they susceptible to corrosion damage;
- This type of heating provides uniform heating and air and soil;
- not always popular due to installation difficulties pipe systems and often high cost the heating itself;
- such heating requires constant control.
Given the fact that energy carriers are an expensive pleasure, consumers have recently paid attention to infrared heating. Infrared lamps and heaters are used for greenhouses.
Infrared heating for greenhouses
- they do not heat the air, but themselves plants and soil heat is transferred from the soil to the entire room;
- if the heater is equipped with a thermostat, then it periodically turns off;
- turns on only in order to maintain the desired temperature, which is significantly saves electricity;
- infrared heaters and lamps are considered harmless for both humans and plants.
One of the most economical ways to heat a greenhouse can be wood heating using a Buleryan stove.
wood heating
- the stove is best placed in a kind of hallway in front of the greenhouse, and the chimney pipes run throughout the room with access to the outside on the other side;
- the greenhouse is heated in this way, and carbon monoxide exits through the chimney;
- however, the downside may be the fact that the laying of firewood needs to be done on average every 4 hours which is not very convenient at night;
- there are also wood-burning boilers for heating.
Air heating system
- one of the most simple and affordable greenhouse heating methods;
- with her help only the air is heated, and the soil remains at the same temperature, this type of heating is better to use in combination with others;
- for air heating, it is necessary to lay pipes inside the greenhouse in such a way that its end goes outside, near the outer end of the pipe you need to light a fire so that warm air could flow through pipes into the greenhouse;
- this type can be considered as alternative, because it requires regular monitoring and laying firewood.
It should also be borne in mind that for winter greenhouses it is recommended to install double layer polycarbonate, glass or film. This also serves as an additional method of warming.
Backup heat sources
 In order to provide the greenhouse with constant heat, it is best to install several heat sources in case shutdown or breakdown one of the energy sources. The most suitable for this purpose may be boilers with a combined heating method.
For example, in addition to electricity, use heating with wood or coal. This will help avoid unforeseen circumstances and do not freeze plants. It is also possible, in addition to, say, a gas boiler, to build a brick stove in case of possible failures. In addition, for emergency heating of the greenhouse in the event of a failure of any heating method, you can light a fire in a metal barrel, and place the barrel itself near the greenhouse, directing heat into a pipe that goes outside. For rapid heating greenhouses can also be used and gas burners. However, it is undesirable to use them for a long time, since gas is not the best for plants.
As an additional heating, it is also used biofuel. In areas with cold winters, it is really used only as an additional source of heat. Most often, horse manure, fallen leaves with pig or cow waste, undecomposed peat, and urea are taken for biofuel. You can also use plant waste mixed with garbage. When this mixture rots, carbon dioxide, which warms and nourishes the plants.
There are craftsmen who use non-traditional heating methods, such as a solar oven. To do this, near the roof are installed special containers with stones. During the day, the sun heats the air in the greenhouse through glass or film. It rises and lingers on the stones, heating them. Further, the stones give off heat and heat the air in the greenhouse.
On particularly cold nights, greenhouses require additional insulation. To do this, you can use foam, bubble wrap, or, say, burlap or carpet to cover the walls or roof. You can insulate both from the inside and outside. However, you must remember to remove opaque materials during the day so that the plants do not suffer from insufficient lighting. It would also be nice to set signal device, which would give a sign in the event of a critical drop in temperature.


