How to convert a color photo to black and white? How to colorize a black and white photo in Photoshop
If you want to drastically change a photo in just one simple action, then nothing beats converting it to black and white. A grayscale translation can also save an image that color correction can't help, or prettier a person who needs some serious teeth whitening or skin care. These problems almost disappear when you enter the black and white realm.
But does this mean that you need to set your digital camera to black and white? No no and one more time no! It is much better to shoot in color and then desaturate the pictures in Photoshop. In this case, you get a huge number of possible creative solutions, for example, the effect of partial desaturation, achieved by desaturating not the entire picture. And speaking of color, there are several tools in Photoshop that allow you to change the color of everything from a car to a hair on your head. In addition, you can give new life to old photographs by adding color to them.
You have probably heard the expression “As they pay, so we work!” In Photoshop, this expression is converted to "The fastest way is not always the best". In other words, for some tricks - these include converting a color image to black and white- you have to spend a little extra time, but the result is worth it.
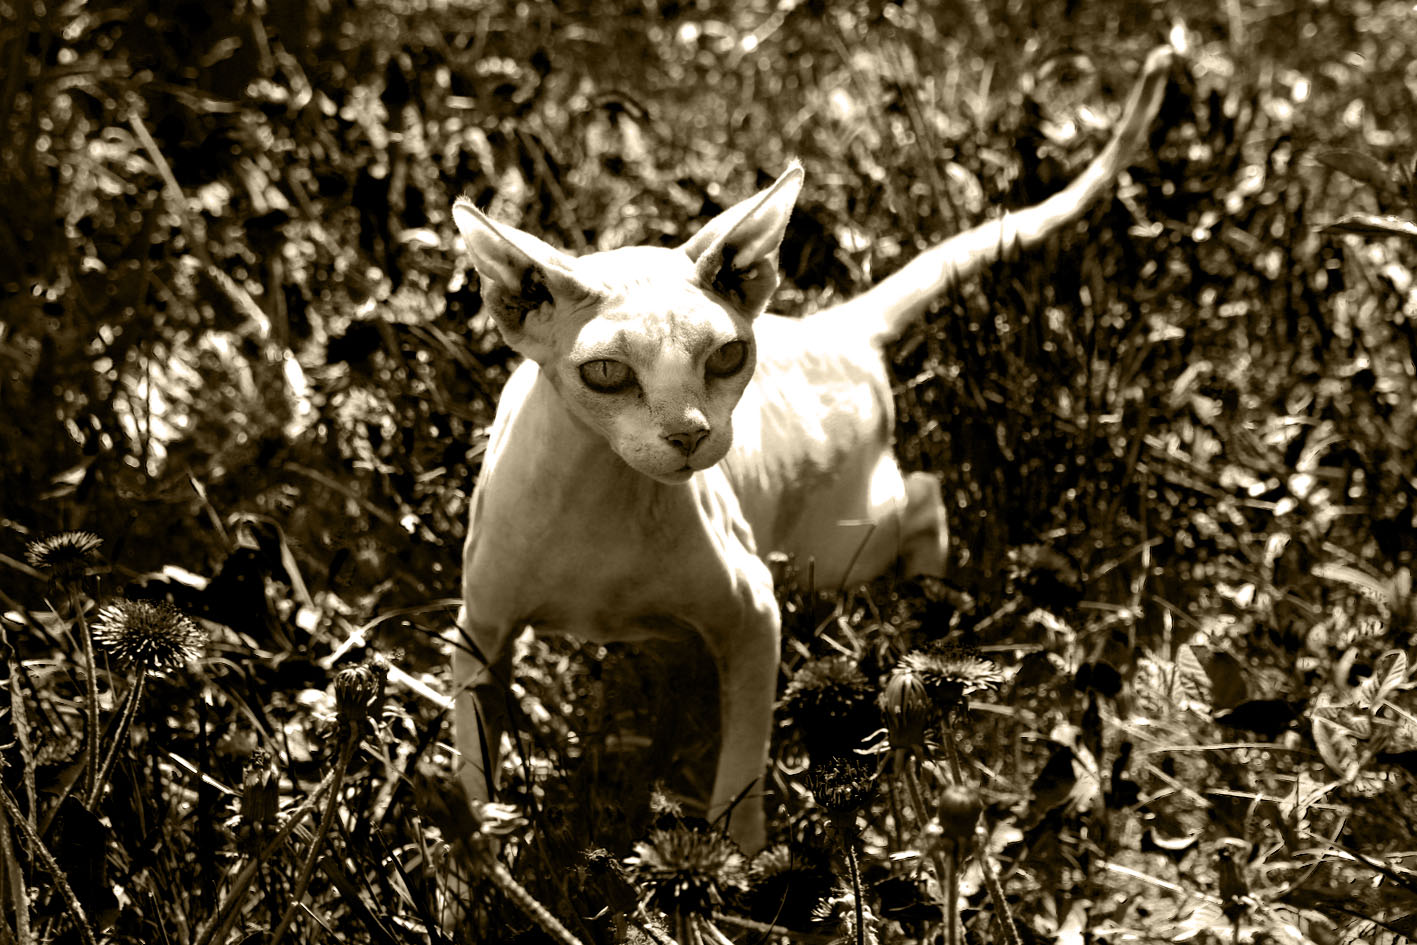
Let me explain with an example. Open a color image. I'll take Daska's photo.
Select the menu command Image => Correction => Desaturate (Image => Adjustments => Desaturate).
Desaturation means removing all colors from an image.

Photoshop converts the image to black and white without difficulty, but the result is unlikely to inspire you.
2. Create a Black and White Adjustment Layer.
Open palette Correction, selecting the menu item Window => Correction (Window => Adjustments), and click on the icon layer Black and white (Black & White) (looks like a rectangle, diagonally divided into black and white halves).

Photoshop will turn the image black and white and display several sliders and other controls in the palette that you can use to fine-tune the created layer.
3. Move the sliders until you get a high contrast black and white image.
Although the program has discolored the image, there is still room for improvement. Move the color sliders to make things in the image look even better. Moving to the right colors areas that were previously colored with the slider's color to a lighter shade of gray; moving to the left colors the areas a darker shade of grey.


In addition, a drop-down list at the top of the palette contains a lot of ready-made settings - select the list items one at a time to see how they affect the photo. If you click on the Auto button, Photoshop will show you how it thinks your grayscale image should look.
4. Save your photo as a PSD if you want to edit it later.
Lightning touch-up
You probably already noticed the Tint checkbox at the top of the Adjustments palette when you created the Black and White adjustment layer. If you check this box, the program will add a brown tint (called a sepia tone) to the entire image. If you want to use a different color, click on the colored box to the right of the checkbox to open the color selection dialog. This technique allows you to create the so-called false two-tone images.
Channel Mixer Adjustment Layers
Using Black and White adjustment layers is the quickest and easiest way to desaturate images, but . They have no advantage over adjustment layers.
First, make sure the Background layer (or the image layer you want to work with) is selected in the Layers palette, then click on the half black, half white circle button at the bottom of the palette and from the context menu select command Channel Mixer. When the Adjustments palette opens, check the box Monochrome at the top of the palette, and then move the sliders Red (Red), Green (Green) and Blue (Blue), as you like, or choose one of the presets from the drop-down list at the top of the palette.

If you want to darken or lighten the entire image, move the Constant slider at the bottom of the palette to the left or right.

Channel "Brightness"
As noted in the article on Lab mode got its name from the names of three channels. The letter "L" stands for the Lightness channel, in which the program stores all light values and thus all visible contours and details of an image. (Letters "A" and "B" stand for channels a and b, which store color information.) This means that the Luminosity channel, taken separately from the others, is a black and white version of the image.
To see what the channel looks like, open the image and select Image => Mode => Lab from the menu (Image => Mode => Lab Color). In the Channels palette, select Luminosity. If you like the resulting image, select Image => Mode => Grayscale from the menu and click OK when Photoshop asks permission to remove the color information.

In my case, it turned out too bright and pale. This option is not suitable, but you need to know about it. It looks different in different photos.
Converting to grayscale in the Camera Raw plug-in
If you are taking pictures in Raw, you can also use an external module to convert them to grayscale. This module is easy to use and does a good job of converting. To open an image in this format, double-click its file icon and it will automatically open in Camera Raw.
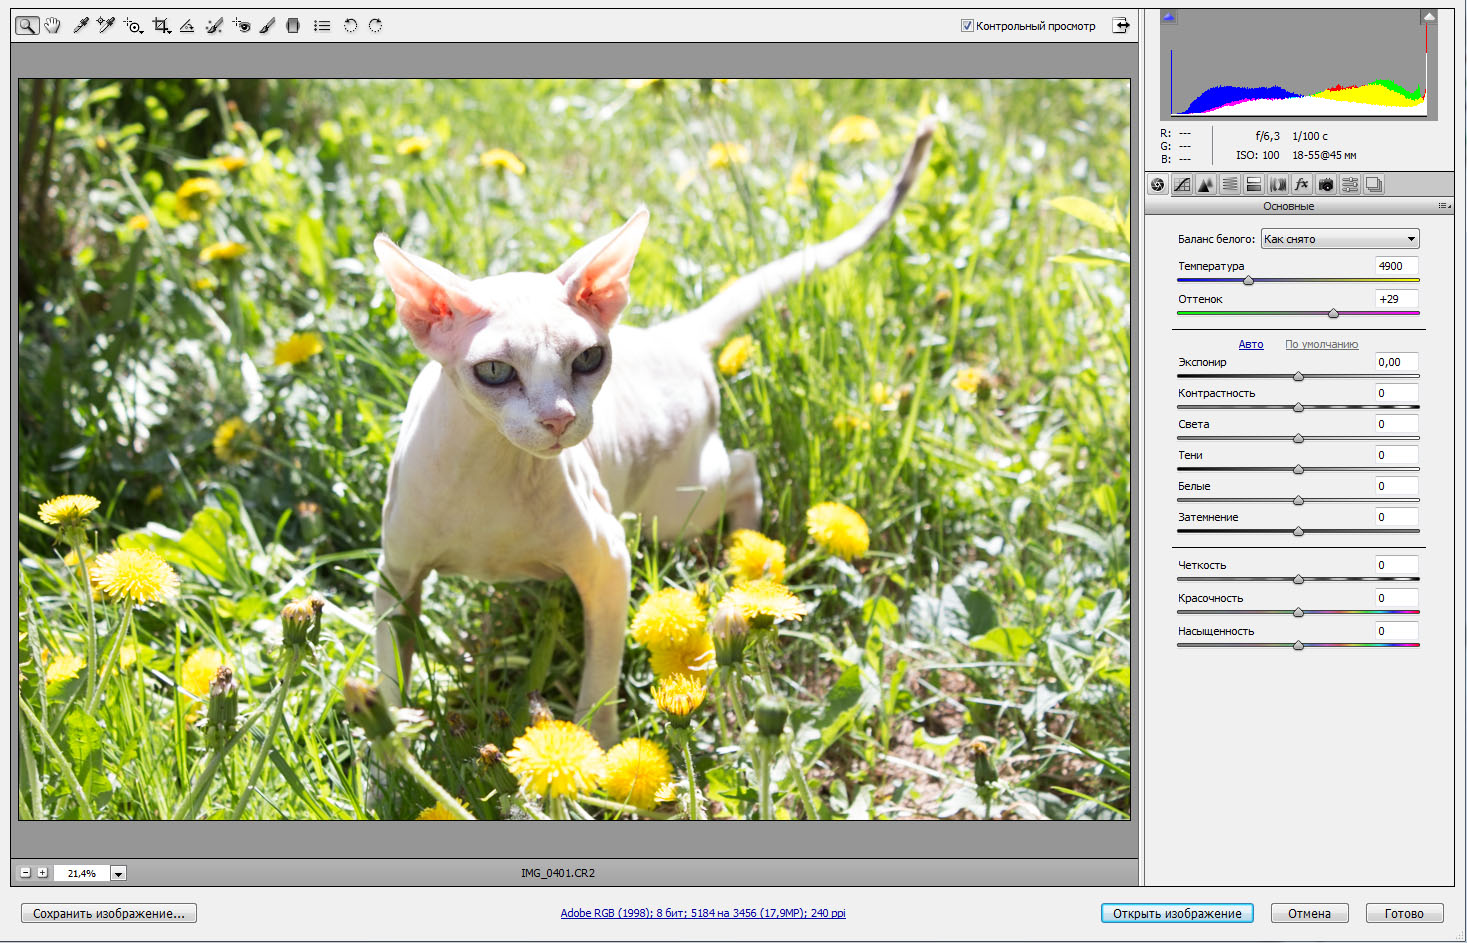
1. In the Camera Raw window, open the HSL / Grayscale panel (HSL / Grayscale).
To open this panel, click on the button of the same name. Then in that panel, check the box Convert to Grayscale. A group of sliders will appear on the right side of the Camera Raw window. To add contrast to an image, you can lighten a color by moving its slider to the right, or darken it by moving the slider to the left.

2. Open the Basic panel and move the Exposure slider to adjust the black and white image. Also move the sliders with various other settings in this tab and you will be pleasantly surprised how your black and white photo will play!

Even dandelions have become like dandelions!
Noticed an error in the text - select it and press Ctrl + Enter . Thank you!
HOW TO MAKE A BLACK AND WHITE PHOTO IN COLOR IN PHOTOSHOP
Today we will learn how to turn a non-color photo into a color one. I’ll make a reservation right away, for those who are looking for the “make photo in color” button in this article. Alas, such a button has not yet been invented. You can desaturate a photo with one click, but you can’t colorize it with the same click, because a black and white photo has no color information. So we have to work with our hands and fill our black and white image with color information in the most direct sense. Some plugins for Photoshop do a good job of colorizing photos, but now we will not discuss any plugins that we don’t understand where to get. Let's talk about what is available for colorization in Photoshop itself. And it has a lot.
The method of coloring a photo is simple and primitive. A five-year-old child can master it in 10 minutes. I will tell you about all the ways to colorize a photo, as well as show how this simple operation can be taken to a new, more professional level. So let's get started.
THE EASIEST WAY TO MAKE A PHOTO COLORED (blend color)
To colorize a photo you will need to be able to use the tool brush tool, as well as have an idea about the work of other Photoshop tools. The ability to select areas of a photo and the initial knowledge about layers and masks, which you can learn from my article Masks in Photoshop, will not hurt. In this tutorial, you will see in practice how you can automate work in Photoshop using masks, and have full control over the color settings.

I borrowed a photo from the collection of a photographer friend of mine. Black and white photographs look mysterious and conceptual, but what happens if we lightly colorize it? Create a new layer on top of the photo Layer > New > Layer or click on the little layer icon in the layers palette Windows > Layers

Now select a tool brush tool, a brush with soft edges, make it bigger and move the mouse over a new layer with some red. The natural result is a red daub on a masterfully taken photograph. It doesn't suit us. In order for the red color to be painted, you need to change the settings of the layer itself. These settings are called overlay settings. Color Mode. You can only find them in the layers palette. Layers, above the layers themselves. Click on this drop down menu and you will see a whole list of different blend modes. The point is that by changing the blending mode of a color, we establish new rules by which the color of the layer interacts with the colors of the layers below. The blend mode we need is called color, and its meaning is simple - it colors the image in the color we need, while maintaining the naturalness of the colors. Install Let's Decide color, choose the color you need, and decorate the girl's hair.

That's all. Quite simple isn't it? Save me the trouble of stretching this process out over 10 pages and demonstrating how I will step by step paint the skin, gloves, eyes, and so on. Coloring depends on your imagination, and realism, on the quality of work and the naturalness of the selected colors. Work with the brush, choose the size, adjust the invisibility opasity and fill, which you will find in the brush settings menu Windows > Options
This is the “mask” my wife sketched for a few minutes of work. Note that the layer blending mode is Normal. I hope you are convinced that making a color photo in Photoshop is very simple.

And this is what happens if you change the layer blending settings to color.

COLORING A PHOTO THROUGH LAYER STYLES (layer style)
And now let's start to go deeper and complicate the process. Complication, it is not in order to make work more difficult, but in order to make work easier. You know, all these kali mali on one layer are fine, of course, but they are more suitable for creative personalities, for those who like to sit and wind a clay pot on a gurney for hours. Smearing one color and another on this layer is perhaps convenient for artists from the academy who are banned from Google, so they still have not heard about Photoshop. Alas, even cartoons are drawn on a computer, 1000 drawings on paper, which are then quickly flipped over, remained in the 20th century. Personally, as a designer, I would like to have more control over color and settings. I would like to effectively and quickly tweak the colors through the menu, rather than redrawing the layer.
How can we bring more control over the image? To begin with, it would be nice to divide one layer into several layers. Let's create
really many layers. And each layer will be responsible for its own area. Create a layer "hair", layer "eyes", "gloves", "nails" and others. I started coloring the photo myself, creating thematic layers for this. Now the control process is more manageable, at least the coloring is not on the same layer. Any part of the coloring can be muted, turned off, in other words, do everything with it that can be done with a layer. Other coloring layers will remain untouched.

But it still doesn't make much sense. The color of all layers is still arbitrary. On the layer "Hair" you can paint as before with both blue and red. In other words, as before, Kali Mali, but more manageable Kali Mali, divided into sectors. And I would like to control the color. I want to change the entire color with one click, and not sculpt with a brush, constantly reworking the result with my hands. I'll show you how to do it with layer styles. layer style.
Create a layer and name it "Hair". Decorate your hair with any color, even green. Go to the layers palette and set the fill Fill on the 0% Thus, what you have drawn will become invisible.
Roughly speaking, we create some kind of raster area, turn off the filling fill and apply layer styles to the area. The area itself does not become invisible, as is the case with Opasity. The content of the region becomes invisible, but not the region itself. Therefore, the applied layer styles will be visible. But if we set the Opasity to 0%, the entire layer would become invisible along with the styles. We will give the area a certain style, but since we still have to apply layer blending to colorize, the original color must be removed by setting Fill to 0%, otherwise it will become translucent when blending and we will not get the desired result.

Now let's add a style to the layer. Layer > Layer Style > Color Overlay In the blend menu blend mode set the mode color. And in the box with the color, set the color we need.

If you forgot to set the fill to 0%, then this can be done in the same window, in the blending settings tab Blending Options. If you did it in the layers palette Layers, then the fill will already be set as it should.

Now we have full control over the color. Give each layer its own style. Double-clicking on the layer will automatically bring up Layer Styles, where you can change the color of the hair with one click. You don't have to smear everything 100 times, the color changes in one second, while you see the result in on-line mode. Choosing a color just got a whole lot easier.

That's what I call color control. Now let's go even deeper.
COLORING PHOTOS THROUGH FILL LAYERS (fill lyers)
You know what I think. These attempts to control the image are certainly cool, but somehow difficult. What if you need to change the color? You have to constantly click on the layer, call the style window, go to the tab color overlay and change something. Not such a fast process if you want to quickly change the colors of the layers. Of course, if we have 2 layers, this is not difficult, but what if we had 102 layers? We need to make this process even easier. This is where the real work with layers comes in. Now I'll show you how to make a photo color using fill layers.
Create a new fill layer Layers > New Fill Layers > Solid Color The fill layer completely covers the photo, filling the entire work surface. We just don't need this. As you can see from the layers palette, the fill layer is created with an empty mask ready. We need to turn the white mask into a black mask in order to hide the entire fill layer entirely. You can click on the mask icon and select Delete.

Or select the mask icon and do the same from the menu Layer > Layer Mask > Delete. Now create a mask from scratch, but not empty, but hiding. We did this in my article "Masks in Photoshop". Select Layer > Layer Mask > Hide All
And you can go the other way. The mask is the same working surface as the layer itself. The mask can be drawn by hand with any drawing tools. For example with a brush brush tool. Only unlike the layer, the mask is created in gradation from black to white, where white is the visible part, and black is the hiding part. Click on the mask icon in the layer palette. The mask must be selected so that you can draw on it. Then select the fill bucket Paint Bucket Toll and black color. Click on the work surface. The empty mask has become a concealing mask.

Now choose a regular brush brush tool and white color. Create a hair mask by painting on top of the mask exactly as you did.
draw on a layer. You can enjoy all the benefits of brush settings. Make it transparent, resize, soft edges. All this will only affect how visible our mask is. And of course don't forget to set it to blend mode. color to immediately see the result of painting. We could go the other way. For example, leave the mask white, and paint over the entire area around the hair with black. But you must admit, it is somewhat tedious to gloss over 70%
working area. And of course don't forget to work on the mask, the mask must be selected. This can be done by simply clicking on its icon in the layers palette.
As a result, you should get a fill layer, with a hair mask. The advantage of this method is that you do not have to dig into the color settings every time, which is not clear where. One simple click on the fill of the layer brings up a window with a choice of color.

Paint other areas of the photo in the same way. In some areas where color does not tolerate soft transitions, you will need to create selection areas. For example, in the case of nails, I created selections with the tool Magic WandTool and Polygonal Lasso Toll. In other cases, I managed to change the size of the brush and switch between soft edges and hard edges.

Once you've created all the layers with areas of the photo, you can create other tint layers that create hair tones, iridescence, and other lighting effects. This is the professional result. And now consider alternative options for coloring a photo.
MAKE PHOTO COLOR THROUGH CORRECTION LAYERS (adjustments layers)
Here's another way to color your photo. Use color correction settings adjustments. I already imagine how you open familiar to everyone Image > Adjustments, highlight the area and apply the effects. No, we certainly won't do that. We will get the same kalya mala. Of course, selecting an area, applying color correction, selecting a new area, applying color correction again is an option. Only this option is dull, without any possibility to tweak and change the results.

Therefore, we will use color-correcting layers. Layer > New Adjustment Layer. The color correction layer is the same color correction, only it is not applied to the graphics layer, but is a layer itself. Imagine that the photo is our layer. And on top we put red glass, which changed the color of the photo. The red glass is the color correction layer. You can remove it, make it invisible, apply layers, mask and more.
Which of the color corrections are suitable for coloring? In my opinion, color correction works best. Photo Filter. Select Layer > New Adjustment Layer > Photo Filter Or create a color correction layer via the layers palette menu Layers.

Now I want you to do all the things I described for coloring photos through fill layers. Create a mask, fill it with black and use a regular brush to apply a filter to the area you need. Here is what you should get:

At the same time, you can reconfigure the filter color, change the color and adjust the mask at any time. Just click on the color correction layer and in the palette adjustments adjust the color. If you don't know where this palette is located, open it via Windows > Ajustments. You'll see for yourself that it's as easy to color a photo through color correction as it is through fill layers, but I personally like the latter.
I hope that there is no need to demonstrate phased coloring. You already understood that in a similar way you need to colorize all areas of the photo. I will give the final version of the photo coloring and wish you successful experiments in Photoshop. Now you know how to make a photo in color.
Hi all! As usual, I am with you, Dmitry Kostin. And today we will photoshop again. Remember how we did? Be that as it may, this is not surprising, since it is not difficult to discolor an image. But how do you turn a black and white photo into color? Is that possible?
Of course available. Already entire films are coloring. What is there to make some image color? But it's still a very interesting experience. Can you imagine? You can think of the colors you would like to see in this photo. For example, you can set the color of eyes, hair, skin, clothing and much more. This is how I colored old photos. It turned out funny)
Let me not make long introductions. Let's start coloring right now. Open any b/w photo (I chose a photo I found on the Internet).
Just look at what mode the photo is in right away. It's just possible that it is saved in the format "Greyscale", then you just won't be able to work with color.

Change the color mode to RGB. To do this, go to the top menu and select the item "Image" - "Mode". Well, if it's not the RSL, then put it.
Let's look at the first method, namely the familiar one.

Overlay Options
Here is another fairly effective trick for coloring photos. The main thing here is to create a separate layer for each element. I took a new photo for these needs.


By the way, this was the very first method that I learned about. When I found out about it, I liked it so much that I colored a lot of photos).
Layer mask
Well, the last way of transformation for today is with the help of a layer mask. Let's get straight to the point.

Well, the result is a beautiful color photograph and it looks completely different. Oops, I just screwed up a little. But you can always fix this.

I never cease to be amazed at the power of Photoshop. Indeed, in many cases the same problem can be solved in several ways, and you yourself can choose the method that suits you best. By the way, which one do you like best? Or do you have your own way of how to make a black and white photo color in Photoshop, which I have not described here? Please write in the comments.
If you want to explore the possibilities of Photoshop in the shortest possible time and learn how to work with it, then I strongly recommend that you look great video course. Everything is told in detail in it, everything is told in human language and laid out on the shelves. The material is easy to digest. So I recommend.
Well, I'm done for today. I hope you enjoyed my article. Be sure to subscribe to my blog updates, then you will always be aware of the most relevant information on the blog. I will not spam. Promise). And I wish you good luck in mastering Photoshop. Bye Bye!
Sincerely, Dmitry Kostin.
Are you curious to see what black and white photographs from your old albums would look like if they were colorized? Think you need to spend a lot of time in Photoshop for this? It turns out that you can make an image in color using a special online program! But let's talk about everything in order.
Colorize a black and white photo online in one click in Algorithmia
In order to make a picture black and white online, dozens of Internet resources have been created, but only one is provided for the reverse function - Algorithmia. The work of this unusual site is built on the practical application of neural networks. In addition to the fact that he can convert an image from black and white to color, he can also:
- determine the area depicted in the photo;
- to distinguish the faces of people in the pictures;
- analyze the positive/negative mood of the given text;
- and much more.
Algorithmia has an English-language interface, but since the section we need - Colorize Photos - implies only one function, working with it does not cause any difficulties.
So, upload your bw photo, which we are going to colorize - this can be done by selecting a picture on a computer or entering a link to its location on the Internet.
If you just want to test how to turn a black and white photo into a color one, you can choose one of the pictures offered here for an example.
The coloring process takes about half a minute. Next, we are offered to evaluate the photo before and after.
 Move the purple slider to see the effect of the changes
You can save both a fully colored drawing and the comparison itself - a photo partially in color and partially in b/w. I was a little disappointed with the watermark on the finished picture, but it is quite compact and modestly located in the corner. You can get rid of it by simply cropping the image.
Through several experiments, we found out that the service copes best with painting skin, water and trees. The clearer their boundaries, the better the result.
 Let's compare - on the left is the original photo, which we discolored and uploaded to the site, and on the right - its colorized version
 As you can see, Algorithmia distinguishes people well and automatically colors the skin in beige tones. True, the service does not feel the borders very well, so the cardigan, just in case, was also made flesh-colored.
In the background behind the girl, the editor "didn't recognize" the Christmas tree, so he left it just a dark spot. But he clearly defined the color of the gift and jeans and did almost everything right, except for the beige trouser leg in the foreground and very blurry borders. The service decided to “revive” the bird in the corner of the picture, so it made it yellowish.
In general, of course, there are certain flaws in the result, but all the same, Algorithmia deserves respect, if only because it is the only site that allows you to turn a black and white photo into color.
How to colorize a picture in Photoshop: a simple guide for beginners
We want to say right away that this method will require much more time than the previous one. Also here you will need minimal skills in Photoshop, and the more of them, the more beautiful the result will be.
Load the image into Photoshop and create a new empty layer. Next, use the "Quick Selection" tool and click on the objects that we are going to convert to one color.
 Use the Alt key to deselect unwanted area
Select the tool "Brush", select the appropriate color and sketch the selected fragments.
 If you want the shades to be not too saturated, you can reduce the opacity and pressure of the brush.
  In order to preserve the presence of shadows and color transitions, change the layer blending mode to "Overlay"
  It already looks much more natural.
We repeat the same operations with the rest of the objects in the photo. Recall the sequence:
- create a new layer;
- select a fragment;
- apply the desired color;
- change the layer's blend mode.
 For convenience, it is better to name each new layer in accordance with the fragment being painted.
 If the edges are not handled too carefully, then this will definitely be noticeable and the picture will look unnatural. We recommend using the "Gaussian Blur" function with a small radius to smooth out all the imperfections a little.
 In the "Filter" section, select "Blur", and then - "Gaussian Blur". Then just control the radius until you achieve an organic result.
 Let's see what happened in the end. On the left is the original photo, which we then discolored, on the right is its color version.
 In general, the new image looks quite natural, although many shades differ from those in the original version.
 Summing up, we can say that making a black and white photo color in Photoshop is much more difficult and longer than using an online service. For comparison, let's say that the whole process took us more than an hour, although in Algorithmia everything would be ready in a few seconds. True, the result in Photoshop is more organic and predictable, and you can control all the moments yourself.
So far, these are all ways to colorize a black and white photo. Therefore, decide what is more important for you - efficiency or quality of the result, and rather use all the advice received in practice!
Hello, dear readers of my site! Today I will tell you how I add color to b/w photos.
This method is not new and not mine. Once I spied it on YouTube, now I will try to repeat it. During the campaign, I am sometimes asked to add color to old black and white photographs. This was the reason to write this article on the transfer of b / w images to color.
How to colorize a black and white photo in photoshop
1. First we need the original photo. I took a photo from the article "". There she is:
2. Since old photographs are often digitized using a conventional scanner, they acquire a greenish or bluish tint. Therefore, we translate the photo into black and white using Photoshop, more precisely into shades of gray. This is done in several ways, but for this method it is better to do it as follows. Pressing a keyboard shortcut Ctrl+U and drag the slider to the very beginning, as in the screenshot below:

As a result, my photo has changed a bit:
That's it, now we can quickly and easily turn any photo into black and white in Photoshop.

And we give it a flesh color, as I usually start by painting the skin of the face, arms, legs, etc. Initially I choose a color with a code #ffcc99:

Give it a blending mode Color (“Color” in the Russian version of Photoshop). Who cares that we are doing this mode, then we enter in the google search "Color blending mode". The first couple of articles give an exhaustive answer. In Photoshop, it is at the very bottom:

4. Now select the brush and color white and paint over the areas that we need to color. At the same time, if you made a mistake and painted over the excess, then change the color of the brush to black and adjust it. As a result, I gave the skin color as follows:
Change the flesh color in the new layer to the one with which we will dye the hair and give color to the hairstyle:
6. Now, step by step, we create layers and give color to all objects in the photo. I painted only the bride, since there are a lot of details in the photo, I will have time to color everything and update the article, but now we are making a color portrait from a black and white portrait of the bride. Paint lips:
7. To give the eyes more expressiveness, I simply created a new layer by pressing the keys Shift+Ctrl+N. Selected tool Brush (Brush) and gave it a color close to black (code #161616 ) and summed up the lines of eyelashes, eyebrows and tinted a fountain pen (actually it is ballpoint or gel, I don’t remember already). As a result, I got this photo and the following layers:
8. For comparison, I post the result of how I made a color photo from a black and white photo using Photoshop:
Original black and white photo
Final color photograph
If you have any questions about how to add color to a b/w photo, then ask them in the comments or through the feedback tab.