The most interesting DIY crafts on the theme of spring. Applications on the theme of spring: step-by-step instructions for making DIY crafts from paper, napkins and cotton pads Collective application spring
For the successful versatile development of the child, the development of fine motor skills of the hands is of great importance. One of the types of such activities are colored paper applications, the templates for which were developed by methodologists, taking into account the characteristics of the age groups of preschoolers.
It is important that the complexity of the task corresponds to the age of the child, that the classes are carried out systematically, gradually becoming more difficult, and take place under the supervision and with the help of adults.
Paper applications- a creative process through which children learn about the world around them and acquire many skills. In addition to the development of fine motor skills of the hands, this is coordination of movements, the study of colors and their combinations, the concept of composition, acquaintance with various materials and textures, the development of observation, imagination and fantasy.
Working on the application in a team contributes to organization, endurance, accuracy. It is also necessary to note the development of spatial imagination: while doing appliqué, children create a whole from several components and, conversely, learn to divide the whole into parts.
Scientists have proven that in the cerebral cortex, the center responsible for fine motor skills is located next to the speech center and contributes to the development of speech skills.
Types of applications according to the template
There are three main types of applications:
- subject - the cut parts have a simple, clear shape and proportions, an image is created that is not associated with any plot;
- plot-thematic - correspondence to a certain plot (taken from a fairy tale or invented independently);
- decorative - decoration of postcards, photo frames with patterns of geometric shapes.
Simple applications for children 2-3 years old
Simple appliques from colored paper using templates can be practiced from 2 years old. However, some experts believe that children from 1 year old can also perform feasible tasks.
The initial lessons are gluing pieces of paper on a sheet in any form. At this stage, the child must understand and remember the basic actions: spread, turn over, attach, smooth. The process itself attracts kids so far, they will strive for the result later.
At the second level of complexity, templates are used. The child must also place the elements randomly, but within the contour, and a certain image appears.
 Application template from colored paper "Hedgehog"
 A template is a schematic image of a future picture, drawn or printed on a printer. Simple templates for colored paper applications can be, for example, a Christmas tree with balls, a tree with apples and others.
For such work, you need to prepare elements: balls, apples, etc. The child must determine for himself how to place them on the templates.
 Application template "Palm tree"
  Application template "Flower"
 For young children, it will be interesting to perform a simple breakaway application. The kid watches how the adult tears the paper into long strips, then he tears them into pieces. These pieces need to fill the contour. 
If the child wants to tear the paper himself, then these uneven, awkward strips can also be used to make an application, for example, grass. Ants are drawn with finger paints.
Further, the task becomes more complicated: you need to get the element to a specific place in the template or the drawn contour. So, with the help of cut out circles, an image of a caterpillar is made. At this stage, children are interested not only in the process, but also in the result. 
When making applications from colored paper using patterns and contours with children under 3 years old, prepared cut-out elements are used.
A three-year-old child can already be taught how to work with scissors with rounded ends.

At the same time, it is necessary to explain how to properly hold scissors and paper so as not to get hurt. You need to start with straight cuts, then work out the bends and roundings.
At this age, children are already able to create simple plot pictures. The elements glued onto the template allow you to create a specific image.
The background for the application can be a drawn contour with partially drawn elements. For example, children can populate a template aquarium with algae and stones at the bottom with inhabitants: fish, jellyfish, etc.
An interesting activity can be the connection and gluing of the cut picture. If the child copes with such a task easily, it is recommended to complicate it: add raindrops to the umbrella, glue windows to the house with an attached roof. Such activities develop fantasy, observation, a sense of proportion.

Applications for children 4-5 years old
At this age, colored paper applications and patterns for them become more difficult. Preparing, together with an adult, elements for a future picture, the child shows more independence: he cuts out, selects colors and, thus, gets an idea about the composition.

Such activity develops logical thinking, allows you to show creative inclinations.
For children 4-5 years old, making postcards is an exciting activity, which they then give to their parents and friends.
The base is folded in half and elements are glued inside the card, forming a plot picture.
The templates developed by experts are only examples to indicate the direction of work.
Parents and educators can contribute their ideas. For example, the use of a cut-out contour of the baby’s palm in the application - such pictures cause amazement and delight in children.
 Applications with a palm
 The application technique from one circles reveals for the child the relationship of parts and the whole.
Developing the creative imagination of the child, you should show him various methods of working with paper: for example, fold it in the form of an accordion. For such a picture, you need to prepare the base, apply the contours. The gluing process is also complicated. 
Complex applications for children 6-7 years old
Children of senior preschool and primary school age already have certain skills.
Classes with colored paper appliqué using templates during this period help to further develop fine motor skills, thinking, memory and concentration, and the ability to plan one's activities is developed.
An important circumstance is that the child foresees the final result of his work. 
At this age, children consolidate the skill of cutting out individual details and solid silhouettes, symmetrical elements from paper folded in half, as well as the ability to create compositions and correctly arrange their individual parts on the basis.
At this stage, children learn color combinations, analyze and compare details. The texture of the material also becomes diverse: in addition to ordinary colored paper, crepe (“crumpled”), highlighted (glossy), textured (embossed or imitating velvet), and foil are used.
During this period, you can move on to voluminous symmetrical compositions. 
To perform such a task, templates (clouds, balloons) are cut out in the usual way. Next, two identical templates are folded in the center and fastened together (can be sewn). Prepared elements are glued to the base.
To make a three-dimensional bird, the template is folded in half and glued together, except for the wings, which are folded along the dotted line. 
The result obtained can be glued with one side and a wing on the base (in the form of an appliqué) or turned into a craft by tying it to a thread and hanging it on a twig. 
Having learned the basics of composition at the previous stages, children of 6-7 years old are able to create whole pictures - landscapes, still lifes, using ready-made templates for applications from colored paper or making them with the help of a teacher or parents.


Applications using a disposable plate
Disposable plates are a convenient material with which you can create original and beautiful compositions. Made of polystyrene or cardboard, in different colors, with different embossed patterns, they can be both the basis for the application and the elements for it. 
Children can be involved in making applications from colored paper on a disposable plate using templates from a young age. On a prepared colored background, children arrange simple elements in the form of a pattern.
A more complicated option is to use two or more colors for the background and more complex elements. Children 6-7 years old already make thematic compositions on plates or use them as material for individual elements.
Examples of gradually becoming more complex applications on plates: 
Combined applications
When making applications from colored paper, patterns can be diversified by combining different materials.
Grain applications
This type of application can be done even with small children. The algorithm of work is as follows: an adult applies glue to the prepared drawing, the child pours grits on it and presses it lightly with his finger. 
The remaining non-glued grains must be shaken off. Such an activity brings up attentiveness and accuracy in a child.
Older children can use different types of cereals. In this case, the glue is applied alternately to individual sections. For the colorfulness of the picture, it is recommended to pre-tint the grits with gouache in different colors. As a template, you can take your own drawing of the child, this stimulates him, inspires him.

Button applications
To perform such an application, preliminary preparation is necessary. Having studied the drawing and choosing colors, the child, with the help of adults, selects buttons that are suitable in color and size. Then you should lay them out in a drawing to represent the desired result, and proceed with gluing. 
For younger children who do not yet possess the necessary skills, you can apply a pattern according to the template on a layer of plasticine - the child will attach the buttons by pressing. This technique is applicable when working with cereals.
For combined applications, cotton wool, napkins, eggshells, natural materials - leaves, petals, seeds and much more are also used.
Multi-layer applications
Multi-layer (overhead) applications of colored paper or other materials are made using templates designed or made independently.
Such work develops spatial imagination, brings up aesthetic taste. They are made of paper, fabric, leather, felt - the main thing is that the edges of the material do not crumble. 
Multilayer applications, like other varieties, come in varying degrees of complexity. For little ones, this is a simple gluing of parts on top of each other. By pinning elements from only one edge, you can create a three-dimensional effect.
More complex appliqués are characterized by more detail and require good scissor skills, a sense of proportion and color.

Older children, with developed fine motor skills of their hands, with the skills to make complex details, create real works of art - unusual compositions and even portraits. Light and shade effects give them a special brilliance.
Multilayer application is already a truly creative process in which the imagination and artistic abilities of the child are manifested. It is necessary to think over the image, color scheme, sequence of actions, so such work implies a certain level of intelligence.
Applications from pieces
Applications from cut or torn pieces of colored paper using templates are a fairly simple look, even small children can do them. A drawing must be applied to the base sheet. In addition to ready-made templates, you can use children's coloring pages or come up with a sketch yourself.
The production of appliqué elements is carried out together with the child - small children are happy to tear the paper into pieces. If you already have scissor skills, you can allow these elements to be cut out.
An important detail: the younger the child, the larger the fragments should be.

 After choosing the right colors, you can start gluing. Glue is applied not to small parts, but to the template, in sections.
When working with kids, this process is carried out by an adult, older children themselves apply glue with a brush. When gluing pieces of paper, the child must exactly fall into the contour.
A kind of appliqué from pieces is trimming. This technique is quite complicated, but for children of 6-7 years old it is quite within their power, especially when working together.
To master the technique of facing, teachers and parents are offered master classes on this topic.

Autumn themed applications
The bright colors of autumn make it possible to create colorful pictures of autumn nature. For applications on this topic, both colored paper and natural materials are used: multi-colored leaves, petals of late flowers, seeds, spikelets, twigs and other objects. 
When making autumn-themed applications from colored paper according to templates and in a free composition, the main attributes are preserved - flowers, mushrooms, fruits, acorns, tree silhouettes are cut and painted. An obligatory component is autumn leaves.
When working with natural material, you need to prepare it. The collected leaves must first be leveled and dried under pressure. If the leaf needs to be given any shape, then a fresh leaf is used for this, which is then dried.
For collages and mosaic paintings, you can prepare cardboard templates on which elements are glued. 
Autumn nature is fertile ground for the flight of children's imagination. Leaves appliqués, placed in a photo frame, will decorate any interior.
Autumn lanterns will also be a spectacular decoration. To do this, a glass vessel is glued on the outside with multi-colored leaves (paper or natural), a small candle is placed inside.
Winter themed applications
To create winter and, in particular, New Year's applications, any of the described techniques is used, depending on the age of the children.
The most common type of winter applications are snowflakes - this is a subspecies of silhouette-type applications. It is recommended to fold the sheet correctly, cut off the edge and sharp corner, it is recommended to make cuts first on plain paper - this is how the skill is developed.
In addition, pendants made of such snowflakes decorate the room. Thin, airy snowflakes can be stuck on windows and other surfaces. 
For young children, it is better to prepare templates (circles with an outline) and make a broken snowflake from pieces. For flat, voluminous, multi-layered snowflakes, it is required to prepare patterns for cutting.
To make a traditional Christmas tree, kids use green paper triangles, a snowman is made from white circles, a teacher or parent helps to complete the application with details. 
Older children can be invited to make a Christmas tree from strips of paper or create a picture of a winter forest using templates using small pieces of paper or cotton wool. 
A tree made of paper balls looks bright and voluminous. For this, a template and elements are made of crepe paper. The main color is dark green, multi-colored balls are made for the garland.


An interesting application with the image of winter accessories allows children to show their creative imagination.
Hats and mittens can be decorated with any ornament, animal figurines, winter pictures, beads or rhinestones.
Cotton wool is used to imitate fur. 
Using a disposable plate, you can make a polar bear mask craft. Holes are cut out in the plate - eyes, the surface is pasted over with pieces of paper, a disposable cup is used for the nose. 
Senior preschoolers and elementary school students are able, under the guidance of adults, to create complex winter landscapes using mixed media. 
Spring themed applications
Snowdrops and lilies of the valley, starlings and flowering trees - these signs of spring are traditionally used in children's colored paper applications using templates. The smallest perform simple tasks, placing prepared elements on the contours. The same images can be complicated by adding pictures of spring nature. 
More complex compositions - voluminous, multi-layered, with a large number of elements - are created by children who have the skills to work with glue, scissors, a brush and use different techniques. 
Lilacs in a vase of cereals, a spring picture in the technique of drawing and application - these and many other ideas are offered by experts to parents and educators for developing activities with children. 
Application is a visual activity. Having achieved the desired result, the child experiences aesthetic pleasure, thereby joining the world of beauty, the world of art. A simple and accessible way for children to create artwork makes applique one of the favorite types of educational activities with children.
The seasons change each other: spring, summer, autumn, winter, and so on year after year. And it was not for nothing that we began the enumeration from spring, because spring is the time of the birth of a new life, grass blooms in spring, trees turn green, rivers are freed from icy fetters. Applications on the theme "Spring" are especially popular in kindergartens and schools, because we are all so happy about the arrival of spring! For children, spring is an omen of summer, which means holidays.
Spring has come, and with it come interesting ideas for crafts and applications that can be done both in kindergarten and in grade 1. Such applications can be made from anything: from cotton pads, from napkins, from colored paper, from cereals and pasta. There are really a lot of ideas and materials, the main thing is to choose an interesting and beautiful plot, because spring is a time of inspiration!
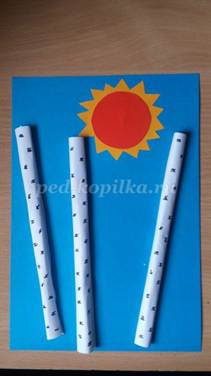
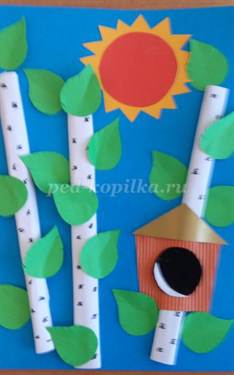
spring forest
The first master class on the theme "Spring" with templates is one of the versions of applications on spring themes. We will make a spring forest that has just woken up from its winter sleep.
To make crafts, take:

- Colored paper. You can also take velvet paper for some elements;
- White paper;
- Colored cardboard;
- Glue;
- Pencil;
- Black marker or felt-tip pen;
- Ruler;
- Scissors;
- Cut out templates (see photo).
It is better to cut out the templates in advance and distribute the ready-made cut-out figures to the children.

Before starting work, remind the kids about safety when working with scissors so that children do not damage clothes or fingers.
So, let's get to work.
- Let's work on the details first. Take white paper, cut into three identical strips. We twist the strips so that we get three identical tubes - these are birch trunks. We will draw a drawing on them with a marker - thin black markings on the bark.


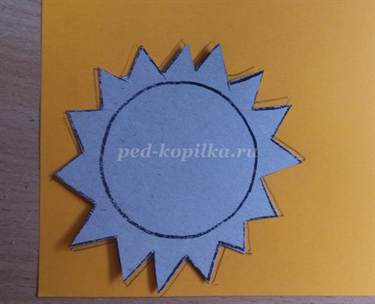
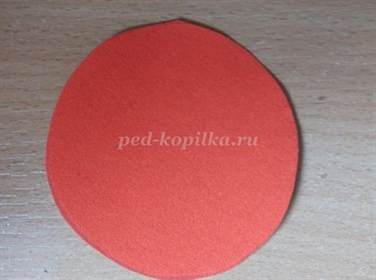
- Next, draw a pattern of the sun on yellow paper and cut it out. From red velvet paper, cut out the middle of the sun according to the template.

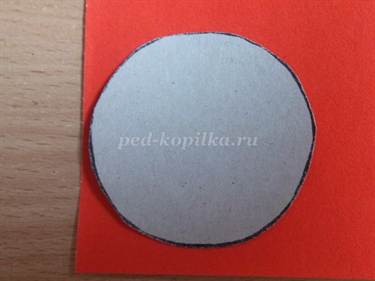
- When the details are ready, we begin work with glue. Glue the yellow sun on the blue cardboard first, then the red middle on top of it.

- Now glue the birch trunks. You can arrange them any way you like.
- Next, we will make a birdhouse. From colored paper or cardboard, cut out the details of the birdhouse according to the templates and glue them on one of the birches.


- Then we move on to birch leaves. We take green paper, circle the leaf patterns and cut them out. To get several leaves at once, you can fold the paper in several layers and only then cut out the leaves. With scissors we will give them volume, slightly incising, and bend in half. So our picture will look more voluminous. Glue the leaves to the birches.


- Cut out bird patterns from black paper. You can use velvet paper to show texture.

- We glue birds on tree trunks, glue wings cut out of any color of paper to them.

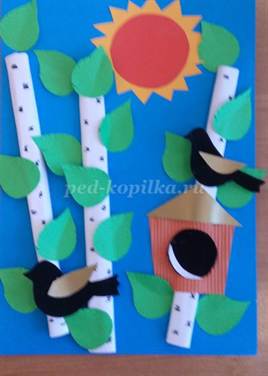
In addition to birds, butterflies can be placed on the picture. Application is ready! Such an application will be easy for kindergarten, for school and for extra classes.

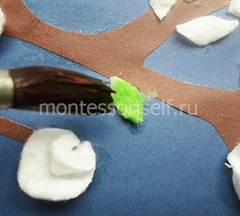
Craft from cotton pads

Applications from cotton pads can be found more and more often in kindergartens and schools, this is already a fairly familiar material for creative undertakings. The application on the theme "Spring" did not bypass this "field" of ideas, about this the next master class.
We will need:
- Colored cardboard for the background. Colors are better to choose blue, silver or lilac;
- Brown colored paper;
- Multilayer cotton pads;
- Paints and brushes;
- Glue.
Let's get to work. Cut out a tree branch from brown paper and glue it to the cardboard.


Give each piece a round shape with scissors.

Now we need to turn each of the resulting circles into a miniature ball. To do this, fold the outer edges to the middle. Look at the photo, it clearly shows how to do it.

We will need as many such balls-lumps as there are branches on your cut branch. Glue the balls to it.
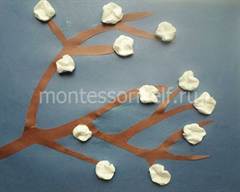

And stick to our work.

Now let's start coloring our "cotton" picture. You can take any paint - watercolor, gouache, acrylic. We cover each leaf with green paint. To give different shades, you can experiment with water: for a more saturated color, use more paint and less water, and, conversely, for lighter shades, use more water, less paint.
Do not overdo it with water, because cotton wool absorbs it very well, so you just need to barely touch it with a brush, as the entire fragment becomes colored.
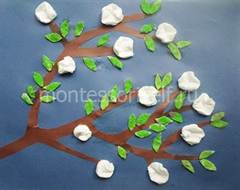
Then we move on to coloring the flowers on the branch. They can be made pink or scarlet. You can not completely cover the entire flower with paint, but drop colored water into the middle of the flower, and then the water will spread over the cotton in interesting patterns. You can drop a more saturated shade into the center, and then add a little more water so that it “spreads the color” throughout the flower.
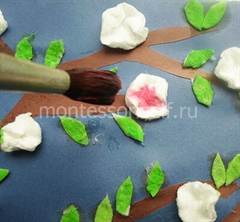
Let's wait for the paint to dry completely. And finally, our spring tree is ready!

You can experiment with the size of flowers and leaves, with different colors and shades - there are no limits to the scope of fantasy! And this applies not only to this work, but also to spring applications in general.
Video related to the article
Also, do not miss a special video selection on the topic of spring applications.
Can be made with older preschoolers and younger students.
Purpose: interior decoration, plot for a spring postcard.
Application "Merry caterpillar" for children from 5 years
In the spring, when the grass turned green and the first flowers bloomed, the warm rays of the sun woke up the little Caterpillar. How beautiful this world is, how many interesting things are in it!
You will need:
yellow cardboard for the base; medium-weight paper blue, orange, purple, green, white, yellow, black; paper lace; tracing paper or carbon paper; drawing paper; glue stick; scissors; mock knife; substrate; ruler; pencil.
Preparation of templates and parts
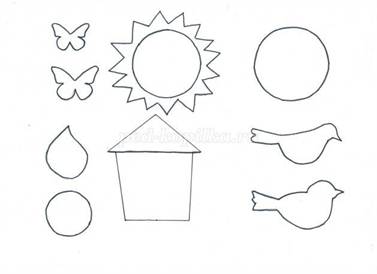
1. Transfer the template drawings to the drawing paper.
Composition templates "Curious Caterpillar"
The numbers on the templates indicate the order of gluing the parts.

2. Cut out templates for all the details of the composition.
3. Cut out the details of the composition: from blue paper: torso - 6 pcs., paws - 6 pcs., head - 1 pc., tail - 1 pc.; from green paper: blades of grass - 5 pcs., stem - 1 pc.; from orange paper: sun - 1 pc., rays - 4 pcs.;
from purple paper: a flower - 1 pc.;
from yellow paper: the middle of the flower -1 pc.;
from white paper: eyes - 2 pcs.; from black paper: pupils - 2 pcs., antennae - 2 pcs.
4. From thick cardboard, cut out the base for crafts measuring 19 x 19 cm.
5. Cut 2 pieces of paper lace 19 cm long.


Advice
If you don't have paper lace on hand, you can cut strips out of white paper and trim them with serrated scissors or cut out the pattern with a shaped hole punch.
Sticking
1. Place blades of grass on a cardboard base and glue them, lubricating the lower part of the parts with a glue stick.
2. Glue the eyes on the detail of the Caterpillar's head, and the pupils on them. Lubricate with glue not the base, but the parts to be glued.
3. Glue the antennae of the Caterpillar to the cardboard base, then the head, body parts and tail.
4. Glue the paws.

Advice
When working with a glue stick, always keep a damp cloth handy: the glue sticks to your hands and you can stain the craft.
5. Place the sun and rays on the base. Glue them by applying glue to the parts to be glued.
6. Glue the center to the flower.
7. Glue the stem to the base, and then the flower, so that it covers the top of the stem.
Making crafts
1. Apply a strip of glue to the top of the paper lace, following its location in the picture.
2. Glue the lace to the corresponding sides of the base.
Application is one of the favorite activities of all children. This is a great way to interest a child, spend quality time and just cheer up. Works made in the application technique always turn out bright, they can then be presented as a postcard to a grandmother or mother, or decorate a child's room with them.
Application is very useful. By cutting, gluing parts, the child develops fine motor skills, learns to use scissors, a brush, glue. In the process of making the application, it is easy to learn colors and shapes, and you can also practice in spatial orientation (top, bottom, right, left, under, above, etc.). Using various materials, develop the child's tactile perception. If you give free rein to the baby and allow him to do everything for his own consideration, imagination and fantasy develop.
Now spring is already actively coming into its own outside the window - a wonderful time of the year. Why not take the opportunity and create beautiful spring-themed applications with the children?
You will need:
- scissors
- ruler
- pencil
- colored and white paper
- colored and white cardboard
- threads
- napkins
- scraps of fabric
- your desire and imagination
And we offer you an excellent selection of spring applications. We hope they inspire you to create even better paintings with your child.


Colorful and spring. And since the manifestations of spring are not the same in different parts of the country, applications on the theme of spring for children will be diverse. The most often depicted are green grass and the first snowdrops, birds that have returned from warm lands and build their nest, tree branches with young leaves and fluttering butterflies collecting nectar from spring flowers.
Spring applications from various materials
When creating applications on the theme of spring, children can use colored paper and downy feathers of birds to give a feeling of warmth and softness.
Here come the first starlings. Birdhouses can be depicted in different ways, both in the form of voluminous paper cylinders and flat painted bird houses. For older preschoolers, to add volume to the application, the leaves on the trees can not be glued tightly to a sheet of paper, but left hanging from the branches. So they will look more natural and elegant.

Applications on the theme of spring develop children's imagination and sense of beauty, train endurance and fine motor skills of hands. It is especially useful for children to engage in weaving a nest on applications with birds. Such a nuance also creates the effect of volumetric work and gives it a delicate spring flavor. The leaves on the branches are glued tightly, and the flowers in the middle, lifting the petals up.

Birds can be glued double, then glued to the middle, leaving the tail and head free. This approach will give the picture a slight feeling of flight and freedom.

Paper leaves made of colored paper, which was previously folded into an accordion, and buds made of cotton buds give the appliqués on the theme of spring some pomp in the composition and one gets the impression of a revived picture.

Application Snowdrops
Back in March, Emir and I were busy creating applications. We were looking forward to the arrival of spring and talked about the first snowdrops. Since Emir is still small and it was very difficult for him to cut out the details for the application on the theme of spring, we limited ourselves to a clearing with snowdrops.

This will require:
- Cardboard
- colored paper
- White paper
- Scissors

We first tried using origami with him, making flowers. The emir diligently folded a white sheet of paper to make a square, then once again he repeated this operation on his own. It was difficult for him to bend the paper obliquely, so I finished the flowers myself to the end.

Here is an unfolded piece of paper from which a snowdrop is obtained. I made several copies of the snowdrop in a simplified version, without lengthening the petals of the flower. To prevent them from opening, Emir glued their edges, pressing them against a sheet of cardboard.

From green paper, I cut out the stems and leaves, which my grandson had already glued on a sheet of cardboard on his own. He chose the blue background himself. And since the cardboard was white, we had to stick a sheet of blue colored paper on top.


In order to make our spring application more cheerful, Emir cut out a circle and strips from yellow paper and got a sun.

Here we have such an application of Snowdrops.

Write, did you like the selection of spring-themed applications, did you pay attention to their diversity in terms of materials and mood? We are waiting for your opinion about our snowdrops, which we gave to Emir's mother as a gift. You, too, can please me by clicking on the buttons of social networks.
Spring is a wonderful time of the year when nature finally comes to life after a long cold winter. The snow melts under the warm rays of the sun, the first young sprouts of grasses and flowers appear on the ground, birds return from distant lands, and a person simply rejoices at the onset of the long-awaited spring and pleasant warm weather. Not surprisingly, in schools and kindergartens, children are often asked to make spring applications.
However, such applications are made not only in kindergarten and elementary grades. Some children and even adults who are interested in creative activities create amazing applications at home on their own from a wide variety of items.
Applications on the theme "spring" from paper
Most often, applications are made of paper, the necessary figures are cut out and glued onto a landscape sheet. Every child did such crafts in kindergarten, at school or at home with his mother and on his own, because it is quite simple, but beautiful and interesting.
From colored paper, you can make a wonderful application with a tree and a butterfly. Due to the fact that the elements are not completely glued, the craft looks voluminous.
The basis for the application will be a dense landscape sheet, painted in pale blue. On it, with a simple pencil, you need to mark the line of the earth, draw a tree and clouds in the middle. It is recommended not to put pressure on the pencil, so that later the contours can be easily erased.
Further, the trunk of the future tree is cut out of brown paper and glued onto the drawing, as shown in the photo. Grass is cut out of green paper - a strip with large teeth. The strip is glued at the bottom of the sheet so that the teeth remain not glued. They can be wound on a pencil to achieve the greatest volume.

It's time to decorate the tree itself. To do this, you need to cut out several small leaves from green paper (it will look more interesting if you use scissors with teeth) and flowers from pink, preferably corrugated paper. The cut is glued to the top of the trunk, forming a crown. It costs half to glue the elements, as in the case of grass. In place of the painted clouds, figures from ordinary white paper are glued.
On this, the application "Spring has come" is still finished, it remains to make a paper butterfly. Two small square leaves (one large, the second smaller) are folded like an accordion, then in half and glued together in the middle. The central part of the butterfly is glued to a sheet of paper, the wings remain not glued. From above, you can glue thin antennae made of paper. This application is perfect for children of school and preschool age.

Application "Chamomile"
A very simple application "Chamomile" is made from the same paper. For the base, you need to take a sheet of A5 cardboard, you can choose any color. A thin strip of green paper is cut out the size of half a sheet and glued in the middle, this will be the stem of the future flower.
Also, two leaves of a similar size are cut out and glued on both sides of the stem. Several petals are cut out of white paper, which must be glued over the stem. In the center of the flower is a core of yellow paper. Such a simple application is suitable for kindergarten or first graders.

Applications on the theme "spring" for younger students
The most difficult craft "Vase with Flowers" is more suitable for schoolchildren. Sheet A3 or A4 is painted blue, a vase cut out of brown paper is glued onto it. Next, you need to cut out several thin strips - stems for future flowers. The strips are glued over the vase. Multi-colored flower buds are made of corrugated paper. Such an application can be performed by children in grade 1.

Applications on the theme of "spring" from napkins and cotton pads
But paper is not the only material for creating applications. Napkins are also suitable for crafts, from which you can make an interesting application "Dandelions". On sheet A4, the sky, a green meadow, the sun, clouds and several stems for flowers are drawn. Leaves are cut out of green paper, their lower end is glued on the sides of the stems. Next, you need to make dandelions. For these purposes, yellow napkins are taken, fold two of them four times and, connecting, make small cuts. The resulting flowers from napkins are glued over the stems.

Cotton pads are another material for creating interesting applications. With the help of them you can make a beautiful bouquet of callas. Making flowers is quite simple, you need to take cotton buds, cut in half, and cotton pads. The tip of the cotton swab is painted with orange paint, the wand itself is wrapped in a cotton pad. The bottom is wrapped with green adhesive tape, forming a stem.
Several of these flowers from cotton pads are collected into a flower, the bottom is decorated with green cardboard leaves. Everything is glued to a separate sheet of cardboard of any color.
It's so easy to come up with and make an interesting craft. Some other spring applications with templates can be viewed on the Internet.
Volume application from paper for children from 7 years. Master class with step by step photos
Spring panel for elementary school children "Chicks in the nest"
Derkach Yegor, 9 years old, student of the creative association "Pavlin", MBOU DOD CDT "Sodruzhestvo", Novosibirsk
Supervisor: Derkach Anastasia Sergeevna, Teacher of additional education, MBOUDOD CDT "Sodruzhestvo", Novosibirsk
Description: This master class is intended for children from 7 years old, teachers of additional education, parents.
Purpose: Gift, home decoration.
Target: Creating a three-dimensional application
Tasks:
- to form practical skills in working with paper, waste material;
- to develop interest in artistic creativity;
- develop fine motor skills of hands, eye, fantasy, aesthetic taste, compositional skills and spatial thinking;
- to consolidate the skills of handling the simplest tools - scissors, paper
- improve design and application skills and abilities;
- educate independence, accuracy in work, patience, perseverance
Manufacturing technique:
- application
- paper plastic
Materials and tools:
For work we need:- a sheet of watercolor paper format A-3
- colored paper (possible for copier)
- scissors
- simple pencil
- PVA glue
- junk material (insert from a box of chocolates)
- pink parchment
- openwork paper napkins of medium size
- markers (black and blue)

Safety rules for working with scissors
1. Work with well-adjusted and sharpened scissors
2. Scissors must have blunt, rounded ends
3. Put the scissors with the rings towards you
4. Follow the movement of the blades while cutting
5. Don't leave scissors open
6. Pass the scissors rings forward
7. Do not play with scissors, do not bring it to your face
8. Use scissors for their intended purpose
Rules for working with PVA glue
1. When working with glue, use a brush if necessary
2. Take the amount of glue that is required to complete the work at this stage
3. It is necessary to apply glue in an even thin layer
4. Remove excess glue with a paper towel
5. Try not to get glue on clothes, face and especially eyes
6. After work, close the adhesive tightly and remove
7. Wash your hands and work area with soap
Templates:

Progress:
Panel No. 1 Master class with photoWe take a sheet of A-3 size watercolor paper.
This will be the background of our work.

From brown paper cut out branches of arbitrary shape

Glue the branches to the background

Cut out a circle from gold paper. This will be the nest

Glue it to branches

Take the insert from the box of chocolates

We cut straws of any shape from it

We glue the nest


From yellow paper cut out the details for the sun and glue on the background


From green paper cut out leaves of different sizes

Glue them to branches.


We make chicks
We cut out all the necessary details from colored paper.

Glue the eyes on the yellow circles

Colored felt-tip pens draw pupils, eyelashes

Glue the beaks

legs

Wings

Tails

tufted


The chicks are ready. We put them in the nest


Cut out butterflies

Glue them to the picture


Job ready

In the manufacture of this panel, many details remained: leaves, branches, rays for the sun, butterflies, straws for the nest ...
We thought, added more material and made the second panel.
Spring panel No. 2 Master class with photo
First, glue paper lace napkins on the background.
It will be clouds

Sun

branches

Nest

Making chicks


tufted


We put the chicks in the nest

Making a caterpillar


Glue

Cut out the flowers
Spring pleases with holidays, and kindergarten teachers prepare for each of them, work with kids, and create crafts. Sometimes parents are invited to participate in the creative process. This is not just a help of mom or dad to the baby, it is a joint creative process.
By creating spring crafts in the kindergarten, you can train the child’s dexterity and needlework skills, teach him to distinguish colors and features of different materials, and develop his imagination.
materials
The most popular material for children's crafts is colored paper. You can also use woolen threads, toothpicks, multi-colored paper forms for cupcakes, plasticine, cotton buds, cotton wool, seeds, pasta. Everything that is at hand can be used to create a unique craft.
Important! It is necessary to fasten the elements with PVA glue - it is safe for health.
Plane crafts
Work on the plane is convenient for the baby. If you use a variety of natural materials, as well as products, you can make original crafts that will delight both the child and parents.
paper rings
Many fathers and mothers in childhood made garlands from paper rings and decorated Christmas trees with them. Using the principle of such rings, you can make a snowdrop, a cloud, a whole bouquet.
How to make a snowdrop:
- Take white paper. Cut 3 identical strips 1 cm wide, 7-10 cm long.
- Bend each strip slightly and glue both ends - you will get droplets. These will be the snowdrop petals.
- Put the petals on a sheet of paper, glue them to each other, close the top with a semicircle cut out of light green paper.
- It remains to stick the stem, cut out long leaves, fold them lengthwise and glue the bottom half onto the base.
Panel on a spring theme
Even kids 2-3 years old can cope with applications-panels on a spring theme. As a basis, you can use disposable cardboard plates of a suitable color.
What options for fun and easy-to-make crafts can be offered to children:
- "Birds in the Nest" It is necessary to cut out all the elements from paper. Parents can help the little ones. It will take birds, clouds, a tree, flowers. Everything is glued on. A bird's nest is made of woolen threads or decorative straws. Cut into pieces 3-5 cm long, stick it on paper.
- "Insects on the move". Flat pebbles are glued to the base and painted. Let it be spiders, ladybugs, bugs.
- "Palm kittens in a vase". Draw on the basis of the outline of the vase and branches. Make flagella from plasticine and lay out, starting from the outline of the vase, in a circle to the center. There is no need to leave gaps. Lay out branches from brown plasticine flagella. Roll up pieces of cotton wool, wrap plasticine from one edge and place them on the branches.
- "Button Forest". A composition is drawn on the basis (forest, flowers, stream). The drawings inside are sealed with buttons of the desired color.
- "Bird". You will need grains of rice, buckwheat, peas, sunflower. On cardboard, draw the outline of a bird and cut it out from the inside - you get a dense stencil. Stick it on the base. Fill the stencil with grains, laying them tightly.
- "Pumpkin Flowers" Take pumpkin seeds, paint with bright colors. Put three pieces on the green base (lawn), glue, finish drawing the stems and grass. If you arrange the grains, connecting them at the bottom, you get a fantasy flower, and if at the top - a snowdrop. Instead of seeds, flat curly pasta is suitable.


Bulk flowers
For a child, a do-it-yourself three-dimensional image is a real work of art. It is easy to do this kind of work.
fun lawn
To make a lawn you will need:
- a sheet of A4 cardboard for the composite base;
- colored paper;
- glue;
- scissors.

How to make a craft step by step:
- Fold A4 sheet of green colored paper in half. In the places of the fold with a step of 2-2.5 cm, cuts are made. The cuts have different heights: near the edges - 5 cm, then the height decreases, closer to the center it will be 1 cm. The cuts are made mirrored, conditionally dividing the sheet into 2 halves.
- Open the sheet, bend the slots inward - steps will turn out, they will become flower stalks.
- Cut the sheet with the lawn into a cloud shape and stick it on a piece of cardboard so that the composition is stable.
- Their red, yellow, blue paper cut flowers, stick on the stems.
- Decorate the stems with leaves. To do this, cut out oblong parts 4-5 cm in length, bend in half, glue the bottom half onto the stem.
- Individual flowers are glued in the center of the lawn. For the stem, you need to cut a green strip, bend it like an accordion, glue it to the base. Fasten the flower on top.
- You can add thin strips of green, you get herbs and butterflies.
- A funny worm will decorate the composition. It can be made by cutting circles according to the pattern, you will need 15-20 pieces. They are bent in half and glued to the base with the lower half, each next circle is glued close to the previous one. It remains to stick the head with eyes and a cheerful mouth - the multi-colored lawn is ready.

Minimum materials required:
- a sheet of green double-sided paper;
- some multi-colored paper;
- toilet paper sleeve;
- glue.
The green sheet should be folded in half along the length, cuts should be made in increments of 1 cm. The cuts do not reach the edge of the sheet by 5-7 cm. Then, without unfolding, the uncut edges of the sheet are glued together.

The sleeve from the toilet paper is shortened, its height should be 5-7 cm. A sheet of green paper is glued in a circle on the sleeve - you get a grass bump.
The final stage of work is to glue flowers on the grass. These can be details cut out of colored paper, pompoms, beads. You can see the result in the photo.

Accordion bouquet
For a bright bouquet, you need a sheet of green paper and some red or yellow colored paper. This is a very simple craft that every child can handle, but it looks unusual and will decorate the table of mom or grandmother.
Progress:
- Take a green leaf, fold it like an accordion along the short side of the leaf.
- Fold the resulting accordion in half, glue the side edges. This is not a fan, but a lawn.
- It remains to decorate it with flowers, it can be snowdrops or paper tulips, or it can be fluffy, from pompoms, roses.

Other volumetric color options
There are many ways to make voluminous flowers. Not much material is required:
- Cotton buds (you need red ones). Sticks are stuck into the plasticine center in a circle, having previously cut off the cotton wool on one side. Bright flowers will turn out, they are attached to a tube-stem - and the bouquet can be put in a vase.
- Stripes for quilling. It is necessary to wind several colors according to the patterns, then they are attached to a dry branch.
- Yellow woolen threads are reformatted into dandelions - just make pom-poms out of them.
- Wrap the candy in corrugated paper and fasten it to a wire stem wrapped in green corrugated paper.
- If you take the upper part (red, yellow, pink) from a plastic disposable spoon, you get pretty tulips. For 1 flower, 5 spoons are required, the handles glued together are wrapped with green corrugated paper. The leaves are fixed on top, the bouquet can be decorated with a ribbon or put in a vase.

homemade sun
Kids of any age can make funny suns with their own hands. You will need cupcake or candy molds and long sushi sticks.

Progress:
- Cut out 3-5 suns of the same size from yellow paper, draw faces on them, decorate with beads, flowers, stickers.
- Cut out circles, 1-2 cm more suns. Put suns on them.
- Stick the circles on straightened cake pans or round wrappers.
- Fasten the stick from the wrong side, close it with another paper form.
Thematic composition
An excellent spring craft for kindergarten is a boat. You can also create a thematic composition: a boat sails along a spring stream.

How to make a boat? You can take a nutshell, into which a toothpick-mast with a leaf-sail was fixed with a piece of plasticine. You can also make a raft glued together from wine corks. Or make a ship out of paper.
A raft assembled from dry twigs looks good (they are fastened with glue or threads). On the raft it is necessary to hoist a mast from a twig and a sail.
A scene is built on a sheet of cardboard (it can be framed):
- stream (made of plasticine, colored paper, small stones painted with blue paint);
- make flowers along the banks of the stream (colored paper, pasta will come in handy);
- thin trees can be made from tubes;
- another option is to put a jar of willow branches on the “shore”.
Such a craft will undoubtedly attract the attention of others, and the process of its creation will bring joy to children.
Spring symbol
Birds are another indispensable symbol of spring. They can be made in a variety of ways, using a variety of materials and techniques.

So, birds - do-it-yourself spring crafts for kindergarten. Each job takes 20-40 minutes, depending on the complexity and preparedness of the child.
chicks
You will need pompoms and felt of the same color. Pompoms can be taken ready-made or made independently by winding the thread on a fork. Wings and a tail are cut out of felt, glued. Eyes are added (ready-made or from buttons, beads, paper) and a beak! You can also glue the nest in addition.

This craft can be done in 2 ways:
- Cut out the details of the bird house according to the template, cut it out, then glue it.
- Use a milk carton.
It is important to decorate the birdhouse. To do this, you need buttons, stickers, colored paper. Inside it is recommended to put a warm nest of branches or threads.


Another variant
Birds are cut out of paper or felt according to a pattern. A dry branch is dyed or wrapped with threads. Birds are attached to the line. 
Chicks from improvised materials
The glove is tightly stuffed with padding polyester, synthetic fluff. Each finger in the middle is tied with a yellow thread. The upper part of each finger will become a head - eyes and a beak are glued to it.

The lower part is the body, wings can be glued from felt on it. Birds are planted in a small basket, fixed with glue.
Easter crafts
Easter is a bright, joyful holiday of spring, for which many kindergartens also create crafts.
The easiest option is a garland. Figures of hares, eggs are cut out of colored paper and attached to a thread.
Application "Egg"
On the base sheet, draw the outline of the egg and fill it in; strips of colored paper, plasticine are suitable for this.
Panel "Easter chicken"
Cut a dense blue base sheet in the shape of an egg.
Draw the outline of the chicken and fill it in, different materials are suitable for this:
- twisted small pieces of paper;
- plasticine balls;
- pompoms;
- peas.
The eye and beak should be highlighted. In its beak, a chicken can hold a willow branch (it is easy to make from cotton buds) or mimosa (plasticine).

The chick can sit in an egg or a nest.
Option for older children: draw the outline of the church on the sheet and fill it with quilling elements.
Conclusion
Spring crafts are a great occasion to be with your child, to help him express himself in creativity. Such activities develop thinking, talent, creative abilities.
Galiya Zaripova
Collective application Spring has come wonderful with younger children
It is usually considered that applique- This is a painstaking and difficult task for skillful and accurate children of older preschool and younger age. However, according to E. A. Yanushko “Such a delusion deprives kids of new knowledge, learning new skills”. When teaching children 2-3 years old in technology applications it is recommended to use the simplest methods of work, such as: tearing paper; sticking ready-made figures carved by an adult. figurines for applications should be large enough so that the kids can comfortably work with them.
I. A. Lykova, Candidate of Pedagogical Sciences, Senior Research Fellow and Doctoral Student at the Institute of Art Education of the Russian Academy of Education, believes that collective application at an early age in children "develops a sense of form, color and composition".
Working with children 2-3 years old, it is very interesting for me, as a teacher, to spend collective applications. For kids, I initially come up with an unfinished composition, then directly - educational activities are carried out in the form of a game. While working, children learn to arrange the details in the picture, smear the back of the form with glue, take it a little on the brush, press the image to the paper with a napkin with the whole palm. Each kid performs his task, but the result is the same.
I can't help but notice that during applications kids behave amicably, with pleasure communicate with the teacher on a given topic. Based on my experience, I can say that collective work on the application in early age groups it is useful and necessary. This experience gives positive dynamics in the development and education of children. Collective application effective in integrated forms of children's activities, in combination with such educational areas as the cognitive and speech development of children.
Create and enjoy it!
Related publications:
"Spring came". Vedas. The sky is brightening, the snow is melting. We will tell you about spring. Spring brings beauty and joy to us. Since ancient times, people have welcomed her arrival.
 How mesmerizing the night starry sky is! To convey all the beauty of the night starry sky, we decided with the pupils of the first junior group.
 A blizzard, a blizzard, And it spins and spreads, And sings a song, And evokes thoughts. Purpose: production of work for the winter children's exhibition.
 Purpose: to introduce children to non-traditional methods of application from the palms; Tasks: - to teach children to convey the image of a Christmas tree in co-creation.
 Collective application "Spring is coming - spring is the way!" Purpose: to create a joyful mood from the arrival of spring, to decorate the group. Has come.
 Program content: Continue to teach children to compose a composition from non-traditional application techniques. Develop skills in working with glue.
 MBDOU Kindergarten No. 14, senior group No. 5. Artistic and aesthetic development. Visual activity. Drawing. Goal: Draw.