Proper dressing of fox skins at home. How to properly skin a fox and its primary processing Predators and rodents
You will need
- Enamelled tank or glass bowl, wholemeal rye or oat flour, table salt, soda, yeast, chromium alum, washing powder.
Instruction
Place the dry-dried skin in a tank and fill it with water. Soak, changing the water twice a day and kneading, a few. As a result, the skin should look like fresh. So that, while soaking, the skin is washed off at the same time, add washing powder to the water.
The next stage after soaking is skinning. Pull the skin over the deck with the fur inside or spread it out if it is. With a dull knife, or the back of the hacksaw blade, or a steel brush, carefully remove the remaining fat, meat and film from it from the tail to and from the ridge to the stomach.
Degrease the hide by rinsing it again with laundry detergent, shampoo or toilet soap, depending on what you are cleaning. Let all the water drain and wipe the inside with a clean, dry cloth to remove excess moisture.
The next stage of dressing is fermentation. In an enamel or glass bowl, prepare the following composition: stir 200 g of wholemeal rye or oat flour in 1 liter of hot water, add 7 g of yeast, 25 g of salt and 0.5 g of baking soda to the mash. For 1 kg of skins, 3 kg of this jelly is needed.

In the cooled solution, immerse the skin with the flesh outward. The process is quite long, but it is important not to overdo it, because it can lead to hair loss. Turn the skin over periodically. After 2-3 days, a white coating should appear on the surface of the mezra and the solution will acquire a persistent smell of bread. The process is over. Take it out, let the solution drain and start tanning.
Put 7 g of chromic alum and 55-60 g of table salt per 1 liter of water. Stirring occasionally, soak the skin in the solution for 12 to 24 hours. For 1 kg of skins there should be 3 liters of chrome tanning agent.

Prepare the bark and small willow branches. Fill a bowl with them, without tamping, and boil for 30 minutes. Then drain the solution, add 50 g of table salt per 1 liter of water to it and cool. This is tannin tanning. The skin in it can be from 12 hours to 4 days, until the skin is completely saturated. After tanning the skin for two days, put under oppression for ripening.
To make the skin soft, increase its strength and elasticity, burn the skin with some kind of water-fat emulsion. After fattening, leave the skin to lie down for 3-4 hours. Without letting the skin dry completely, knead, stretch it in different directions. Then rub the flesh with chalk and rub with sandpaper. It remains to give a presentation - beat out the skin and comb the fur.

However, what to do, you need to get dirty and separate the meat. The current hunter, which, as a rule, does - they chop the carcass into pieces with an ax along with the skin, here's the cut for you.
Wild boar and elk are mostly butchered by hunters today, especially in winter. However, all this is not very good, and the skin is a very important trophy, since many hunters mainly hunt for it. And then you want it - you don't want it, but you have to become a skinner. Do you like to ride, as they say, you have to carry the carcass to the base even without a sled, or, nevertheless, remove the skin and cut the carcass into pieces on the spot.
Not, you can, of course, load this work on homework, motivating by the fact that I, they say, got the beast, and what you will do with it there is your concern. But it is sometimes difficult for owners of cars to transport home a whole carcass, and in a city apartment, you can’t even bother with butchering a carcass.
So you have to do it either in the garage, or at the base. And there, how it will turn out - you need exactly meat, - we remove the skin as necessary, and if you need the skin as well, then it doesn’t matter - either you got married well, or take off the skin yourself. And what is good and what is bad is different for everyone.
Who is richer - can entrust this business to rangers for a certain amount of money, and if you go hunting yourself, and you don’t want to spend extra money - then again in a situation that you yourself will have to work hard.
Those who want to neigh at those who do not know how to skin or are just learning how to do it - the Internet is full, so there is no need to do it - there are plenty of photos. It remains to find out how to do it right. "Country Man Must Survive" is true if you are a country man. But that's not the way to skin it.

Photographing and processing animal skins for the manufacture of hunting trophies
There are quite a few shooting options, depending on the type of animal and what you plan to do.
Predators and rodents
If, for example, you have caught a large predator (bear) and do not know whether a carpet or stuffed animal will be made from it, then the option of shooting the skin “in layers” is suitable. If you want to make a stuffed animal standing on its hind legs, then the option of shooting the skin “from the back” is more suitable. For other types of stuffed bear, both options are suitable.
If you have caught a medium-sized predator (wolf, lynx), then to make a carpet you need to skin it in a “layer”, and to make a stuffed animal, shooting in a “layer”, “from the back”, and “stocking” is also suitable.
For skinning small predators (fox, raccoon, badger, wolverine, polecat, marten, etc.) . For skinning a porcupine, only the “layer” option is suitable.
About shooting a skin for making a trophy head from predatory animals will be discussed separately.
Ungulates
There are four main options for ungulates: shooting the skin to make a trophy head, shooting “from the back” - for making a whole stuffed animal from small and medium-sized ungulates, “layer” - for making a stuffed animal from a wild boar, and a combined shooting option - for a whole stuffed animal from large ungulates .
Shooting the skin "layer"
This method is used, as a rule, for skinning large predators, although it is applicable to other animals, especially if you intend to make a “carpet” out of your trophy.
So that the shooting process does not take a lot of time and effort, you need to have a well-sharpened tool on hand and prepare a place for work.
The sooner you start skinning after mining, the more chances you have to keep the skin in perfect condition. Already a few hours after shooting, and in the summer, or when shooting an animal during or immediately after feeding, the skin begins to deteriorate. In the axillary and inguinal regions, when the animal lies on its side, its body cools down very slowly, and the skin begins to rot. Due to the ongoing fermentation process, heat and gases are released in the stomach and intestines of the animal, as a result of which the stomach swells and the skin on the stomach becomes green. In such places, the fur almost always comes out during dressing, and in some cases even before dressing.
Of course, while hunting, it is far from always possible to skin an animal immediately after shooting. However, keep in mind that your trophy will only look great if, at all stages of working with it, you try to process and preserve it, following the tips outlined in this article.
If you do not have the opportunity to remove the skin immediately after the extraction of the trophy, try to protect your prey as much as possible from exposure to heat and moisture.
Do not leave the animal lying in the sun. Do not put it on a cellophane film - without oxygen, the skin will begin to rot, not to mention that this film will not allow the carcass to cool. You can put the trophy on any natural surface - on the ground (but not on wet or warmed by the sun), dry grass, boards (except for pine boards - the resin strongly stains the fur), hay or several layers of cotton fabric, matting or canvas.
The main thing is that the surface on which your trophy lies is as clean, dry and not heated as possible. It is best if the animal lies in a cool, well-ventilated, shaded area. During the hunt, most likely, it will not be possible to comply with these conditions, and then everything will depend on how quickly you can process the trophy.
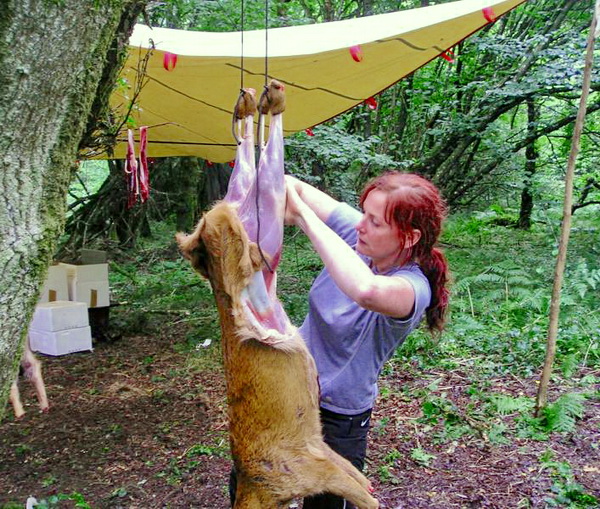
In order to avoid damage to the skin in the axillary and inguinal regions, it is necessary to fix the paws of the animal at a distance from the body and from each other, for example, by stretching them on ropes. It is even better if the whole animal is suspended in the air. It is also important to position the limbs and head of the extracted trophy not pressed against the body for the reason that it is rather problematic to move the limbs apart when rigor mortis sets in. An animal's muscles can stiffen so much that often the bones of the limbs break - as a result, you can not only pierce the skin with the sharp edges of the broken bone, but also injure yourself.
But even if you take all the above measures, it is best to start shooting as early as possible.
Starting to shoot the skin, try to position the body of the animal so that it is convenient for you to work with it. The less you get tired when processing your trophy, the better your work will be. If you do not have an assistant, secure the legs of the animal by stretching them to the sides and tying them with a rope (Fig. 1).
Thus, you will achieve that when working with the skin you will have a minimum number of hard-to-reach places for shooting.
Start shooting with a cut in the skin on the sternum (Fig. 2). To do this, push the fur to the sides until the skin appears. Make an incision that cuts through the skin, but not deeper, otherwise blood may flow, which will stain the fur and interfere with further work. Then insert the point of the knife under the skin with the blade up and cut the skin towards the head of the animal with the knife from the inside out, constantly spreading the fur to the sides so as not to cut it. Try to make the cut as straight as possible. You need to finish the incision between the bases of the jaws, at the level of the ear.
During the shooting, the fur of the animal fluffs up at the edges of the incision and is stained with blood. As a result, a number of problems arise. Fur stuck to the meat makes it difficult to see the edges of the cuts clearly. If it is not removed to the side, there is a risk of continuing the incision in the wrong place. Or the fur gets under the knife, and you cut it off, which affects the appearance of the trophy.
All this can be avoided by wetting the fur along the edges of the cut with salt water (100 g of table salt per 1 liter of water, preferably cooled boiled). It is more convenient to do this if you have a plastic spray bottle with you, although a brush, a piece of cotton fabric or foam rubber may well work.
Next, peel the skin to the sides, pulling the edges and sticking your hand under the skin (in many freshly mined animals, the skin is well separated from the meat with almost no help from a knife). Before continuing the incision from the sternum to the abdomen, try to separate the skin from the walls of the abdominal cavity with your hands so as not to accidentally cut the animal's belly. Having brought the incision almost to the anus, go around it on one side and continue the incision to the tip of the tail. Also, on one side, go around the genitals and scrotum. Never leave the fur covering the animal's genitals on the carcass.
Remove the tail with a knife. If the animal’s tail is well removed with a “stocking” (for such animals as a fox, marten, etc.), then it is more convenient to remove it at the last moment, when the skin is removed from the whole animal, but before shooting the head, holding the skin with your fingers and stretching the vertebrae . But after the tail is removed in this way, be sure to open it with a knife from the underside to the very tip. Try to make sure that the cut goes strictly from below. This is necessary in order to subsequently carefully salt, degrease and scour the tail. It is unlikely that you want to have a trophy with a mangy tail.
On the hind limbs, start the incision from a point located a few centimeters from the anus closer to the abdomen (between the anus and the scrotum - in the male). Next, lead the incision to the popliteal cavity along the inner side of the thigh.
If you are going to make a carpet out of the skin, then lead the cut to the center of the heel and further along the bottom of the foot to the skin cushion on the paw of the animal. Cut the pillow in the middle almost to the fingers and then cut the cuts to the sides of the paw. In this case, incisions should be made between the balls of the fingers and the ball of the foot along the hairline (Fig. 3).
If you intend to make a stuffed animal out of this animal, then cut from the knee area not to the heel, but to a point located between the heel and ankle, on the inside of the paw, but not along the hollow, but closer to the heel. Do not cut the pillow on the foot, but go around the inside of the paw, leaving a fur edging about 1 cm wide on the pillow. And then between the foot pillow and the fingertips along the hairy part of the skin to the outer side of the paw (Fig. 4).
On the forelimbs, the cuts start from the middle between the top of the shoulder and the armpit. Then make an incision along the inside of the paw, closer to the elbow, then to the middle of the hand pad.
On the hand, the skin is cut according to the same principle as on the feet, depending on what you want to make from the skin of the animal (Fig. 3 and Fig. 4).
After that, you need to remove the skin from the paws of the animal. To do this, pull the edge of the skin and with the help of a knife separate the skin from the meat, starting from the convergence of the longitudinal section (from head to tail) with the cuts on the limbs. Then remove the skin from the paws on both sides of the cut. Separating one of the paws from the skin, bend the paw at the joint. Now, fixing the paw in the area of the joint and pulling the skin, you get to the fingers.
Remove the fingers from the skin to the last joint, leaving in the skin only the last phalanx of the finger, on which the claw is located (Fig. 5). Pillows on the fingers are not cut.
Having removed two paws, for example, the front and back left, remove the skin from the back of the animal. Now it will be easier to remove the remaining two limbs.
Lastly, remove the skin from the head of the animal. This is one of the most difficult and crucial moments. The skin is removed from the head with a “stocking”. When you get to the base of the ears, separate the ear from the skull by cutting close to the skull with a knife so that the ear cartilage is completely on the skin. Next, continue to skin with a "stocking", cutting with a knife as close to the skull as possible, especially in the eye area, where the skin is closest to the bone. To keep the eyelids intact, you need to pull the skin away from the skull and, as soon as the back of the orbit is exposed, cut the skin not along the surface of the skull, but by directing the tip of the knife into the orbit. When the eyeball appears, pull back the skin of the eyelid and cut it near the eyeball itself. If everything is done correctly, you will get an incision in which the inner surface of the eyelids will be visible. Insert your finger into the resulting hole and, pulling the skin away from the eye, cut close to the eyeball. After the eyelids are separated from the skull, do not rush to remove quickly. The lacrimal gland is located in the corner of the eye. The skin in this area is very thin and is attached close to the bone, so you need to separate it by cutting almost along the bone. At the same time, you should not press hard on the knife, scratching the skull, if later you expect to make a trophy out of the skull of an animal.
After separating the skin to the molars, cut it closer to the skull so that the teeth become visible in the cut.
Next, separate the lips, cutting them as close to the skull as possible. First, remove the lower lip, then, having lifted the skin almost to the nostrils, separate the cartilage of the nose from the skull, leaving it on the skin of the animal. As a result, the entire soft part of the chin, lower and upper lips, and the nose, together with the nasal cartilage, should separate from the skull. With a certain skill, you will be able to remove the skin from the skull in such a way that a minimum of “cut” meat will remain on it. But this skill is acquired with rich experience in high-quality processing of raw materials, as a result of which you will learn to visually and tactilely determine that thin border between the skin itself and the muscle or subcutaneous fat layers, along which (ideally) the incision should pass.
While the experience is not so great, it is easier when shooting to leave more cuts on the skin, which can later be removed with the help of skinning, but to avoid numerous cuts in the skin.
Shooting the skin "from the back"
This method of shooting is a little more laborious than the previous one, but it ultimately affects the quality of the stuffed animal very significantly.
Draw the main incision along the back, from the base of the tail, slightly stepping back from the center line of the back in any direction; trying to make the cut as even as possible, move along the spine to the head, ending at the back of the animal's head.
Then return to the beginning of the incision and continue from the side of the tail and anus towards the abdomen, ending 5-7 cm after the anus.
Make incisions on the hind legs in the same way as when shooting in “layer”, bypassing the pads of the paws on the inside 1 cm from the border of the pad.
Start the incisions on the front legs just above the elbow along the inside of the shoulder and then along the inside of the forearm, similarly to the previous shooting option.
After that, you can begin to remove the skin, showing special care in the axillary and inguinal regions, where it is quite easy to make a mistake in the folds of fat and skin and cut the skin.
Remove the skin from the shoulders with a “stocking”, otherwise the shooting is practically the same as the previous method.
If the animal has rigor mortis or you do not have an assistant, or the trophy is very large and it is difficult to remove the front paws with a “stocking”, then it is quite acceptable to continue the cuts on the front legs from the elbow along the lower edge of the shoulder blade to the central cut on the back, actually removing the skin with a “layer ", but from the back.
Shooting the skin "stocking"
Draw the main incision from one foot to the other, from the outer edge between the pads of the fingers and the pad of the paw to the inside. Then, rounding the pad of the paw on the inside, to the center of the heel, to the popliteal cavity and, moving to the second paw between the tail and the anus, repeat everything in reverse order.
On the front legs, make cuts in the same way as when shooting “from the back”, from the elbow to the hand.
Next, remove the skin from the feet and toes of the hind legs of the animal. Now you can hang the carcass by the hind legs, threading the rope through the puncture between the ankle and the Achilles vein. This will greatly facilitate your further work on shooting the skin.
With this option, after you release the hind legs and tail of the animal, the skin is removed from the carcass quite easily. In fact, you can simply pull it off the carcass by grasping the edges of the skin and pulling it down to the very armpits. Try not to overdo it. If the skin is pulled together with difficulty, it is better not to risk it, but to gradually remove it from the carcass, lifting it around with a knife.
A. Salov
***
Enduring the hardships and vagaries of nature, the hunter spends day after day to achieve his goal - to get the beast. And when the work of participants in a collective hunt, many kilometers of a forest road or endless hours of sitting on a storage shed are rewarded with good luck, the eternal question “What to do?” arises. The trophy has been obtained, but it needs to be properly processed and saved. If the shot animal is not large, and in the next few hours you have the opportunity to transfer it to a taxidermist, then this is exactly what you should do. When the size of the animal does not allow it to be freely transported, then it is necessary to remove the skin. As a rule, a special person is present at commercial hunts - Skinner, his duties include the processing and conservation of your trophy. However, such a service is of high quality only in the hunting grounds of the regions where a large number of hunts are conducted with the participation of foreign hunters, for example, in Kamchatka. In our country, the role of a skinner is often performed by a “pro” from rangers or sympathizers. The result of their work is cut off eyelids, lips, torn ears, improperly salted and subsequently peeled areas, as well as other, sometimes irreparable, defects. Therefore, never use the services of people in whom you are not sure. Below we will try to explain how to deliver the trophy safely, and some of the basics of the initial processing of the trophy for the manufacture of a taxidermy product.
1. Large mammals: Of course, we will talk about the bear, the largest predator in the Urals. The specificity lies in the fact that the hunt for this animal begins quite early, even in summer, when the average daily temperature is quite high. In such circumstances, proper conservation is especially important. First you need to decide what product you want to see from the beast you have obtained. If it is a stuffed animal, then first of all try to take measurements, at least two indicated in the figure (1. body length from the tip of the nose to the base of the tail, 2. from the inner corner of the eye to the tip of the nose.). If the animal is not large, then you can remove the skin using the cut pattern for making a stuffed animal, with this method the main cut runs along the back, above the tail it is divided into two cuts running along the caudal (back) side of the hind legs. Two auxiliary incisions are also made on the forelimbs going from the elbow to the hand along the inside. If necessary, these incisions can be expanded above the elbow bend. We recommend this method of shooting for the subsequent production of a stuffed animal, but it is quite laborious, especially when a large bear is caught. Therefore, you can remove the skin with a layer. It is not necessary to cut the animal's genitals more than twice, making the main cut along the midline of the abdomen, when the skin is obviously removed for a stuffed animal, for the subsequent manufacture of the carpet, the integrity of the genitals does not matter.
If in the near future it is possible to deliver the skinned skin to a taxidermist, then the head, hands of the front and feet of the hind legs can be left unskinned. In cold weather<+5о) время безопасного хранения шкуры в таком виде около суток. В теплую (+18о) не более 3-5 часов. Не стоит солить такие шкуры, так как из оставшихся лап и головы будет излишний рассол, лучше обильно проложите шкуру пихтовым лапником. Ни в коем случае не укладывайте шкуру сразу в полиэтиленовый мешок, сначала в тканевый, а потом в полиэтиленовый. Ткань, впитывая влагу и кровь, предотвратит быстрое запревание эпидермиса, а полиэтилен сохранит салон вашего автомобиля.
When there is no possibility of a quick delivery of the skin to the taxidermist, then it is required to remove the hands, feet and head, and salt the skin. Here you need to be especially careful, if the Crocodile Dundee knife is in the hands of your skinner, then this does not bode well, you need a more modest tool. A lanceolate, sharp knife with a comfortable handle and a blade length of about 12 centimeters can be easily purchased at a hunting store. Have one of your own, it will come in handy.

On the hands and feet, an incision is made along the border of the callus, the fingers are carefully turned out one by one and separated from the skin along the joint between the last and penultimate phalanges. Thus, the last phalanx, along with the claw, remains on the skin, and so all twenty fingers. Care must be taken during this operation, as it is easy to cut the skin in the sinuses between the fingers.
When skinning a head, attention should be paid to the following aspects. Firstly, the ears - you need to separate the ear cartilages from the skull as close to the skull as possible, and secondly, you should try not to cut your eyelids, they should remain on the skin. Thirdly, lips - they must also be left on the skin. And lastly, the nose - the nasal cartilage of a bear is large enough to rot. The proposed figure indicates the place of separation of the "meat skull" from the skin, cutting the cartilage, make sure not to cut off the nose itself.
After the skull is separated, it is necessary to finish processing the skin of the head. The ear cartilages must be turned out by carefully separating them from the skin of the back of the ear, a properly everted ear has one hole - in the cartilage, at the place where it was separated from the skull (see figure). The mucous membranes of the lips and eyelids are carefully incised and twisted.
After the skin must be salted. Coarsely ground salt that does not contain iodine is suitable for salting, the amount of salt should be large enough. So, for example, an average bear with a body length of 160 cm requires at least seven kilograms of salt. The skin should be spread with the skin up and salted over the entire surface, rubbing salt into the skin. Fingers and hands are filled with salt, salt is also poured into the turned-back ears. Pay attention to the edges of the cut, they can turn up, and the salt will not get there.
Properly removed, processed and salted skin gives you some guarantee of its safety. Nevertheless, try to transfer the skin to the taxidermist as soon as possible, shifting the care and responsibility for further safety to him. Instead of waiting for the skin to remind you of itself with an unpleasant smell in the garage or on the balcony.
2. Mammals of medium and small size: For the manufacture of a carpet from a wolf, a wild boar, a lynx, a scheme of cuts similar to the scheme of skinning a layer from a bear is suitable. The rest of the processing and preservation requirements described above also remain (the paw brushes must be removed to the last phalanx, the ear cartilages should be turned out, the eyelids should be kept on the skin, the mucous membranes of the lips should be opened, etc.). The scheme of skinning from the back to a stuffed animal is somewhat different. The main incision does not connect with the auxiliary ones on the hind legs, and the incisions on the hind legs themselves are much smaller.
Hunting for wolves, wild boars and lynx is carried out during the cold season. Therefore, the head and lower parts of the limbs can be left in the skin, simply freezing it. Such skins do not need to be salted. When there is a strong minus on the street (<-20o), рысь или не крупного волка можно заморозить целиком, но учтите, не следует хранить добытый трофей в таком виде, заморозка лишь позволит не мараться в крови, и доставить зверя, в течение ближайших полутора - двух суток, таксидермисту.
Foxes, beavers, raccoon dogs and smaller animals should also be brought to the taxidermist in their entirety. If you do not have the opportunity to do this, or you yourself want to practice skinning, it can only be noted that for making a stuffed animal, the skin from a fox, a raccoon dog is removed in the same way as from a wolf, and from beavers, martens, squirrels through one cut, running along the spine from the base of the tail to the middle of the back (see figure).
3. Trophy heads: In addition to carpets and stuffed animals, trophy heads are also made from animal skins, which adorn the walls of hunting interiors. In modern taxidermy, the concept of a trophy head means a full-fledged product in which the animal is exhibited from the tip of the nose to the shoulder girdle. Severed heads resting their ears against the wall are not an aesthetic sight. And to avoid this, it is necessary to leave the right amount of skin behind the head. The cut pattern indicated in the figure (behind the forelimbs) is suitable for making a trophy head from any kind of animal. These cuts (along the back side of the skin with subsequent bifurcation to the base of the horns) are necessary only for skinning the heads of horned animals. Roe deer are often skinned with a "stocking", with such a shooting, you can simply separate the head from the carcass, leaving it in the skin. Then it will not be necessary to remove the skin from the head, making the indicated cut, but only cut off the required amount of skin behind the head (hereinafter referred to as the shoulder blades). You can leave your head uncut, with a large supply of skin, with an elk or a wild boar. The main thing is that it is cool, and the transfer of the material (skin) to the taxidermist is fast.
Birds: Birds, as well as medium-sized mammals, are best transferred to the taxidermist as a whole. One of the features of bird conservation is their feather cover. Feathers are very easy to damage. Therefore, if you decide to deliver a bird for the manufacture of a taxidermy product, then you don’t need to throw it at random into a bag, then into the trunk, and put a bunch of things on top. The result of such transportation will be a kind of lump of blood and feathers with broken and bent wings and tail.
After you have obtained the bird, inspect it for severe damage. If not, then the best method of transportation would be: put cotton or toilet paper in the beak, wrap the beak, head and neck with toilet paper. Tuck the wrapped neck and head under the wing, put several layers of paper under the second wing, press the wings to the body, fold the tail, wrap the whole bird in paper (for example, in a newspaper), trying not to wrinkle the tail and ends of the wings. The wrapped bird can be lowered into a sufficiently large plastic bag, with the tail up. In the same bag, for better preservation, it’s a good idea to add a few fir branches, the phytoncides contained in them inhibit bacteria that cause decay. It is better to store the bird packed in this way in a cool place. If it is warm outside, and your car is in the sun, you do not need to keep the game in a heated cabin. Duck, hazel grouse or black grouse packed and laid with fir, in a shady place at an air temperature of + 150C, can lie for a day. It is also necessary to take into account the degree of damage to the bird, if there are bleeding injuries, then they must be covered by inserting a piece of cotton wool into the wound or covering it with toilet paper. Game with a damaged belly is stored for a shorter time. In the cold season, birds can be frozen, having previously packed them. In any case, hand over the obtained trophy to the taxidermist as soon as possible.
Often hunters, being in the lands, meet birds of prey and owls, strive to get them. Remember - these are very few species, many of them are in the Red Book. Owls and hawks in the cold season accumulate near roads and settlements in search of mice, rats, pigeons and jackdaws. This creates a misleading impression of their numbers. Every time you aim at an owl, remember that our children have a real chance in the near future to hear their voice only on CDs and see them on DVD.
Fish: Both whole stuffed animals and trophy heads are made from fish, for making stuffed fish it is better to deliver the whole fish to the taxidermist, try not to damage the fins. To do this, press the dorsal, lateral, pectoral and anal fins to the body, put a lining of thick cardboard or fiberboard along the folded caudal fin. Wrap all fish in cling film. If it is not possible to do this, pack the fish in any other way, just take care of the safety of the fins, for example, the fish can be wrapped in a regular bag, laying a straight stick of greater length along its body. If you intend to go for a trophy far away, from where it will be impossible to deliver a whole fish in a short time, then consult with a taxidermist how best to deliver the trophy. To make a fish head, you need a supply of skin behind the head. It is required to cut off the head along the indicated line without damaging the fins. If it is not possible to freeze the head or quickly give it to the taxidermist, you need to remove the entrails and muscles from the side of the cut, the esophagus and gills should be left. To store the head for four to five days, carefully salt the part freed from the viscera and muscles, fill the mouth and voids under the gill covers with salt, then pour the salt into the bag and put the head there. The head preserved in this way should be stored in the coolest place available, handed over to the taxidermist as soon as possible.
HOW TO STORE THE SKIN - FROM HISTORICAL SOURCES
No matter how good the skin is, it can quickly deteriorate when lying down if special measures are not taken to store it.
The fresh skin is called steam room. For a tanner, there is no better skin than a steam room, especially if it is not stained with blood and dirt. But it is rarely possible to immediately send the skin to the factory or dress it yourself. And when lying, the steam skin quickly deteriorates. At first she shrinks, frowns, becomes horny. Then she starts to sing. Her hair is falling off. In the end, she completely rots. Therefore, something has to be done so that the skin is preserved without damage.
The best thing is to salt the skin, and such wet-salty skins are considered the most expensive. Although you need to buy salt for the salt, but then you will get more money for the skin and more than cover the money that you paid for the salt.
Before salting the skin, you need to clean it thoroughly. Where cattle are poorly looked after and kept in the mud, there is often a lot of manure on the skin adhering to the wool, the so-called bulk. Bulk spoils the skin and prevents the tanner from working. We must take care that it does not exist on live cattle, and it is better to keep cattle in a barn. If the torn skin turned out to be in bulk, then before salting you should try to remove it. To do this, it is convenient to put the skin on the deck, and where it is not, then on an inclined board. The bulk is carefully upholstered with a wooden spatula or a blunt mezdryak, but certainly so as not to scratch or tear the fresh skin. If the bulk stuck so tightly that it cannot be knocked down, then you need to sprinkle salt over the wool in those places on the skin where the bulk remained.
Peeled hide you have to salt it.
Salt is taken fine, not buzun. For each skin is taken in winter from 8 pounds per pood of skin weight and up to 12 pounds in summer. Less salt is taken for a thin skin, and more for a thick one, but it is unreasonable to take less than what is said here. You will regret salt for a penny, and you will spoil the skin for rubles. Therefore, for a large ox skin, you will have to take from 14 to 16 pounds in winter, and 20 to 25 pounds of salt in summer; 8-12 pounds will go for a cowhide in winter, and 12-15 pounds in summer.
The skin is placed on a clean place in the spread, with wool on the ground or on the floor. It is good to put some kind of lining under the skin so that sputum can drain from it. The whole skin is evenly sprinkled with salt from the inside: it is useful to grind the salt with your hand so that it sticks well to the skin. If the skin is properly salted, then after three days it will show solid salt. If all its salt has been absorbed, then it is necessary to add fresh salt. When the whole skin is evenly salted, the head and part of the skin at the tail are bent inward, as well as the floors at the edges. Then salt is sprinkled on the head and all the thick parts are also sprinkled with salt over the wool.
Now fold the whole skin into a bundle. You have to fold according to the rules. First the fourth part of the skin is bent inward, starting from the head, then the right and left floors are bent to the middle, then the whole skin is folded along the ridge, then rolled up, starting from the head, into a bundle and tied with a tail or twine.
Five days later, the bundle is disassembled. The sputum is allowed to drain, lightly salted and rolled up again, as for the first time. If everything is done according to the rules, then the skin will lie for a long time and will not rot.
When, say, a lot of skins are collected at an artel, then you can salt in riots or stacks.
The first skin is salted on the floor in spreading, as has just been described. Then the whole skin is folded around, so that the head, paws and floors lie inside, and the whole skin around becomes like a saucer. All bent parts are sprinkled with salt over the wool, the head is especially carefully added. Then a second skin is placed so that the head does not fall on the head of the first skin, but next to it. Everything is done as with the first skin. The third, fourth, fifth and so on are placed on the second in the same way, each time salting everything well. Heads will lie in a circle one after another. Up to 200 skins can be stacked into such a riot. The brine in the riot should not flow to one side, which can happen if the skins are not properly distributed.
If the skin was * badly salted, then it ban. When the skin begins to rot, then hair will begin to come off it first of all. From time to time, you need to twitch your hair with your fingers. On a healthy skin, the hair sits firmly, and on a lean one, it immediately rips out easily.
A buckled hide is no good for a tanner.
If the skin begins to let out hair, then it can quickly rot. You can fix the matter if you disassemble the skins and salt them again. It is necessary to carefully monitor the hair so as not to be late with salting.
Wet-salted hides are the best, but sometimes it's hard to get enough salt. Then you can store the skins by drying them.
Drying skins done during the warm season.
The skin taken from the animal is hung on a pole with the wool inward along the ridge.
The pole is hung somewhere under a shed or in a barn, in the shade. You should never start drying the hide directly in the sun, because drying in the sun spoils the fresh, raw hide. She becomes horny from this, and then easily cracks and breaks. Only almost completely dried skin can be dried in the sun, and even then not in summer, but when the sun is not so hot. Many skins have been spoiled by improper drying in the villages.
You can’t dry the skins by spreading them on the ground, the only correct way is to dry them in the shade so that there is air on all sides. You can dry the skins of cows and horses. Almost always dried calf, sheepskin, goat and foal. They can also be dried in the winter in the hut.
However, it is much better to salt the flasks, as the Germans and Americans do, because then much better skins can be made from it.
During drying, the skin on the paws and cheeks of the muzzle shrinks. To avoid this, the paws and cheeks are straightened by inserting chips or splinters. Where the skin is adjacent to the pole, it is better to make linings so that air gets in there and the skin would not prop up along the ridge.
It happens that the whole skin has already dried up, but the head and thicker places have not dried up yet. Then you can expose the skin for a short time in the sun, covering it with matting, so that only the head dries openly in the sun.
In winter, it is difficult to dry the skins, and there is nowhere. Therefore, they are often freeze, but this should only be done as a last resort, when it is impossible to establish salting in any way. Very bad lumpy frozen skins, frozen right in the yard in the snow, because a lot of snow and dirt stick to them. Then, when the skin thaws, it is difficult to dress it. Better soldered frozen skins, which are frozen on poles in suspension, as in drying.
During transportation and disassembly, frozen skins easily crack and break. At the factory, they have to mess around a lot to put them into production. When the skin freezes, it becomes weaker. In the event of a thaw, especially during long-distance transportation, frozen skins easily deteriorate and rot.
There is another type of skin preservation, this is dry salting. The skins are first salted and then dried. Salt can be taken less than with wet salting.
Any prepared skin must be handled with care, not trampled on, not thrown anywhere, but stored in a safe place. Dry skins are almost the same as frozen ones, they break easily. Therefore, it is necessary to save the skins so that they lie in a cool, dry place, so that water does not drip on them through a thin roof, so that they do not get wet from below, so that moths do not start on dry skins and, in general, so that they do not deteriorate. If the skins have to lie down for a long time, then it is necessary to review them and shift them, if necessary, salt or air them.
09/09/2013 | An old skinning recipe: How to skin a skin
Skinning recipe: How to skin a skin
Many hunters, having obtained a trophy, think about its preservation in the form of a skin. However, not everyone knows the recipe for dressing skins and often wonders: how to dress the skin so that it looks beautiful and pleasant to the touch? Carefully read the old simple recipe for skinning and your trophies will delight you for a long time.

Skin dressing begins with soaking
Very strongly salted and dried skin is first soaked and rinsed. Then they start soaking in the solution. The skin during soaking in water should float freely, and a 4-6 cm layer of liquid is needed above it. The volume of water that is used for soaking must be measured, because. exactly the same amount of solutions will be required for future processes:
- pickling (fermentation);
- tanning.
The skin contains a lot of bacteria, which in the solution multiply at a tremendous speed. To destroy them, antiseptics are introduced into the cleaning solution.
Recipe for cleaning solution for dressing skins
For 1 liter of water, add 40-50 g of table salt (a tablespoon), 0.5-1 ml of formalin or 1-2 tablets of sulfidine (norsulfazol, furacilin or tetracycline). In addition, you can add a decoction of oak, willow, birch or eucalyptus leaves to the water (0.5 l of decoction per 10 liters of water).
Usually the skin soaks (becomes like a steam room) in 12 hours. If this does not happen, it is again placed in a fresh solution.
The next stage of dressing the skin is skinning
The skin dressing recipe recommends scraping the skin turned inside out with the hair inside and put on a wooden block (board, smooth log, conical frame of thick poles) with a blunt knife (the reverse side of the hacksaw blade or a steel brush), removing the remnants of meat, fat and removing films. The direction of movement of the scraper is from the tail to the head, while the side parts are scabbed - from the ridge to the stomach. The skin is stretched tightly without folds, but without stretching too much. If any skin is clearly oily, then it can be washed after skinning in a good powder or soapy solution of laundry soap. Do not rub the soap on the skin so that there are no undissolved pieces of soap left. After washing, rinse thoroughly and rinse the mezra and fur with clean water.
The next stage of dressing skins - fermentation
(classical dressing method), which was previously used for all types of fur raw materials.
Recipe for fermented solution for dressing skins
Fermented solution is prepared in a glass or enamel bowl / For each liter of hot water:
- stir 200 g (faceted glass) coarse rye or oat flour;
- 20-30 g of table salt (incomplete teaspoon);
- 0.5 g of drinking soda (on the tip of a knife);
- when the solution cools down to 28-30 degrees, 7 g of yeast (steamed as for yeast dough).
After cooking, put the fermented solution in a warm place. It is good to make kvass in advance, at least a day in advance, so that it will take "(fermented). This is determined by the bubbles of the released air.
According to the dressing recipe, the skin is immersed in a cooled solution for about 2 days. For 1 kilogram of the mass of paired skins, 3 liters of fermented solution are required. The skins must be turned over more often, and kvass must be stirred so that a film does not form on its surface and it does not rot.
The fermentation (picking) process can last from 5 hours to 4 days and depends on the quality of raw materials, room temperature, age of the animal, its sex, disinfection conditions, etc. The warmer the kvass, the faster the fermentation. But you can not heat above 38 degrees. Yeast fungus dies.
To determine the end of the process, the skins, while stirring in the solution, need to knead a little and try to dry or pinch. The removed skin must be bent near the groin four times with the skin up (into the pig's ear), tightly squeeze the corner, run a fingernail along the rib and release. If a white strip (dryer) remains in place of the scratch and gradually disappears, the skin is ready. For the same purpose, you can try on a pinch: in the groin area, hairs are pulled out and, if this can be done without much effort (with a slight crackle), it's time to finish pickling (picking). Every skin has its time. In solution, the skin is better underexposed than overexposed. We can say that in an overexposed skin (in the groin), the fur crawls out rather than pulls out. But if brought to such a state, do not throw it away. The dorsal part, as a rule, is preserved, but the next stage should be reduced by 3-4 times.
The next operation of dressing skins - lying
The skins ripened in pickel (kvass) are slightly squeezed, stacked with a hair up, covered with thick plywood or a board, and a load (for example, a bucket of water) is placed on top. The bedding lasts a day or two, at which time the skin ripens. The main thing during the sojourn is to squeeze out excess moisture from the skin, and the one that remains in it with the pickle just brings it to the condition. If the skin is one, then just fold it in half.
After lying down, you need to remove the remaining acid on the hairline, which can interfere with subsequent processes. Therefore, then it is neutralized within 20-60 minutes:
- or a solution of baking soda - 1-1.5 g / l
- or hyposulfite solution - 10 g/l (in b/w photography it is used as a fixer).
After neutralization, it is better to rinse the skins with clean water.
The next skinning operation is tanning
Tannin tanning is carried out in a decoction of willow bark. Oak bark strongly tightens the skin, which becomes more rigid, and also slightly stains the mezra and hair in a yellowish color. Willow bark is better.
To prepare a decoction, put the bark together with small branches, without tamping, in a bowl, pour water and boil for half an hour. Drain the broth, add 50-60 g of salt to 1 liter of solution and cool to room temperature.
The tanning agent is prepared in advance and the skin is kept in it from 12 hours to 4 days. Its quality can be improved by adding to 10 liters of willow decoction 2-2.5 liters of decoction of horse sorrel roots, prepared in the same way as described above.
Overexposure during tanning is undesirable, and therefore its end is determined as follows (in the groin area): after slightly squeezing (stretching a section of the groin area between the fingers), a small piece of skin is cut off or an incision is made. And on the cut under a magnifying glass, they consider how deeply the tanning agent (yellow) penetrated the skin. The process ends when it is completely impregnated.
The last stage of skinning is greasing.
According to all recipes for dressing skins, greasing is a must, because it makes the skin softer and increases its water resistance.
The recipe for a fat emulsion to finish dressing skins can be done in the following ways:
- mix and then beat well glycerin with egg yolk (1: 1);
- dissolve 50 g of soap in 0.5 l of boiling water and, while stirring, pour in 0.5 l of animal or fish oil, stir and add 5-10 ml of ammonia.
The emulsion is applied to the mezdra with a brush or swab. Then the skins are folded for a 3-4-hour soak, folded in half, skin to skin or hair up on some surface. It is advisable not to stain the fur, so as not to clean it later. After that, they are hung and dried at room temperature.
As the skins begin to dry out, they need to be kneaded and stretched in different directions. After complete drying, they need to be thoroughly wrinkled. Then the hair is combed, and the mezra is rubbed with chalk or tooth powder (they absorb excess fat and give it a pleasant white color) and treated with sandpaper. In conclusion, the skin is beaten out, dominated and the hairline is finally combed.
Here is such a simple old Siberian skin dressing technology, such a skin dressing recipe is useful to every hunter. In this way, I processed the skins of muskrats, martens, foxes and rabbits. The quality is very high, and the skins are strong and durable. Hares need to be chased away very quickly. Painfully thin.
Gennady Bannikov (G.)
When winter comes to earth and a lot of snow falls, stylish ladies and gentlemen dress in bright fox fur. For many, it remains a mystery how the fox skin is dressed at home to make such chic things. Some hunters also ask a similar question, because the fox most often becomes a trophy after entering the forest.
 Interestingly, the Book of Books tells that the Creator of the Universe himself was the first to use the skin of animals for clothing. When the first people sinned, he showed them the greatest mercy and gave them "long leather garments." It follows from this that the highest quality clothing can only be obtained from the skin or fur of animals.
 Nowadays, it is quite possible to create fur masterpieces with your own hands, if you know how to properly dress a fox skin at home. No wonder they say that knowledge is a great power. After all, fox fur can be used to make a luxurious fur coat, collar, hat or shawl. And if there is an avid hunter in the house, then you can get such things almost for free. The main thing is to be prepared to work hard.
Preparing the skin for the dressing process
 In order for the fur product to have a chic look, it is important that the skin is freshly mined. Therefore, for a professional hunter, this is not a problem. When the animal is already caught and the skin is removed, it must be thoroughly cleaned of dirt. Quite often, falling into a trap or running away from hunters, a fox can get very dirty. In addition to blood stains, a lot of burdock thorns and dirt get on the fur, which must be carefully removed from the skins. s.
Before you start dressing the fox skin at home, it must be washed. For this, warm water is taken, washing powder or liquid detergent is added there. Then the skin is carefully soaked in the solution and carefully washed. Some innovators use a washing machine to clean the fox skin. But in this case, it is desirable to set the delicate mode.
Basic operations for dressing fox skins
 After the fur has been cleaned of blood, thorns and dirt, they start dressing fox skins at home. To do this, perform the following operations:
- thorough soaking;
- mezdrenie;
- picking;
- tanning.
Each of these operations should be performed strictly according to the rules. As a result, the dressing of the fox skin will be successful and luxurious fur products will appear in the house.
Thorough soaking
 The process of soaking the skin is carried out to achieve its complete degreasing. To do this, you need to take the following components:
- pure water;
- vinegar, preferably 90%;
- ordinary kitchen salt;
- furatsilin;
- detergent for dishes;
- suitable container.
In order for the dressing of fox skins at home to be of high quality, soaking should be done in a large container. It can be a voluminous basin, an old bathtub or a tank. A special solution is prepared in it. For 1 liter of water you need:
- 1 tablespoon of kitchen salt;
- 1 teaspoon of detergent;
- 0.5 tablespoon of vinegar;
- 2 tablets of furatsilina.
Skins are placed in the finished solution until completely immersed. During the first 2 hours, they must be turned over with a stick with a blunt end. The procedure is repeated every quarter of an hour. After that, the interval for mixing the skins increases to 1 time in 3 hours. The soaking process lasts approximately 12 hours.
When salt is added to the liquid, you need to wait until it is completely dissolved. In this case, the water should not be higher than 25 degrees.
Skinning is an important cleansing process
 After thorough cleaning, subcutaneous fat and remnants of flesh remain on the skin. This provides for the process of mezdreniye.
Since each animal has its own thickness of the skin, it is desirable to carry out the process of skinning with unsharp movements. It is better to use a dull knife so as not to pierce the skin.
 At home, skinning is performed on a rounded board, stretching the skin on it. If there is no suitable board, you can perform the procedure by placing the skin on your knees.
The skinning process begins with the removal of the film, fat and flesh from the back of the hide. It is best to do this with a blunt knife at a 45 degree angle from tail to head. So there are more chances not to damage the precious fur.
picking
 Not a single fox dressing is complete without picking. Indeed, after this operation, the skin becomes flexible and soft, which means it is quite pliable for fur products.
To carry out pickling at home, prepare a solution:
- 2 liters of water at room temperature;
- 100 grams of vinegar;
- 2 tablespoons of rock salt.
All the ingredients are mixed and the skins are placed there. They are kept in it for about a day, after which they are checked for the degree of readiness. If you can easily pull out a few hairs from the lower abdomen, then the skin is ready. Another way to check is if an imprint appears when folding the skin in several layers, the material is ready.
Tanning
 Before performing the operation, a tanning solution is prepared. To do this, willow bark is placed in a huge pan and poured with water. Boil for 40 minutes, after which the liquid is drained. Salt is added to it - 1 tablespoon per 1 liter of broth. When the solution has cooled, the skins are lowered into it for 24 hours. At the end of the process, fur blanks should be dried.
The last stage is high-quality drying
 To make beautiful fur things out of the skin, it is important to dry it properly. At home, this is not so easy, but it's worth it. To do this, take a special device on which the source material is stretched. Periodically, it needs to be removed and stretched in the other direction. When the skin brightens and becomes almost white, it is left to dry. After that, the material is sanded with sandpaper and carefully greased.
 The dressing of fox skins at home shown in the video will help to do the process correctly. The result is an excellent blank for a chic winter attire. And a chic red fox will warm its admirers in the cold season.
The hunt was successful and you got your trophy. Now you are faced with the task of removing the skin and processing (preserving) so that it does not deteriorate during storage. Of course, it is better to do this immediately in the forest, and not at home, and while the fox has not yet cooled down, it will be easier for the skin to separate from the body. In addition, it will be easier to carry the skin, and not the whole fox, especially if you have a lot of trophies and they still need to be carried to the car.
The process itself will take us no more than 40 minutes.
How to skin a fox
It is better to remove the skin from the fox with a tube. To do this, use a sharp knife to cut the skin on the feet of the hind legs from the middle of the pads to the claw of the middle finger.
Then from the middle of the pads to the anus, along the inside of the hind legs. Next, cut the skin of the fox from the anus to the base of the tail. In the same way, the skin on the front paws is cut open, from the elbow joint through the foot to the middle claw.
Next, we separate the skin from the hind legs, holding the paw with the left hand, with the thumb of the right hand, we separate the skin from the hind legs, and then the front ones. With a knife we cut the connecting film and the tendons connecting the phalanges of the fingers. After removing the skin from the paws, he proceeds to separate the skin of the tail from its core.
For the convenience of skinning, it is better to hang the carcass of the fox by its hind legs in acceleration.

After removing the tail, separate the skin from the body. Gently pulling it down, if necessary, cut the film from the skin. Approaching the front joints, first we take out one paw after the other, then the skin will again be removed easily.

Near the head, you need to help with a knife, because. in this place dense connective tissue. Carefully cutting off the ears (leaving a thin part of the cartilage in the auricle), we remove the skin from the tip of the muzzle, cutting the lips and nasal cartilage, completely remove the skin.
Primary processing of the fox skin
The removed skin should be well degreased and wiped with a dry and clean rag. If there are gaps on the skin, they must be sewn up with threads, and they should not be tightened too much, only until they close. The defatted and wiped skin of the fox is put on the rule, with the fur inward, the skin outward. It is important that the spine and tail are strictly in the middle. Place the rule with the skin at a slight angle so that the paws and tail do not come into contact with the main skin.
The skins should be dried at room temperature. After drying, remove the skin from the rule and turn it out with the fur and dry it.

Fox skin straightener


