How to recover data from phone. Android Data Recovery Tips, Tricks and Lessons
Who among us has not deleted photos or videos without fully realizing what we have done? Yes, it is very painful to realize the loss. But there is no reason to panic: there are many ways to return data. In this article, I will show you how to recover deleted files on android without root access and without a computer.
Advice. Time after deletion plays a significant role: do not copy new files to the device until you have launched . Turn off Wi-Fi and 3G/4G connections. While automatic updating is running, your data may be overwritten without your knowledge. And, if you had any chance of getting your hands on the lost files, he's lost.
Recover Deleted Android Files Without Root
By default, root access is disabled on your phone. Accordingly, your rights on Android are very limited, so you will not be able to use most recovery programs. But there is a way out, and this method will allow you to return data from your phone's sd card. At the same time, it will not fit for the resuscitation of internal memory.
1. Connect the memory card to the PC
The first thing to do is to connect the phone's memory card as a storage device to the computer. While you can connect your Android via USB, I would recommend a card reader: not all Android phones allow you to mount an SD card drive as a separate volume.
2. Download the Recuva program
The first thing to do when running Undelete is to select the storage device where you want to find the lost data (it can be internal or external memory).
2. Scan the phone's memory
Scan the selected device. This process may take from 2 to 10 minutes, depending on the amount of memory and the amount of data stored.
3. Recover data from internal memory
At the end, you will be presented with the found data, distributed in several tabs: files, images, music, videos, documents and other files. are returned to their original place - to where they were stored before deletion. This option may only partially work (if there is a problem with your Android phone's memory). In this case, please refer to Recuva (see above), Wondershare or other root recovery software.
Question answer
Tell me how to recover deleted files on Android without programs? Is it possible?
Answer. No. However, if you back up your files to the Google Drive or Dropbox cloud, you can copy the files from there back to your phone.
How to recover photos on Android without using a PC? Those programs that you listed above do not help!
Answer. What about the Wondershare Dr. Fone and DiskDigger? We can also recommend Mobisaver. However, the effectiveness of such utilities is not too high - it is better to use .
Is it possible to download Recuva for Android? Is there a convenient mobile version of this program?
Answer. Alas, there is no mobile version and it is unlikely that it will appear. In addition, without root access, it will be ineffective.
Loss of information on your favorite gadget ... This cup has probably not passed anyone. And the point is not what caused it - personal inattention, a virus attack or a software failure, but what to do next to fix it. You should not despair, it is difficult to recover deleted files on Android, but it is possible, despite the fact that there is no recycle bin on Android.
There are two not very different methods for recovering deleted data - using a PC and without it. They are based on the use of special resuscitation programs that find deleted information on media. There are a great many such programs, but the principle of their operation is approximately the same, so we will consider only the most common and proven ones.
For this we need:
Laptop or personal computer with Windows OS installed;
USB cable for connecting your tablet or phone;
software to recover deleted files. There should be no problems with this - there are a huge number of them on the Internet and they are distributed mostly for free.
Consider the two most popular applications 7-Data Android Recovery (Download from the developer's site) and Dr.Fone (Download).
7-Data Android Recovery
This program has found its popularity by the fact that with its help you can recover any kind of information, whether it be texts, photos, audio, or video files. Also, unlike many similar utilities, it allows you to work not only with a memory card, but also with the system partition of the device itself.
So, we connect to the PC in USB debugging mode, run the installed application. The next step is to select the partition where the files that need to be recovered were located.
7-Data Android Recovery itself will start scanning the partition for search, as a result of which a plate will appear, the content of which will be the deleted information. I will make a reservation, this procedure can take a considerable amount of time, since it directly depends on the size of the memory occupied by the folder.
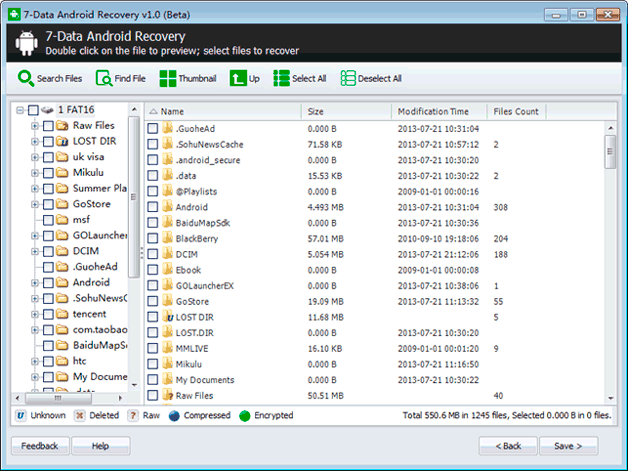
Select the desired file and click Save.
Simple, fast, not difficult, works with system partitions.
Dr. Fone
For this utility to work, you need to make a small configuration of the gadget itself, namely, enable root rights (rights that allow you to change system settings and work with program system settings) and connect in USB debugging mode.
After launching, the program immediately starts searching for deleted files on Android. Again, this may take some time. As a result, we get a table of files available for recovery.
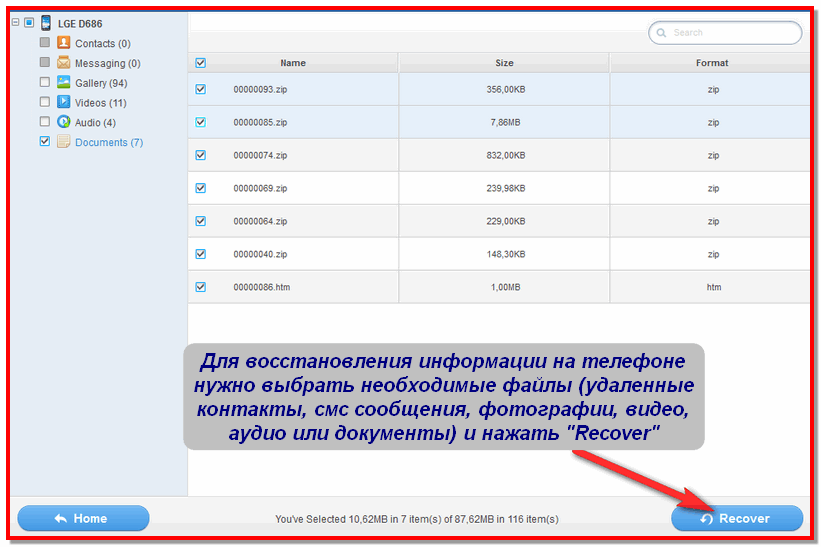
Select the deleted file, click the Recover button. Specify the path to the folder where it can be restored.

As a result of the above actions, the information received is saved to the hard drive of the computer.
Restore directly to an Android device
Unfortunately, a computer may not always be at hand, but this is absolutely not an obstacle to recover deleted files on Android. You can get by with one device by downloading the utility directly to it. The Dumpster program (download) does a good job with this task. It is installed in the same way as all other applications for Android and plays the role of a kind of recycle bin for storing deleted files. By the way, in the settings you can specify which types of data are preferable to store, and which can be deleted immediately.
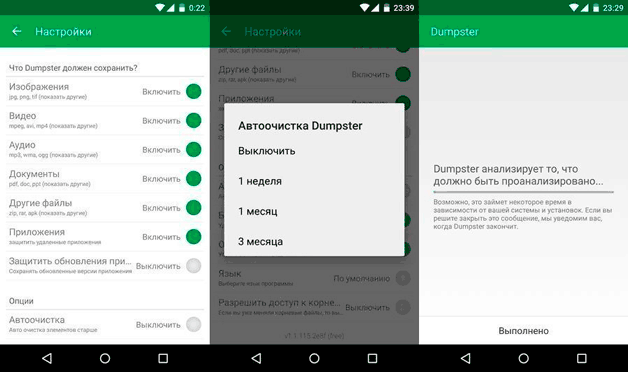
It will not be difficult for the user to recover deleted data, since after launching the application will independently scan the internal memory of the device and display a list of all deleted data. After that, you can select the file that will be restored to the folder where it was before deletion.
As you can see, the removal of information is not always irreversible. But, nevertheless, it happens that in spite of all efforts, it is impossible to save the lost information.
If you can't restore?
If all of the above methods have not been successful, most likely it will not be possible to recover the data.
But, you can still try to go to photos.google.com under your account. This record is requested from the user when the device is turned on for the first time and can later be used to store and retrieve information from various resources. So there is always a chance that your photos are synchronized and will be found on this resource.

Similarly, you can try to restore contacts using the contacts.google.com link. But, here the list of contacts collected from all devices and applications mixed up may turn out to be a surprise.
In conclusion, I would like to remind you that no matter how miracles modern data recovery applications work, the most reliable and correct option is to synchronize all data with your account, or create archive copies on other storage media.


If you are also tired of endless games on Android and want something serious and interesting in terms of software, then now is the time to eliminate all the hindrances that can distract you from reading the current review, focus and prepare for something interesting to come. Do you know that deleting a file from a memory card can still be restored?
Have you erased a photo or a video or a document or an archive or something else, made a mistake and now you regret the loss? It's really sad, because Android does not have a recycle bin from which you can retrieve inadvertently deleted files. But, as I wrote earlier, there is still a way to resuscitate. And the Undeleter application will help us with this.
In fact, by deleting a file from the trash or in Android from a memory card, we did not completely kill it, but only marked the sectors it occupied as free. Now, at the next recording cycle, some other information will be written to them. But until that happens, the deleted file can still be recovered.
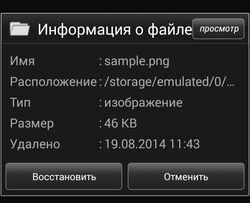
As the name suggests, Undeleter is a data recovery application like Get Data Back, Easy Recovery or Recover4All for PC. Undelete's job is to scan your memory card, find anything that can be recovered and give you the opportunity to do so. Or it will allow you to nail the file completely so that it is no longer possible to get it.
After scanning, you can view all the results in bulk or by type: photos, videos, documents, archives. In the settings, it is possible to specify the folder into which we will pull out the deleted earlier, activate the use of previews, which greatly simplifies the orientation in the found one, you can also select the full-screen mode and send a letter to the developers.
I don’t know how often you have misfires, that you understand that you literally just said goodbye to something important and necessary. It seems to me that Undeleter will not interfere with anyone, just like that, for every fireman. True, such software, which is not surprising, requires root rights in the system.
Peculiarities:
- Recovering deleted files on any partition
- Recognition of documents, photos, videos, music, archives and apk
- Save recovered files directly to Dropbox and Google Drive
Download Undeleter (Recover files deleted from SD cards and internal memory) for Android you can follow the link below.
Developer: Fahrbot
Platform: Android (Device dependent)
Interface language: Russian (RUS)
Condition: Full (Full version)
Root: Required
- tutorial
Now more and more smartphones come without an sd-card slot, and information has to be stored on the built-in memory with access to it via MTP. This connection mode does not allow standard means to restore phone data after wipe or accidental deletion.
Today, using the example of a bunch of Xiaomi Mi2s and Windows 8.1, I will try to tell you how you can recover lost data, who are interested, welcome under cat.
It should be noted that if you formatted the internal memory of your smartphone/tablet/smartpad by mistake, then you should not be upset, and most importantly, in no case do you need to write anything to the device’s memory, so you will be able to recover more data.
The MTP protocol does not allow the computer to recognize the connected device as a USB drive and recovery programs cannot scan such a device and save data, so we will need to copy the entire internal memory partition as a system image.
Preparing your Android device
You will need root and USB debugging enabled.PC preparation
In order to copy the system partition, we need:- Drivers for your device (in case of problems habrahabr.ru/post/205572);
- ADB (adbdriver.com or developer.android.com)
- FileZilla Server.
vhd tool
We create a folder with the address C:\cygwin64\000 (the name does not matter, you should not just use non-Latin letters), our image will lie here. Copy to the folder VHDtool.exe.FileZilla
During the installation, we agree to all standard settings.After installation, FileZilla will start automatically, but you need to exit the program and run it on behalf of administrator.
When you start FileZilla will ask for the name of the server, leave everything as it is.
Listen on those ports 40
timeout settings - the default is 120, 60, 60, and we set 0 everywhere and click OK.
Go to edit - users. In the users window, create a new user. In my case, this is the qwer user.
Click Add - write a name - password pass - click OK.
Next, in the same Users menu, on the left, select the Shared folders tab. We go there and add a folder in which our block will be filled. Click Add and add the folder C:\cygwin64\000. The path to this folder will appear in the window. If there is no letter H to the left of the inscription C:\cygwin64\000, then you need to click Set as home dir. Then, highlighting the line C:\cygwin64\000, you need to check the Read and Write permissions. Then click OK.


adb
We will need the following files:- adb.exe
- AdbWinApi.dll
- adb-windows.exe
- AdbWinUsbApi.dll
- fastboot.exe
You can download them at .
Or pull it out of the Android SDK distribution.
Copy them to the folder C:\cygwin64\bin
Checking if ADB is working
We launch the console from the folder C:\cygwin64\bin, for this it is enough to enter cmd into the address bar of the explorer
We enter the command:
The list of connected devices should not be empty, if after the line List of devices attached is empty, then you have not installed a USB driver or have not enabled USB debugging.
When everything goes well, the console looks like this:

20352f2c - my Xiaomi Mi2s
USB modem mode
We will need to connect the device via USB to your PC and enable USB modem mode. I use CyanogenMod 11 and I have this mode on the path: Settings> Wireless networks> More ...> Modem mode> USB modemScreenshot

Now we need to find out what IPv4 address your computer received.
Using the ipconfig command on the command line
or
We go along the path: Control Panel\Network and Internet\Network and Sharing Center

Click on the inscription 'Local Area Connection', then Details and copy the IPv4 address.

In my case it is 192.168.42.79
Important! Each time you reconnect the USB cable and turn on/off tethering mode, IPv4 will change.
What block of memory do we need?
All memory in your device is divided into logical blocks, we do not need to download everything, it is enough to understand which section contains the erased information.Now we need to see the list of memory blocks, for this we enter the following commands line by line:
Adb shell su find /dev/block/platform/ -name "mmc*" -exec fdisk -l () \; > /sdcard/list_of_partitions.txt
Hint: if you are too lazy to manually rewrite commands or you are afraid to make a mistake, then you can use copying, but pasting the line into the console in the usual way will not work, so you need to right-click on the console window, then select edit> paste.

After that, the list_of_partitions.txt file will appear in the internal memory, which we need to copy to a PC and study.
You can copy it to our 000 folder using a simple command (you should run it in a separate command line window):
adb pull /sdcard/list_of_partitions.txt C:/cygwin64/000
My file looks like
Disk /dev/block/platform/msm_sdcc.1/mmcblk0p27: 25.6 GB, 25698483712 bytes 4 heads, 16 sectors/track, 784255 cylinders Units = cylinders of 64 * 512 = 32768 bytes Disk /dev/block/platform/msm_sdcc.1 /mmcblk0p27 doesn't contain a valid partition table Disk /dev/block/platform/msm_sdcc.1/mmcblk0p26: 3758 MB, 3758096384 bytes 4 heads, 16 sectors/track, 114688 cylinders Units = cylinders of 64 * 512 = 32768 bytes Disk /dev/block/platform/msm_sdcc.1/mmcblk0p26 doesn't contain a valid partition table Disk = cylinders of 64 * 512 = 32768 bytes Disk /dev/block/platform/msm_sdcc.1/mmcblk0p25 doesn't contain a valid partition table etc…
The internal memory in my device is 32 GB. Therefore, I am looking for the largest partition, in my case it is mmcblk0p27 with a size of 25.6 GB, it will most likely have a different name for you, or it will not have a p** at all. Of course, no one guarantees that the largest partition will turn out to be the one on which your photos, videos, documents, etc. were lying until recently, but in 90% of cases this turns out to be exactly the section of memory that we need. Otherwise, you will have to copy all the images in order and check each of them.
We copy the memory section to the PC.
If you have already closed the cmd window, then launch it again.
Enter the commands line by line:
adb shell su mkfifo /cache/myfifo ftpput -v -u qwer -p pass -P 40 192.168.42.79 mmcblk0p27.raw /cache/myfifo
Don't forget to make the appropriate adjustments to the code!
Let's decode it:
Qwer - account name in FileZilla (you have your own if you changed it)
pass - password from the account in FileZilla (you have your own if you changed it)
40 - FileZilla server port
192.168.42.79 - FileZilla server address (you have your own)
mmcblk0p27.raw - copied memory block (you have your own)

Open a second command prompt window and enter the following commands:
adb shell su dd if=/dev/block/mmcblk0p27 of=/cache/myfifo
We look at the FileZilla window and see that the download of mmcblk0p27.raw to the C:\cygwin64\000 folder has begun, now you can close the cygwin windows and take a tea break.

Convert and restore
Are you back? Did the file download? Excellent. We turn off the phone, connect the Internet. Run Cygwin.bat and enter the following commands.Cd C:/cygwin64/000/ VhdTool.exe /convert mmcblk0p27.raw
Don't forget to change mmcblk0p27 to your block number!
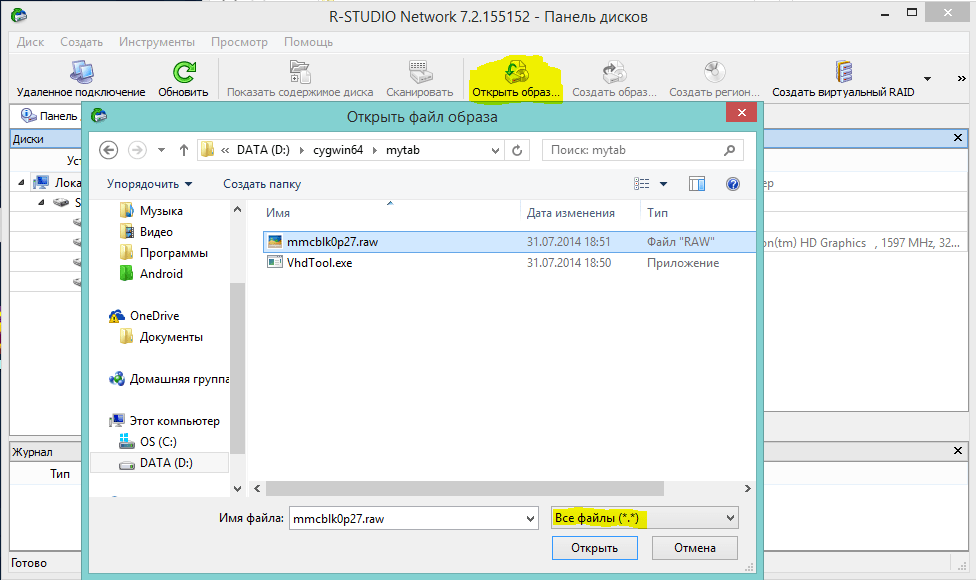
It took me a couple of seconds to convert. As a result, we get the same mmcblk0p27.raw file in the C:\cygwin64\000 folder, but a little different. This converted file can be mounted as a virtual disk, or, for example, through R-studio, data can be restored directly from our image. I did so.
Hint: I marked important points in yellow.
Results
My goal was to explain in popular language how to copy the system partition from an android device to a PC, perhaps some will reproach me for the difficulties associated with a USB modem and ftp, and say that it could have been easier to pull the image. I will answer this way: I tried in other ways, described on w3bsit3-dns.com and xda-developers, it didn’t work out for me, but with ftp it worked on the second attempt, and when writing the article, everything went like clockwork.I was able to recover all the lost photos without loss in quality, and even those that I did not even think of recovering. During the restoration, photos were discovered that I took in August last year, when I just bought the phone and tested the camera.
In conclusion, I would also like to mention one more small utility that restores data -
How many times have they told the world
What should be a backup; but it's just not all right...
Data loss on Android can happen in good and bad scenarios. A good scenario is when the files were stored on the mobile device's memory card. In this case, you can return them easily and even for free. Unfortunately, memory cards are becoming less and less common in smartphones, and data recovery from internal memory is a completely different story. Let's consider both situations.
How to recover data on an SD card
Everything is simple here. To get started, download and install a normal free data recovery utility on your computer. It can be the mega-popular Recuva, the open-source TestDisk or its offshoot PhotoRec, or any other similar program.
Then connect the SD card to the computer like a regular USB flash drive and run a scan on it using the installed utility. Save the rescued data and finally back up them and other valuable files to the cloud.
How to recover data from the internal memory of a mobile device
Unfortunately, the vast majority of modern smartphones connect to a computer using a special protocol, that is, not like a regular flash drive. Accordingly, all the utilities listed above are useless.
There are special programs for data recovery on Android, and most of them are shareware. This means that you can, without paying a penny, install the utility, scan your mobile device and see what was recovered from the lost. But in order to pull out and save the restored one, you have to buy a license.
On the one hand, this approach can be called fair. The user does not buy a pig in a poke, but gives money only after he is convinced that the utility works. On the other hand, parting with several thousand rubles is still difficult. In any case, the loss of information is usually the user's fault, and a powerful blow to the wallet is a great motivator to start backing up important data.
Utilities to recover data from Android internal memory:
- iCare Recovery (Free!!!).
- Undeleter (if you have superuser rights).
These programs work in much the same way. First, the client is installed on the computer, then the smartphone or tablet is connected to the computer via USB. It is enough to follow the instructions exactly, and you will surely succeed.
The only difficulty may be the lack of utility support for a specific model of a mobile device. That is why you first need to test the program in free mode, and only then buy a license.
What to do so that data is not lost
Backup, backup and again. Almost all the data that is on your mobile device can and should be copied to cloud storage. It's almost always free, secure, and happens automatically. For example:
- Google Mail backs up your emails.
- Google Contacts backs up contacts.
- Google Photos backs up photos, videos, and screenshots.
- Google Music backs up music.
- Google Office Suite backs up documents, spreadsheets and presentations.
- Universal storages like Google Drive, Dropbox and others back up everything.
Take any type of data - for sure there is an easy and convenient way to safely store it. Take advantage of this and protect valuable information.


