DIY projector: easy and affordable ways to create projectors at home. How to make a projector at home High-quality homemade projector
A projection apparatus (in everyday life - a projector) is an optical-mechanical device with which an image from flat illuminated objects is projected onto a screen. Its device depends on the purpose for which the device is intended (viewing ordinary slides or high-resolution video content), and the image projection technology used. However, the design of the simplest samples is not characterized by increased complexity. Therefore, in order to get a kind of home theater, it is quite possible to assemble a projector with your own hands. And how to do this is described in the material below.
The principle of operation of multimedia projectors
More recently, in the domestic market it was possible to meet projectors that use light for projection:
- passing through a transparent object (slides, films) - overhead projectors (diascopes);
- reflected from an opaque object (page of a book, etc.) - epiprojectors (bishops);

- passing through constantly moving frames on a transparent film - movie projectors.
There were also universal models, with the help of which it was possible to project an image onto the screen from both opaque and transparent objects. They are called epidiaprojectors (epidiascopes). However, with the development of digital technology, these projectors have been replaced by multimedia projection devices that successfully compete in the market with modern Smart TVs in the home theater segment.
A modern multimedia projector is a small set-top box that can be used to reproduce on a large screen an image received from various digital devices (camcorder, DVD player, USB drive, etc.). Today, there are two types of multimedia projectors, the work of which is based on the use of different digital technologies. The image in them is obtained by means of a light flux:
- reflected through color filters from a matrix of controlled microscopic mirrors - DLP (DMD) technology;
- passing through a transparent matrix of liquid crystal elements - LCD technology.

Structurally, multimedia projectors are quite complex devices in which Optical, electronic and mechanical components operate synchronously with high precision technical parameters.
On a note! Projectors using DLP (DMD) technology provide high-contrast images with optimal color reproduction, while LCDs are characterized by high image brightness and color saturation.
How to assemble a projector yourself
It is almost impossible to build a high-quality multimedia projection device at home. At the same time, it is quite possible for a person who has basic knowledge in the field of electronics and skills in electrical work to assemble a projector of the simplest design with his own hands.
Before you start assembling your home projector, you need to decide how it will be used. For example, if:
- with the help of a projector, cartoons for a child will be shown, then you can make a simple mini-projector even from a phone;
- you need to get color effects when listening to music tracks (color music), you will need a home-made laser projector;
- if there is a desire to surprise loved ones with something unusual, then you can make a simple holographic projector yourself.
The simplest projector
The simplest video projector can be made from a smartphone and a lens that can provide 10x magnification. To do this, you should additionally prepare a box of hard cardboard, and from the tools you will need:
- stationery knife;
- pencil type "Designer" with a hardness of 2M;
- electrical tape, silicone glue or glue gun;
- big paperclip.

Important! When light passes through the lens, the image is flipped 180°. Therefore, a special application must be downloaded to a mobile device that allows you to flip the image on its screen. For example, for cell phones running Android OS, the Ultimate Rotation Control application is most often installed.
The manufacture of parts and assembly of the projector from the box and magnifier is carried out in the following order.

Advice! It is advisable to make a hole on the back wall of the box for connecting cables from the charger and a USB adapter, with which you can connect a flash memory to your smartphone.
A simple 3D projection device can be made from a mobile phone and a truncated plastic pyramid with overall dimensions:
- base, mm - 60x60;
- small (truncated) square, mm - 10x10;
- height, mm - 45.

The 3D projector is based on the construction described above. Now, if you download special holographic video tracks into the memory of a mobile device, place an inverted pyramid in the center of its display and turn on the playback of recorded videos, then the resulting image can surprise the audience. This is especially true for older people.
Projection apparatus based on a slide device
A high-quality image can be obtained without a magnifying glass. In this case, to create a home-made device, you will need a slide projector for slides that are projected from a sheet of white paper measuring 210x297 mm (A4 format). The advantage of this projector is that all optical components are assembled and adjusted at the factory, and the user only has to take care of finding the source of the image.

Best of all, a matrix from a 10.1 tablet (217x136 mm) will cope with the broadcast of photo or video content. True, for this it will need to be carefully dismantled from the case, without violating the performance of the gadget. Having installed the matrix in the projector, it is connected to the tablet, which in this case acts as an image source, and the slide projector is turned on. The best image is obtained if use a slide projector(in our case, a matrix). If a slide projector uses a reflected beam of light to project an image, then the picture quality will be noticeably worse.
You can make a similar projection device based on a slide projector to view smaller slides. To do this, you need a matrix from a phone or an MP video player that fits into the slide window.

gobo projection
For original moving pictures, slide projector instead of a matrix, they are equipped with sets of special gobo lenses which are easy to make by hand. In this case, a projector from a filmoscope can be used as a light source. This option (gobo projection) is most often used when conducting various kinds of presentations.
Note: a gobo lens is a projection filter (stencil, frame) that is installed in front of the light source.
Home theater projector
Quite often, movie lovers are scared off by high prices for a set of equipment that is necessary for organizing a home theater. In this case, you can try to make a fairly good projector yourself, based on a powerful LED and LCD matrix from a computer monitor or from a laptop. This is far from a simple matter and requires engineering knowledge in the field of optical instrumentation. You will have to develop drawings of the necessary parts at home, adjust the optical blocks, etc.
In addition, you will need a number of components, including:
- Fresnel lens with a focal length of 220 mm;
- Fresnel lens with a focal length of 317 mm;
- lens 80mm/1:4/FR=320;
- intermediate lenses (condenser);
- 2 fans with power supplies and controls;
- LED with a power of at least 100 W with a heatsink and a driver;
- LCD matrix with a size of at least 15″ and a resolution of at least 1024x768;
- monitor remote control (via Wi-Fi).

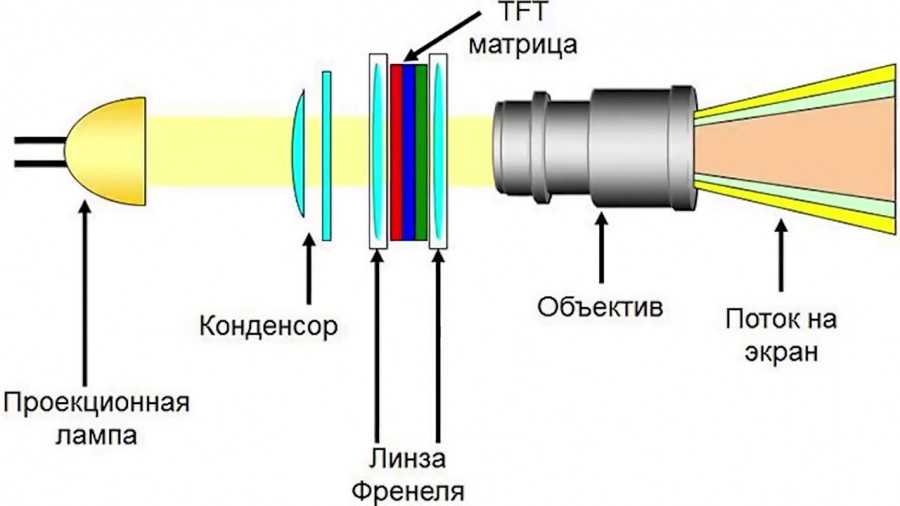
Drawings of body parts for such a projector will have to be developed independently and ordered to be manufactured on the side, or also, using your own abilities and skills. Installation of components in the assembled housing should be carried out in accordance with the above diagram in such a way that the light is evenly distributed over the screen.

Attention! All distances between the optical elements of the projector are determined empirically.

For people who have sufficient skills, backed by knowledge, and are going to make a projector on their own at home, there are a number of recommendations from craftsmen who have experience in such production.

On numerous sites of the Internet community, a large number of a wide variety of designs made from improvised materials (which can be easily found in any home) are given with instructions and feedback from people who took the advice. Well, everyone determines the expediency and economic feasibility of such crafts independently, based on their own capabilities and skills.
In conclusion, it should be noted that a carefully assembled and properly adjusted projector will allow you to get a fairly high-quality image on a screen located at a distance of 4 meters from the device. In this case, the diagonal of the frame at the output will be 100″. This is a perfectly acceptable solution, if not for watching videos in maximum resolution, then at least for spending time together with your family watching an interesting movie.
Popular projectors of 2018
Projector Epson EB-X41 on Yandex Market
Projector Epson EH-TW5400 on Yandex Market
Projector Acer X118 on Yandex Market
Projector XGIMI H2 on Yandex Market
Projector BenQ TH534 on Yandex Market
If we want to project not 8 but for example 2 gobos?
Yes, it's possible, you just set the values for only two gobos in the device menu, the rest of the unused gobos will be skipped, and you won't see the change of gobos, because at the moment of flipping the slide, a special shutter closes the lens.
How many images can we project?
Our projector can project up to 8 gobos, for comparison, similar Italian brand projectors can only fit 6 gobos.
We have frosts down to -40 degrees, what should I buy in order for the projector to work?
Unlike Italian, German projectors, which require additional protection from external precipitation such as rain and snow, our projector does not need such protection, the design of the device is designed to work in extreme Russian conditions up to -40 degrees.
Can we get a quality projection on a black marble walled façade?
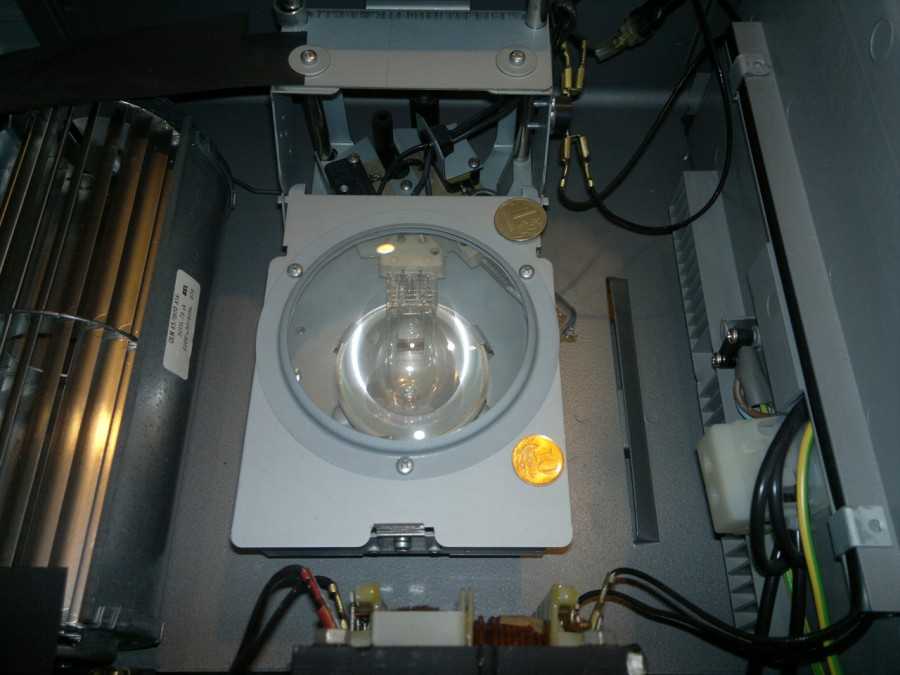
How long does the lamp last and how much does it cost?
Discharge lamps do not have a long life. The average operating time for 1500 watt lamps is 1000 hours. This is about three months of work at night. The cost of such a lamp is 170 Euros (,) Chinese counterparts are two times cheaper, but not sold in Russia, you can order them yourself through online stores.
What is the maximum image size we can get and what is the required distance?
The 575-1500 projector uses a 1500 watt lamp, for which we recommend a maximum projection size of 15 x 10 meters. In this case, the projector should be installed at a distance of 50-70 meters. (the device has an optical zoom function that allows you to install the device at different distances while maintaining the image size)
What is GOBO, how much does it cost, how long does it take to make, can we make gobos ourselves?
GOBO is a glass stencil made of high temperature borosilicate glass with silver sputtering and anti-reflective coating. The image is applied chemically in our laboratory. (the application process is a trade secret) gobos come in two types, black and white and full color. On a black and white gobo it is possible to display any information in the range from 0 to 100% black with a resolution of 3600 . A full color gobo consists of four layers arranged according to a color system (cyan, potassium permanganate, yellow and black.) Each color is applied separately, then all four layers are glued in place to form a full color image. The cost of manufacturing one black and white gobo will be 3000 rubles. and full-color 9000 rubles. Production of a gobo takes an average of one day, then we send it to the addressee by a transport company. You can make your own gobos in your city. We can sell equipment for its production. The approximate installation price is 3,000,000 rubles. you will also have to purchase material from us for the production of gobos.
In this article, which continues our cycle of simple various crafts at home, we will tell you how to make a simple but adequately working projector at home. A homemade device that can be easily made at home even without special skills can replace a small home theater for watching movies or family photos.
Of course, the factory assembly wins in quality, but in terms of comfort and atmosphere, a homemade projector will be much better. Moreover, it can be done together with the child - this is a very serious plus for your relationship.

Even the child himself will not have any difficulties in assembling the projector from an ordinary box of cardboard and a banal magnifying glass if he decides to work on the device without the help of adults. This will take a maximum of 15 minutes.

Now let's tell you step by step how best to make such a projector with minimal time and effort. There are simple and complex schemes, we will analyze one that is as easy as possible in practical execution.


Preparing to create a projector
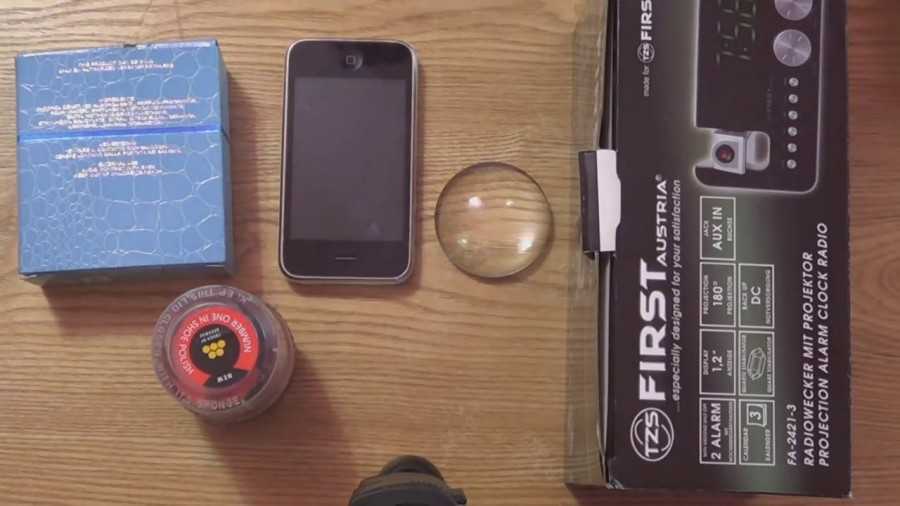
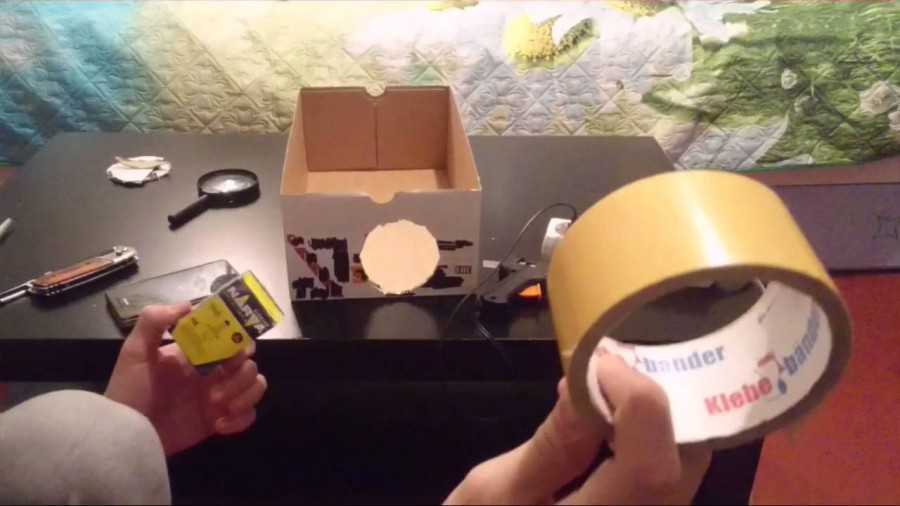
To begin with, let's collect in front of us all those materials and components from which it will be possible to make our miracle projector itself.
We will definitely need an ordinary medium-sized shoe box, a 10x magnification lens, a stationery sharp knife, an ordinary marking pencil, black electrical tape, a paper clip and, of course, a smartphone. A homemade projector for viewing photos and videos will be ready very soon.

Carefully on one of the side walls of the box we cut out a hole exactly in the center in which the lens will be placed. It is very important that it is located strictly in the center - here a pencil will come in handy, with which we will draw diagonals on the side where we will cut the hole. It is in the center of the intersection of the diagonals that the lens will be placed.

We fix the lens with the help of a pre-stored electrical tape. However, other options for fixing are also suitable, for example, building glue or silicone.

Inside the box, we make a stand to place the smartphone (if there is a special case that allows you to put the smartphone behind the lens, then no stand is simply needed).

We turn off the light, hang the curtains and start testing the projector. It will be necessary just by moving the smartphone to find the optimal location of it relative to the lens. It is necessary to achieve the highest quality image - everything is simple here and depends only on the position of the device and the box.

A properly working image flip application must be downloaded and installed on your phone. The fact is that when passing through the lens, the video or photo will automatically turn 180 degrees.


The best option for Android OS would be Ultimate Rotation Control, and owners of "apple" devices will be able to use Video Rotate & Flip or another option.

It is desirable to make a convenient input for the MicroUSB wire - phones are quickly discharged when playing videos or viewing photos.

As you can see, there is nothing complicated in making a simple home projector. The more pleasant moment will be that you will have to spend a minimum amount of money - after all, everything you need for it can be found in almost any apartment.

What points should be considered when working?
If you decide to make a really good projector, then you should increase all overall dimensions. Accordingly, use a tablet or laptop instead of a phone, and the box will also be larger, respectively. The manufacturing mechanics are exactly the same as in the small format.

IMPORTANT: If the image does not improve in any way, no matter how you move the device, then the problem is most likely the quality of the lens you have installed. It will be optimal if you find an old Soviet magnifying glass - their quality is simply amazing.


The brightness settings on your smartphone or tablet should be set to the highest possible. Painting the inside of the box black will also improve the quality of the projected image. Not every wall is suitable either - it would be best if the projection goes onto whatman paper placed on the wall evenly and at a right angle.

Be sure to organize viewing only at night and with minimal ambient light - only in such conditions the picture quality will be more or less normal.

Do not forget that this is homemade, not professional equipment - do not expect too much from it. Homemade projectors with a lens, without a magnifier, can also work fine.

We are sure that our ideas and detailed instructions for creating a home projector have become useful to you. Working with your child on such a device will help you establish additional contact with him, and cozy family evenings will be great activities to relax after a hard day at work. Make a projector and be sure that everything will work out for you.

DIY photo projectors


Watching movies at home on the big screen is a very common desire. But its realization is noticeably expensive for most dreamers. Otherwise, they would simply buy either a projector or a TV. But for those who understand the design of electrical appliances, it is quite possible for them to independently make a projection device for a home theater. This will be discussed further.
A bit of theory
First, let's look at the diagram of the correct projector. Obviously, not everyone can make such a device. If only because it will require several accurate and high-quality factory-made optical parts:
- lens;
- lenses.
The uniform distribution of light on the screen will depend on them. Light must enter the lens at the correct angle. If you do not know the optical characteristics of the lens and lenses, all distances can be determined empirically.
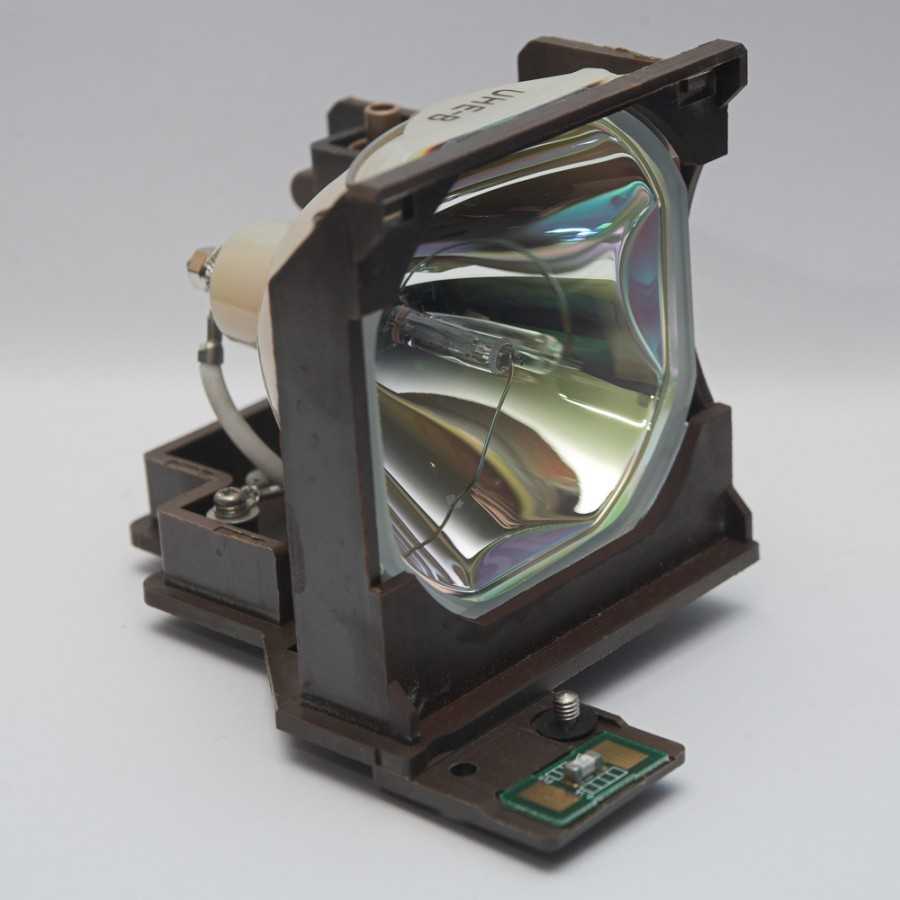
The source of the image in the projection device is a matrix on liquid crystals. They work for the light. Moreover, each pixel on the screen is projected with an increase in size. Therefore, the original image should be as clear as possible. The more pixels the better. The so-called FULL HD is 1920×1080 pixels. The brightness of the projection lamp will determine the maximum screen size on which you can watch movies with acceptable brightness and contrast.
The simplest projector
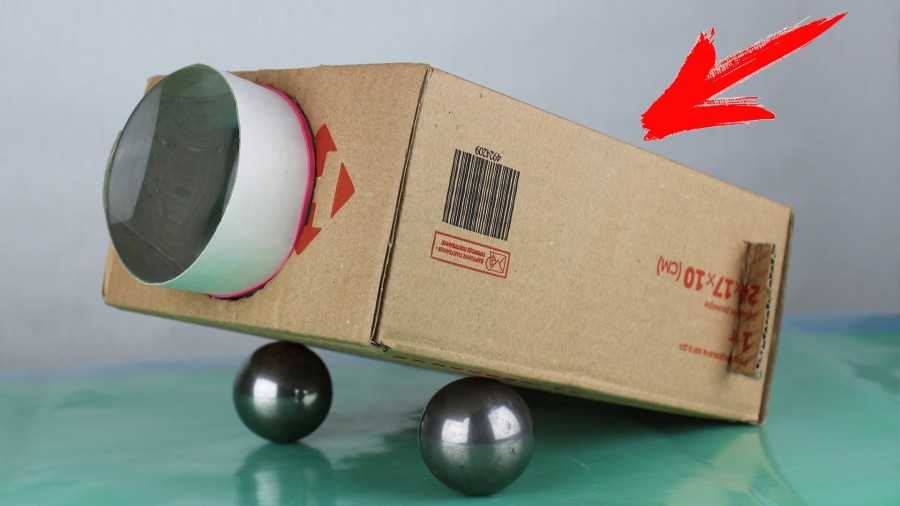
If the reader is the owner of a smartphone or tablet with a bright screen and a resolution close to FULL HD, and also dreams of watching movies on a big screen, he can try to make a simple device out of a box, a lens and his gadget. The box-body should be larger than the gadget in any cross section, and the lens should be commensurate in diameter with the size of its screen. But the distance to the screen will depend on its focal length. The idea is simple:
- a hole is cut in the box for the lens;
- a gadget is placed inside, which can be brought closer or further away from the lens.
The gadget is installed in a mandrel, which is convenient to move in the box. For a mandrel, another box with smaller dimensions can serve as a perfectly suitable blank. The reflection of light from the walls of the boxes should be minimal. To do this, it is best to glue the surfaces with black velvet appliqué paper. Or paint with black matte paint. Instead of paint, you can use a thick black shoe cream. It is best to lay guides between the walls of the boxes, especially when using velvet paper. They will protect painted surfaces from rubbing.
That's the whole projector. See the details in the images below.


Painted box-case

The lens is applied to the body and outlined with a pencil.
A hole is cut along the line from the pencil with a sharp knife.
A lens is inserted into the hole, which is glued along the contour


We place the carriage inside the box-case and use the projector

The result that we see on the screen is highly dependent on the size of the image on it. If the size is reduced, the brightness and clarity of the frame will improve. The image quality in this simplest projection device is at the “better than nothing” level. But the reason for this is obvious - a higher brightness of the image source and additional optics are needed.
High quality homemade projector
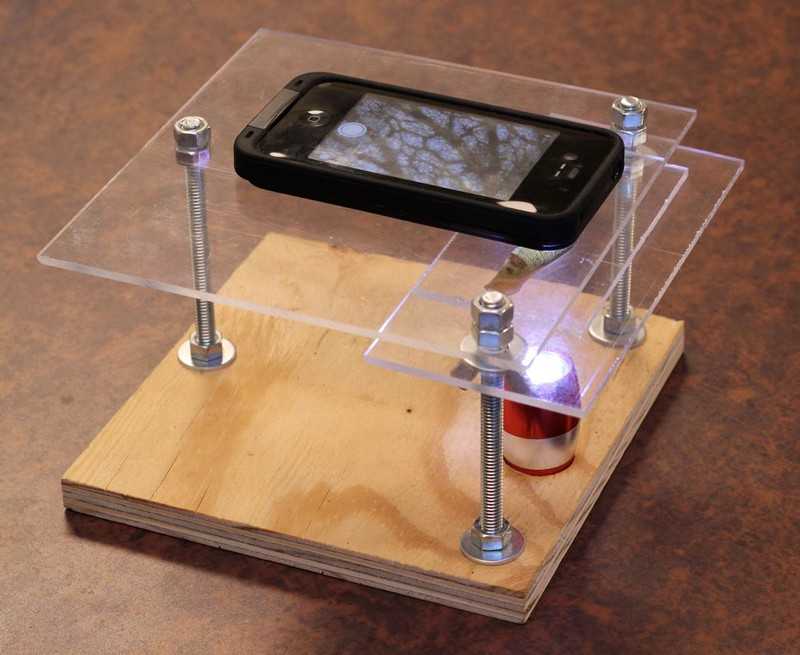
Next, we will tell you how to make a projector with your own hands, observing all the requirements. You need to start by disassembling the gadget. It is dismantled with the preservation of its performance so that the liquid crystal matrix of the screen is available for transillumination by an extraneous light source. If you cannot do this, then building such a projector is not for you.


Used parts:
- LED power supply board;
- LED 100 W (light source with minimal dimensions has an advantage);
- fan power supply board;
- fan control board;
- intermediate lens;
- output lens;
- gadget control panel via Wi-Fi;
- two intermediate Fresnel lenses;
- liquid crystal matrix from the gadget.


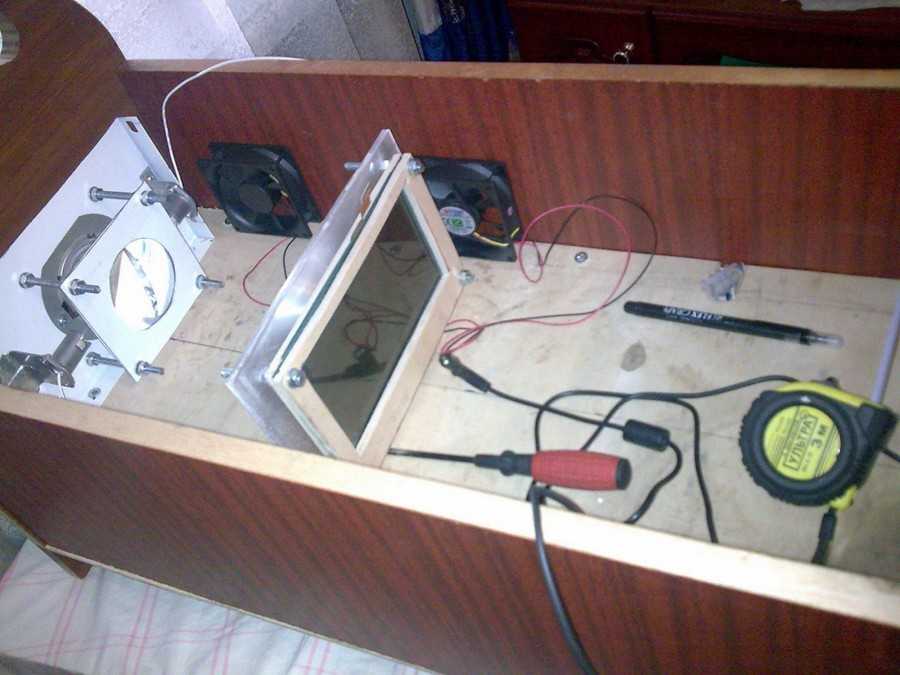
Radiator Mounted LED


Demonstration of the effectiveness of the Fresnel lens.
An intermediate lens is placed between the LED and the Fresnel lens in order to reduce light loss.


Elimination of projection distortion by a matrix suspension with lenses with horizontal and vertical deviation
And here is the result of the work done. The distance to the screen is 4 meters, the diagonal of the frame on the screen is 100 inches. Everything is clearly visible.


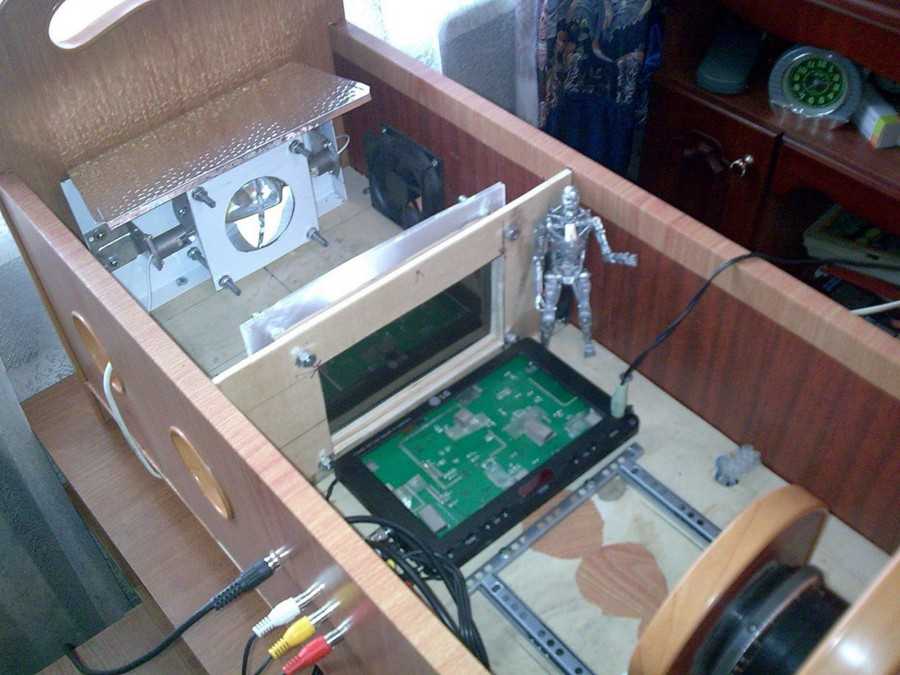
Based on a slide projector
But there is an easier way to create a projector. To do this, you can use a projector for slides that are projected from a sheet of A4 paper (overhead projector). Since all the optics are already in place, it remains to attach only the image source to it. They can become a monitor matrix. It will have to be disassembled to maintain performance. Since after installing the matrix in the projector, the monitor, as usual, is connected to the computer. It is best to use a projector that shines through the slide rather than using reflected light.
What happens as a result of this hybridization of a monitor with a projector is shown in the images below.


That's all there is to it. Unless, of course, you have such a projector. What kind of visibility is obtained on the screen as a result, the image below demonstrates.


The size and quality of the frame on the screen are very good. Moreover, there are projectors for projecting small slides that are commensurate with the screen of a smartphone. They are cheaper. Therefore, you can buy a smartphone with a broken screen and a faulty projector for its matrix. And what should happen as a result, has already been shown above.
Almost every person dreams of having a big screen at home, where you can watch movies at any time. But, unfortunately, buying a projector or TV turns out to be far from affordable for everyone, and it was then that people began to think about how to make a projector with their own hands.
Theory
Before wondering how to make a projector at home, you need to familiarize yourself with the elements present in a store projector. Naturally, few people can create such equipment as in stores, since here it is necessary to purchase several high-precision optical elements:
- lenses;
- lens.

It is these elements that are responsible for how evenly the light is distributed on the screen.
The source of the picture in such devices is a matrix that functions on liquid crystals, the work of which is carried out in transmission.
In this case, each pixel on the screen is represented in an enlarged size. That is why you need to control that the original picture is as clear as possible.


The projection lamp is responsible for the maximum screen size. This is all that is initially important to know for making a projector with your own hands.
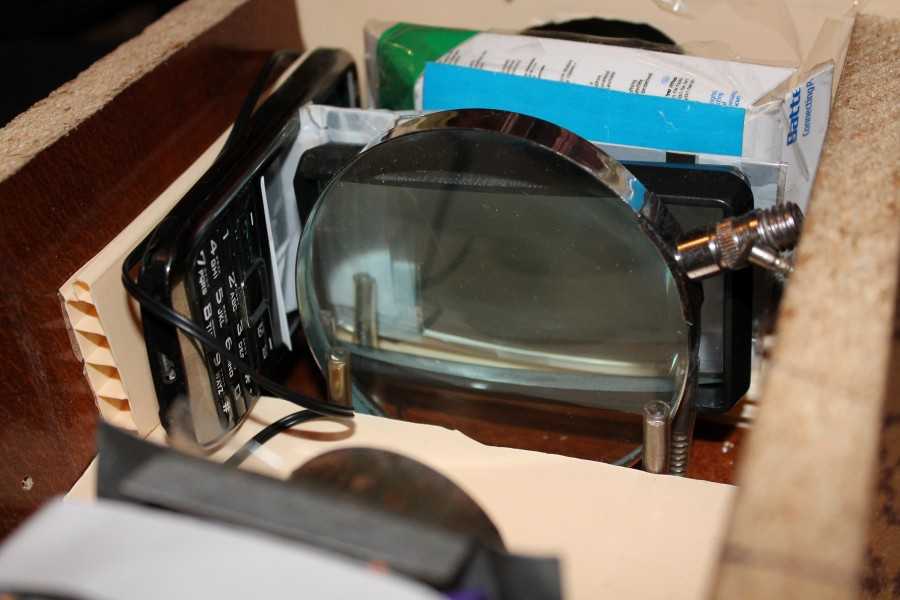
Phone-based device
In this case, the only thing you need to make a projector is a cardboard box and a magnifying glass. These items are inexpensive and you can easily buy them at any store selling household items. If possible, instead of a magnifying glass, it is recommended to use a Fresnel lens.

Next, you need to place the lens in front of the phone (acts as a picture source), which is pre-adjusted to the maximum possible brightness. After that, both elements are attached to the box and the projector can be considered ready. The picture is transferred to the screen (a sheet attached to the wall can act as a screen).
This method of making a projector is ideal for children or teenagers who are just starting to understand the rules of optics, as the resulting picture will be of rather poor quality.

Laptop based projector
To make the described device in this way, you will need a laptop, a cardboard box, a Fresnel lens made of hard plastic and adhesive tape.

The box must be selected so that its length is about 50 centimeters, while the area of \u200b\u200bthe end of the box should be larger than the size of the laptop screen.

The lens is allowed to be selected in various sizes, but the ideal option would be a size of 20 by 25 centimeters. Lenses of this size are used for reading books. The price of one lens varies from 7 to 8 dollars.


Having prepared all these components to create a projector, you need to follow these step-by-step instructions:
A recess in the shape of a rectangle is cut out on the front wall of the box; its dimensions should be smaller than the dimensions of the lens. For accuracy, you need to attach the lens to the cardboard box as a sample, circle it, and then indent one centimeter inward on each side and draw a smaller rectangle. The drawn rectangle is cut out.

Using adhesive tape, you should attach the lens to the inside of the transverse edge of the box. Be sure to check the moment that the lens is attached with a corrugated part.
You need to place the laptop with the screen down and put the keyboard on top of the box. This position will make it possible to immediately achieve a direct and high-quality image. But you need to take into account the fact that the dimensions of the manufactured device will be quite impressive.
To give the projector a visual appeal, you need to separate the box from the laptop and paint it with a spray can in any color you like.

It should be taken into account that the Fresnel lens contributes to a slight distortion of the image: its edges will be slightly blurred, and the cent is focused. In this situation, to increase clarity and brightness, you need to increase the brightness of the laptop as much as possible and darken the room as much as possible.

But it is also worth noting that the brightness of the image also depends on the distance between the manufactured equipment and the screen. The closer the presented equipment is to the screen, the better the picture quality.


slide projector
Another homemade projector idea is to use a flashlight or lamp in combination with a reading magnifier, preferably one that is not very domed.

Initially, you need to create a screen to view the image, for this you need to hang a sheet on the wall, after which, at a distance of 2-3 meters from the screen, a chair is placed. A lighting device is placed on the chair. Slides should be installed in front of the light source, for this it is recommended to make a special stand, or you can simply hold the slides with your hand.

To enlarge the picture, you need to use a magnifying glass. As a result, the slides must be placed between a magnifying glass and a flashlight. The size and clarity of the image, as in the previous version, are adjusted by changing the distance between the home-made equipment and the screen.


A similar projector manufacturing option is ideal for having fun with children.

Below you can see photos of various homemade projectors.

DIY photo projectors