Do-it-yourself postoperative collar. When Should You Use an Elizabethan Collar? When does a cat need such protection?
When a veterinarian recommends barrier therapy, inexperienced owners are horrified: “Forbid a freedom-loving cat to do what she wants?! Forbid scratching? Lick your coat?" It's not scary if you know how to make a collar for a cat so that the pet experiences a minimum of inconvenience and quickly gets used to an incomprehensible contraption covering the neck.
A dense cone around the head will protect the seams and healing wounds from the teeth of the mustachioed fidget, and will not allow the cat to comb the ears or muzzle. After the toilet, the cat always licks intimacy: what will happen when the pet licks the surgical suture or an unhealed wound with the same tongue? The Elizabethan collar is indispensable when it becomes necessary to treat wool or skin with toxic agents - flea spray, hormonal creams, ointments from skin mites or bacteria.
The right collar for cats is, first of all, protection against self-harm during the recovery period, when even without a terrible thing there is a reason for stress, irritation and defiant disobedience. Therefore, it is extremely important that the collar is safe for the cat, reliable - does not come off, does not slip, comfortable - does not make breathing difficult, does not rub the neck. Unfortunately, finished products from pet stores (and in small cities this is a real problem) rarely meet all the requirements.
But making a collar, even for a cat with a character like a real queen, is not so difficult:
- the pattern always has the shape of a half bagel. Depending on the size of the pet, the bagel can be thinner or thicker, longer or shorter, narrower or wider;
- You only need to take two measurements. The girth of the neck is the length of the inner, small semicircle (i.e., the diameter of the cut of the cone, if the pattern is folded). The length from the neck (the place of the collar) to the tip of the nose plus 5 cm is the width of the future collar. Cut a half circle with a margin, fold, try on and cut where necessary.
Option 1, for gentle cougars

Read also: Shampoo for cats: choose the right one!
This veterinary collar is extremely comfortable - light, soft, even cozy. And it is comfortable to sleep in it - almost like on a pillow or bedding. In the photo, the finished model, but sewing it is simple:
two main parts made of chintz, linen, cotton, etc.;
a layer of thick cap material is sewn inside, which keeps its shape well. You can fold any fabric in several layers and stitch it with small rhombuses to make a whole canvas;
the piping along the outer perimeter should also be tight, it helps the collar keep its shape;
Velcro across the entire width of the edge of the "steering wheel" is reliable and strong. So that the cat does not definitely take off the collar, you can replace the Velcro with lacing. The cone will securely fit the neck if a wide, not too tight elastic band is sewn along the collar zone.
This cone has a significant disadvantage - an active cat will crush even dense tissue, and still get to the wound with its teeth. Therefore, the postoperative collar will have to be reinforced with a rigid layer, replacing the inner layer of matter with a piece of flexible plastic. If a suitable plastic is not at hand, buy a collar like this:

This infernal horror costs a penny, it is sold everywhere. Just cut off unnecessary straps, adjust the length and width of the “steering wheel” with scissors and hide it under a dense soft cloth. To sew fabric to plastic, make holes around the perimeter with a hot nail or awl. Don't forget the lacing holes.
Option 2, for tolerant cats

Read also: How to wean a cat to yell - simple and useful tips
Again, you can buy a pre-made plastic cone or cut one from a suitable piece of plastic (bottle, seedling pot, baby bucket, etc.). It is desirable that the plastic is transparent - a limited view makes cats nervous.
Number 1- straps that cover the collar, forming loops.
Number 3- collar closure. Instead of a collar, it is better to use a harness, it creates additional support and eases the load on the neck.
Number 2- a sharp edge that rubs the skin and fur. To make the Elizabethan collar royally comfortable, you need to hide the four edges from strap to strap ( in the photo of the collar in expanded form).
from dense soft fabric we cut out strips from strap to strap, 2-3 cm wide. The strip of fabric should not cover the slot for the strap;
fold the strips along, iron with an iron;
make holes in the edge of the collar;
Place strips of fabric on edge and sew.
This is what a cat looks like in a harness and collar, but only the edges of the cone will not cut into the neck. From the photo it is clear how to put a collar on a cat: we circle the "steering wheel" around the neck, thread the clasp through the slots, pass the ribbons under the collar, bend it and also pass it through the slots:
Option 3, in a hurry
This option is suitable for emergencies when there is no time to mess around with sewing. It turns out frankly inconvenient and not very reliable, but before something more decent appears, it will definitely last. And such a collar can also be used as protection during the processing of leather and / or wool: I used it and threw it away, it’s not a pity.
You will need cardboard - a shoe box or packaging from small household appliances. The thick cardboard from which the large boxes are made is suitable only for large dogs. So:
draw and cut out a semicircle, with a margin;
gently roll the cardboard into a tube so that the collar does not turn out to be too hard;
try on a cat, cut off the excess;
tape, in several layers, paste over the sections. You can cut strips from the fabric and stick them to the tape so that the edges of the Velcro remain uncovered. Now we simply apply adhesive tape thickened with a strip of fabric to the cut and glue it;
if the collar is needed for protection during processing, you can immediately put it on the cat and secure it with the same tape. If the pet will wear the collar for several hours, we make holes in the cardboard and lace up the edges.

Nobody is immune from disease. The cat is no exception. She may get hurt, fight or have surgery. Animals in the wild lick their wounds to cleanse themselves, but domestic cats can give in to instinct with exaggerated zeal.
You need to apply ointment, but the freedom-loving furry personality stubbornly licks off the medicine or tears the fixing bandage. The cat protests, actively expressing dissatisfaction and indignation... In this case, the protective Elizabethan collar, which received its second name for its resemblance to the lush trim of the dresses of the time of Queen Elizabeth I, can help.
Protection is indispensable:
- with skin lesions, burns;
- with injuries;
- during the processing of wool and leather;
- in the presence of fresh postoperative sutures;
- after castration;
- in the treatment of diseases of the eyes and ears.
The collar prevents licking and scratching, facilitating healing. By limiting access to the head, paws and torso, it eliminates additional injuries to the cat during the recovery period.
You can buy a collar at a veterinary pharmacy, a pet store, or make it yourself from improvised means (cardboard, plastic kitchen napkins and flower pots, small buckets). It is important that the collar is reliable, secure and comfortable.
Types of collars
Three types of Elizabethan collars from various manufacturers are presented in stores: plastic, inflatable and soft.

Plastic is a truncated cone with tapes for fixing on the collar or bandage holders. Some manufacturers separate modifications for cats and dogs. Protection for cats is usually lighter and smaller.
Plastic collars may have soft fabric edges to reduce wearing discomfort and Velcro fasteners. The conical shape does not interfere with eating, allows you to sleep, so most animals get used to the need to wear protection for two to three days. For especially capricious cats who refuse to eat and drink, the collar can be removed for a short time, arranging a short rest for the animal.
When buying, you must take into account that opaque plastic closes the side view of the cat, interfering with orientation in space. This unnerves the animal and causes even more stress.
Plastic collars are practical, well disinfected, cheap, but not very comfortable and make noise when in contact with furniture and floors.

Inflatable collars are made in the form of a roller or a circle. They are easy to use, do not cause irritation and allergies, are easy to clean and do not interfere with the view. Such collars cause less inconvenience than plastic collars, but their cost is much higher with less wear resistance. Sharp cat claws can damage the surface, so models with an additional durable nylon sheath should be preferred. Inflatable collars are usually used for long-term treatment.

Soft Cone-shaped collars are made of non-woven water-repellent materials. They are the most comfortable, non-allergic, affordable, but the least practical. Active cats crumple even dense tissue and easily get to a wound or scratch.
Sizes vary from very small (for kittens) to large (for large cats) and are selected individually depending on the structure and body weight. When choosing, you should focus on the girth of the neck - the collar should not be too loose or tight. The optimal size is with a small gap in the cervical region, equal to the size of two fingers.
It is rare that an animal pleases its owners with absolute health and never gets sick. And as much as it would not be desirable to visit a veterinary clinic solely to vaccinate a pet, sometimes they require surgical intervention.
The most common operation now is the sterilization of cats and castration of cats. Uncastrated cats, especially those who were given hormonal drugs, suffer from mastitis, cystosis, purulent pyometra (purulent inflammation of the uterus), hydrometer (formation of fluid in the body of the uterus), breast cancer, tumor diseases of the uterus and ovaries. All of these conditions threaten the cat's life and require immediate surgical intervention. Operations are also performed for fractures, ruptures of internal organs and for other reasons.
The main question after the owners took the animal from the veterinary clinic is how to take care of it now? In addition to injections, tablets and ointments, a cat needs a protective collar to treat stitches.
What is a protective collar?
The protective or Elizabethan collar for cats is a means of barrier therapy, a veterinary device that limits the mobility of the animal and does not allow it to violate the integrity of postoperative sutures by chewing, licking or scratching. He also does not allow external preparations to be licked from the body, combing damaged areas (bite marks, burns).
A properly selected protective collar for cats sits comfortably on the animal, does not prevent him from moving, eating and drinking, while limiting access to wounds, seams on the body and limbs.
The only discomfort with a well-chosen and worn collar is the inability to lick. Cats are clean animals and may worry about leaving scent marks. But this inconvenience is nothing compared to open stitches, drug poisoning, and damage to healing wounds. So the animal will have to be patient.
Why does a cat need a collar after surgery?
A collar for a cat is needed in the following cases:
Cats after abdominal operations are sometimes put on cloth blankets.
A big plus of the blanket is that it protects the seam not only from the impact of the cat itself, but also from contact with objects. At the same time, the movements of the cat are not limited, she almost does not feel the blanket and quickly gets used to it. The pet can lick and not worry about the smell.
The disadvantages of the blanket are that it quickly gets dirty, and the pet can tear it off with its claws. Movement of the tongue along the blanket at the seam sometimes leads to damage to the seam even through the fabric. The blanket cannot be used when treating the body of an animal, because it will absorb ointments, sprays and gels.
The advantage of the collar is that access to the site of surgical intervention or treatment is completely limited. The collar will prevent the cat from hiding in a hard-to-reach place, where they often hide in case of poor health.
The disadvantages of the collar are as follows:
- it is less convenient for a cat to wear it than a horse blanket;
- he can cling to objects;
- picking it up is also more difficult than a blanket.
A protective collar for cats is necessary for all kinds of medical interventions. It preserves the health of the animal, being a necessary measure in the postoperative period. Source: Flickr (thebiblioholic)
How to put on a postoperative collar on a cat?
Collars are of two types:
- The first option is cheaper. This is a semicircle that wraps around the cat's neck and is fastened with “tongues” inserted into the slot. If the cat does not agree to put on the collar, then it will have to be kept alone, and the collar should be fastened to another person.
- The second option is more expensive, but more convenient. It is attached to a decorative or anti-flea collar: its edges are equipped with Velcro and can be easily fastened. It is easy to put on even on a resisting cat alone.
Important! After the operation, the cat must be handled with extreme care: do not squeeze it, do not grab it abruptly and do not pull it out by force, holding it by its paws, from somewhere in order to avoid damage to the sutures, internal bleeding or an epileptic seizure.
Problems when wearing a post-operative collar
A collar that is too large or heavy for a cat will greatly disrupt coordination: it will be difficult and even impossible for him to jump somewhere, pass between objects, eat and drink.
An excessively tight collar will lead to hypoxia - oxygen starvation of the brain, circulatory disorders, rubbing of the skin at the point of contact, and violation of the coat.
An animal can remove an excessively loose collar, or it will jump off below and complicate movement.
It is unacceptable to buy collars with a sharp "chemical" smell. These products are of poor quality, and the cat may be poisoned when wearing it.
Buying a collar for a kitten “for growth” is not the best solution. A young animal will feel uncomfortable in a bulky design designed for an adult. A collar is not such an expensive thing to buy for future use. It is better to pick it up individually each time, rather than squeezing a large cat into a small collar or trying to fix a device bought for an elderly cat on a “teenager”.
The sharp edge of the collar at the point of contact with the cat's body must be pasted over with a fabric-based adhesive plaster.
Periodically, the collar must be removed to allow the animal to run freely and restore muscle tone. It would be good to put on a blanket for a cat after abdominal surgery. Leave the animal unattended while the collar is removed.
A protective collar for cats is necessary for all kinds of medical interventions. It preserves the health of the animal, being a necessary measure in the postoperative period and during conservative treatment with topical preparations. The cat gets used to the inconvenience of wearing quickly. In addition, a properly selected protective collar almost does not cause them.
Related videos
In the days of Queen Elizabeth, puffy ruffled collars made of stiffly starched lace or fabric were in fashion. The head lay on such a collar, as if on a platter. It was difficult to turn my head. However, the aristocrats did not need to turn their heads.
One day, some smart dog or cat owner came up with a great idea to build a protective collar for their pet, limiting the ability of the animal to itch and lick. The invention quickly became known as the Elizabethan collar - the animal in such a collar looked very similar to the nobleman of Elizabethan times. Over time, the invention began to be called shorter - just the E-collar.
In a veterinary clinic or in a pet store (by no means in every one, it should be noted!) You will be offered an assortment of E-collars. Modern industry produces E-collars of different sizes, from different materials. Most often - from dense plastic. The only problem is that industrial collars are not cheap, and you can’t buy them everywhere. And the need for such a product can arise suddenly, at any time of the day. How to be?
What about golden hands?
 E-collar can be easily made at home from improvised material. Moreover, there are several options for the material for the collar, patterns, methods for attaching the structure to the neck of the animal. You just have to choose the most suitable option, tinker a little, and - voila!- the pet is deprived of the opportunity to comb or lick the wound and begins to recover quickly.
Option 1
Materials and tools:
sheet of plastic or cardboard;
adhesive tape (adhesive tape);
scissors;
stapler.

Production order:
1. Draw a circle on cardboard or plastic. The radius of the circle should be a few centimeters larger than the length of your animal's head.
2. Inside the big circle, draw two more circles with the same center. The diameter of the smallest circle should be slightly smaller than the girth of the animal's neck. The diameter of the middle circle is 3-5 cm larger.
3. Cut out a large circle from the sheet. Then you need to cut the circle from the edge to the center in a straight line, and cut out the inner hole.
4. Make several radial cuts from the edge of the inner circle to the line of the middle circle. You will have several stripes. By bending these strips, we get loops for attaching the collar to the collar.
5. We fix the bent strips with tape or a stapler (this is more reliable).
6. Along the line of the radial cut, bring the edges of the plastic one after the other, forming a cone. Secure the form with a stapler or tape.
7. Put the cone on the collar, the collar on the dog. No more than two fingers should fit between the collar and the dog's body, otherwise it will not be difficult for the dog to get rid of the collar.
Ready.
A plus: availability of materials, ease of manufacture.
Minus: fragility. In addition, the edges of cardboard or plastic may be too sharp and hard, and cause discomfort to the dog. Cardboard may tear, or get wet from saliva.
These problems can be partially solved by taking polyethylene foam from a hardware store as a material, 0.5-1 cm thick. The material retains its shape quite well, is moisture resistant, and can be easily washed and disinfected if necessary. At the same time, its edges are soft, and do not injure the skin of the dog. It can also tear, but still not as fast as cardboard. It costs mere pennies.
Option 2
Materials and tools:
sheet of plastic or cardboard;
adhesive tape (adhesive tape);
scissors;
stapler.
This option has a more thoughtful pattern. You can enlarge the image and print it on the printer.

Click to open full image
Such a collar is easiest to make from cardboard. But, as already mentioned, cardboard quickly fails. The E-collar made of thin plastic serves very well, but where can I get it, such plastic ...

You can try to replace the plastic with dense polyethylene, sewn in several layers on a typewriter.
The strips with limiters are threaded into the corresponding slots of the cone, turning into loops for the collar. A long strip on the edge of the semicircle serves to fix the shape. Very comfortably. For greater reliability, the edges of the strips should be fixed with tape or a stapler.
The pros and cons are the same as in the previous version.
Options 3, 4 and so on
It is often advised to use plastic containers, large diameter bottles, flower pots or plastic buckets (for large dogs) to make a collar. In practice, all these options are hardly acceptable. The plastic from which bottles and containers are made, when cut, gives a very sharp edge, which can literally cut itself. So when using such material, sharp edges should be carefully isolated from contact with the skin of the animal.
Flower pots and plastic buckets are usually made of too hard plastic. It is very difficult to cut the necessary holes and conveniently and securely fix the structure on the pet's neck. In addition, such products are too heavy and cause great discomfort to the animal. But if there is nothing else, these options are also suitable, although they have a lot of minuses ...
And finally, I would like to wish that your pets never need any protective collars.
We make a protective Elizabethan collar for a cat with our own hands
When a veterinarian recommends barrier therapy, inexperienced owners are horrified: “Forbid a free-spirited cat to do what she wants. Forbid scratching? Lick your coat?" It's not scary if you know how to make a collar for a cat so that the pet experiences a minimum of inconvenience and quickly gets used to an incomprehensible contraption covering the neck.
A dense cone around the head will protect the seams and healing wounds from the teeth of the mustachioed fidget, and will not allow the cat to comb the ears or muzzle. After the toilet, the cat always licks intimacy: what will happen when the pet licks the surgical suture or an unhealed wound with the same tongue? The Elizabethan collar is indispensable when it becomes necessary to treat wool or skin with toxic agents - flea spray, hormonal creams, ointments from skin mites or bacteria.
The right collar for cats is, first of all, protection against self-harm during the recovery period, when even without a terrible thing there is a reason for stress, irritation and defiant disobedience. Therefore, it is extremely important that the collar is safe for the cat, reliable - does not come off, does not slip, comfortable - does not make breathing difficult, does not rub the neck. Unfortunately, finished products from pet stores (and in small cities this is a real problem) rarely meet all the requirements.
But making a collar, even for a cat with a character like a real queen, is not so difficult:
- the pattern always has the shape of a half bagel. Depending on the size of the pet, the bagel can be thinner or thicker, longer or shorter, narrower or wider;
- You only need to take two measurements. The girth of the neck is the length of the inner, small semicircle (i.e., the diameter of the cut of the cone, if the pattern is folded). The length from the neck (the place of the collar) to the tip of the nose plus 5 cm is the width of the future collar. Cut a half circle with a margin, fold, try on and cut where necessary.
Option 1, for gentle cougars

This veterinary collar is extremely comfortable - light, soft, even cozy. And it is comfortable to sleep in it - almost like on a pillow or bedding. In the photo, the finished model, but sewing it is simple:
two main parts made of chintz, linen, cotton, etc.;
a layer of thick cap material is sewn inside, which keeps its shape well. You can fold any fabric in several layers and stitch it with small rhombuses to make a whole canvas;
the piping along the outer perimeter should also be tight, it helps the collar keep its shape;
Velcro across the entire width of the edge of the "steering wheel" is reliable and strong. So that the cat does not definitely take off the collar, you can replace the Velcro with lacing. The cone will securely fit the neck if a wide, not too tight elastic band is sewn along the collar zone.
This cone has a significant disadvantage - an active cat will crush even dense tissue, and still get to the wound with its teeth. Therefore, the postoperative collar will have to be reinforced with a rigid layer, replacing the inner layer of matter with a piece of flexible plastic. If a suitable plastic is not at hand, buy a collar like this:

This infernal horror costs a penny, it is sold everywhere. Just cut off unnecessary straps, adjust the length and width of the “steering wheel” with scissors and hide it under a dense soft cloth. To sew fabric to plastic, make holes around the perimeter with a hot nail or awl. Don't forget the lacing holes.
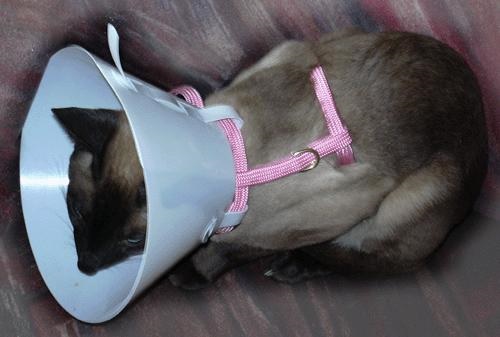
Option 2, for tolerant cats

Again, you can buy a pre-made plastic cone or cut one from a suitable piece of plastic (bottle, seedling pot, baby bucket, etc.). It is desirable that the plastic is transparent - a limited view makes cats nervous.
Number 1 - straps that cover the collar, forming loops.
Number 3 - collar clasp. Instead of a collar, it is better to use a harness, it creates additional support and eases the load on the neck.
Number 2 - a sharp edge that rubs the skin and fur. To make the Elizabethan collar royally comfortable, you need to hide the four edges from the strap to the strap (in the photo of the collar in expanded form).
from dense soft fabric we cut out strips from strap to strap, 2-3 cm wide. The strip of fabric should not cover the slot for the strap;
fold the strips along, iron with an iron;
make holes in the edge of the collar;
Place strips of fabric on edge and sew.
This is what a cat looks like in a harness and collar, but only the edges of the cone will not cut into the neck. From the photo it is clear how to put a collar on a cat: we circle the "steering wheel" around the neck, thread the clasp through the slots, pass the ribbons under the collar, bend it and also pass it through the slots:

Option 3, in a hurry
This option is suitable for emergencies when there is no time to mess around with sewing. It turns out frankly inconvenient and not very reliable, but before something more decent appears, it will definitely last. And such a collar can also be used as protection during the processing of leather and / or wool: I used it and threw it away, it’s not a pity.
You will need cardboard - a shoe box or packaging from small household appliances. The thick cardboard from which the large boxes are made is suitable only for large dogs. So:
draw and cut out a semicircle, with a margin;
gently roll the cardboard into a tube so that the collar does not turn out to be too hard;
try on a cat, cut off the excess;
tape, in several layers, paste over the sections. You can cut strips from the fabric and stick them to the tape so that the edges of the Velcro remain uncovered. Now we simply apply adhesive tape thickened with a strip of fabric to the cut and glue it;
if the collar is needed for protection during processing, you can immediately put it on the cat and secure it with the same tape. If the pet will wear the collar for several hours, we make holes in the cardboard and lace up the edges.

And even such a collar for a cat can be made more convenient with your own hands by attaching loops at the edge. They can be cut from thick paper or fabric, thin elastic plastic and any other material that can withstand the onslaught of cat claws. The loops are attached simply - with adhesive tape or lacing. Now a collar can be passed through the loops, which will not allow a persistent cat to remove the collar over its head.
Do not forget that the collar needs to be removed from time to time so that the recovering pet can rest. Of course, you shouldn't leave your cat unattended. Many pets refuse to drink and eat while they are wearing a protective collar - in this case, the cone will have to be removed regularly so as not to violate the usual mode of the mustachioed stubbornness.
More information


